Assembling an Intel NUC-based Touchscreen PC (2015)
Introduction
 Here at The Tech Buyer’s Guru, we have a thing for Small Form Factor PCs. That’s why we have an entire section of our buyer’s guides dedicated to them, along with several hands-on assembly guides in our how-to section featuring ITX-based systems. But if you want a really small PC, when ITX isn’t enough, then your obvious choice is the Intel NUC. We’ve long featured a NUC Buyer’s Guide on The Tech Buyer’s Guru, but thought it was about time to provide a hands-on assembly guide for the NUC, just to provide our readers a little more confidence that yes, indeed, they can build a NUC too!
The NUC is a little different from other do-it-yourself builds that we profile, in that it comes partially assembled from Intel. That makes it more of a “barebones PC” than a do-it-yourself PC, but it still leaves a number of decisions in the hands of the builder, which is what makes the NUC so exciting. You can select a standard slim NUC if you’re just using an M.2-based SSD, or go with the NUC “H” model to use a laptop-style SSD or hard drive. You can use standard or high-speed memory, ranging in capacity from 2GB all the way up to 16GB, and you can choose Core i3, Core i5, and Core i7 processors (all of the dual-core variety, by the way). And you can also select your operating system, although some version of Windows is the most obvious choice.
Because the motherboard and CPU come pre-installed, the assembly process itself is pretty straightforward, so to spice things up a bit, we decided to add another element to this guide: mounting a NUC on a VESA-compatible touchscreen monitor for a complete home computing solution. We think you’ll find this configuration a pretty compelling option, as it truly takes advantage of the NUC’s incredible form factor. Sure, having a little NUC sitting on your desk in place of a huge desktop PC is cool, but having a NUC tucked away behind your monitor, invisible to the untrained eye, is even cooler!
So let’s get right to it then. Here’s our complete parts list:
- NUC Kit: CPU: Intel NUC NUC5i5RYK
- RAM: 2x4GB Corsair Vengeance DDR3-1866 SODIMM
- Solid State Drive: Samsung 850 Evo M.2 500GB
- Keyboard: Logitech K400 Plus
- Monitor: Planar PCT2265 22-Inch Touchscreen Monitor
- Cables: StarTech 1ft HDMI to Mini-HDMI and StarTech 1ft USB 3.0 A to B
- Operating System: Windows 10 USB Stick
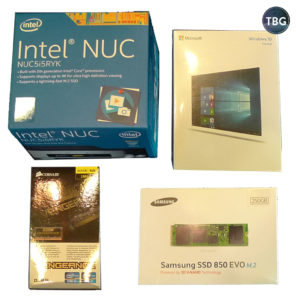
Below you can see just about all of our parts selections prior to diving into the build, which include the NUC, the operating system, the solid-state drive, and the memory:
Let’s go over a few notes before getting into the build. First, we recommend using a version of Windows 10 that ships on a thumb drive, as you’ll need to use a thumb drive to install it one way or another. Not only do you not have an optical drive in a NUC, it can be tricky (read: impossible) to install an OS from a DVD to an M.2 solid-state drive. That being said, you can save a bit of money buying a DVD copy of Windows, and then use Microsoft’s media creation tool to make your own flash drive installer. It’s an extra step (and requires a large download), but it’s definitely a great option for do-it-yourself types.
Another thing to note is that M.2 solid-state drives are not the same thing as mSATA drives that older NUCs used. The current-gen NUCs (and undoubtedly future-gen NUCs) cannot use mSATA drives, so make sure your the drive you choose has M.2 in the model name. Both SATA-based and PCIe-based models will work, with PCIe-based models like the amazing Samsung 950 Pro typically being 3-4 faster than the already fast SATA-based 850 Evo we used, at about twice the cost per GB as of our publication data. For a PC like the NUC, the extra speed of a PCIe-based SSD is probably going to go to waste (and they also run much hotter), so sticking with SATA-based drives would be our recommendation.

Lastly, we think the Core i5 NUC offers the best compromise between speed, price, and noise of all the NUCs, so that’s the one we chose. Note that it comes in two varieties, standard and tall (“H”). To get the sleekest setup with our touchscreen monitor, we chose the standard model.
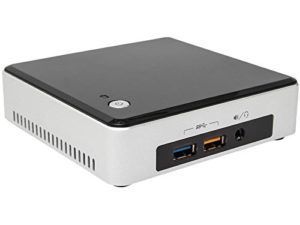
In the NUC box you’ll find the NUC itself, the external power supply (which is just a bit bigger than a cell phone charger!), a manual, warranty information, and the VESA mounting bracket plus mounting screws.
OK, that’s it for the introduction, ready to see how it all comes together?!?
Building the Box
As we noted on the previous page, we chose a SATA-based M.2 drive (the Samsung 850 Evo), going with a 250GB capacity, which offers an ideal amount of storage for a system like this, along with a very attractive price. Additionally, it offers nearly all the speed of larger models, and much more bang-for-the-buck than smaller 120GB models. We also went with high-speed RAM, which gives the NUC a huge speed boost. Because both the CPU and its build-in video processor use system RAM, boosting RAM speed benefits just about everything you’ll do with your NUC.

As you can see in the photo here, the interior of the NUC leaves little to the imagination. You have to SODIMM RAM slots, an M.2 SSD slot for drives up to the 2280 size, and that’s about it. Well, actually, there’s that big blue SATA connector, which is a vestige of the motherboard’s use in the NUC “H” models, which can fit 2.5″ SSDs and hard drives. Our slim model can’t use such drives, so that blue connector is just for decoration here! Note that an 802.11ac networking card comes pre-installed, residing under the solid-state drive. This generation of NUCs was the first to include WiFi in the box, and it’s a welcome addition.
What all this means is that installation is really a breeze with the NUC, with our RAM sticks snapping in easily, and the M.2 drive fitting easily into its slot, and secured with the included screw. Note that all components are installed with labels facing up. The beauty of the NUC is that there’s no internal cabling to worry about – the RAM and SSD draw power and transfer data through their respective slots, so the internal layout is just as neat when you’re done with installation as when you started!
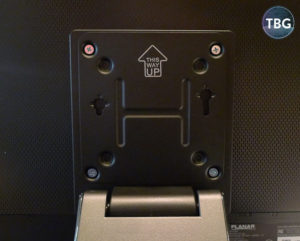
So that’s pretty much it for assembly, but as we noted, we wanted to take this guide to the next level and show you how to install your NUC on a VESA-compatible touchscreen monitor. As we mentioned before, the VESA bracket comes in the NUC box, and it’s a great perk. Note that the screws that come in the box are only long enough to go through the bracket; if your screen itself is attached to the VESA mount, you’ll need to source longer screws, as we did.
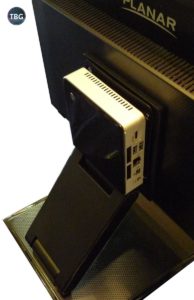
In the photo here, you can see the bracket affixed to the monitor. We needed to use custom screws, which we picked up at a local hardware store, as the NUC screws weren’t long enough to go through the NUC bracket and the monitor bracket. This won’t be an issue with monitors that aren’t mounted on an articulated arm, such as this free-standing Acer. We, however, wanted the extra versatility of the Planar’s adjustable stand. use the VESA mount for the screen itself. We’ve provided another photo here to show you the NUC dropped into the bracket – about as simple as it gets!
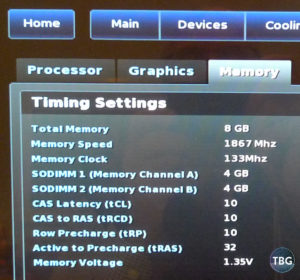
The Corsair memory kit we chose runs at 1866MHz, versus 1600MHz kits, providing a theoretical 17% speed boost. But that’s not all; it also features tighter CAS 10 timings, versus the CAS 11 timings of standard DDR3-1600 kits. That effectively puts it at two speeds bins ahead of DDR3-1600, which we think is well worth the $20 or so extra it costs, given that it’s the one and only hop-up you can give your NUC. Note that you want to enter the UEFI BIOS to select the high-speed XMP profile, as all sticks may default to DDR3-1600 (and Core i3-based NUCs will not allow RAM speeds greater than that). The screenshot below illustrates what the correct settings look like with this RAM kit installed.
To finish our build, we installed the OS via the Microsoft Windows 10 flash drive, and selected the inexpensive but highly-functional Logitech K400 Plus keyboard/touchpad combo for our input device. We think that the end result is a pretty sleek setup! For that extra-custom touch, we used a 1′ HDMI cable for audio and video, plus a 1′ USB 3.0 cable for the monitor’s built-in USB hub. This made for a much tidier exterior than standard 6′ cables would have.
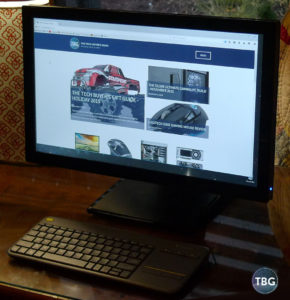
All in all, this was about as easy as you get with anything other than plain old off-the-shelf PCs, and we ended up with something totally unique. It offers the power of a high-end laptop into a palm-sized box, attached to a big, high-quality touchscreen display, with the latest in storage and memory components. Yes, it costs more than a standard desktop PC with the same capabilities, but those PCs won’t disappear behind your monitor like this one!
We hope this guide has been helpful to you, and perhaps it’s even inspired you to build a similar NUC-based PC. For all the latest NUC component picks, see our NUC Buyer’s Guide, updated monthly, and feel free to post questions in the forum using the link below!
Update: After extended testing, we found that the Intel HD graphics adapter available at the time of publication did not work properly under Windows 10, causing the system to hang when waking from sleep. Using the latest driver available from Intel’s Download Center fixed the issue.