Assembling a Mini-ITX Bookshelf PC (2014)
Introduction
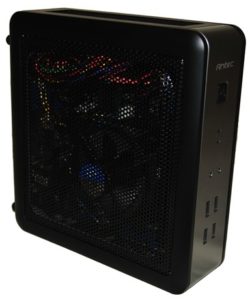 One of the builds that generates the most interest among all of the ITX builds we feature in our Small Form Factor Buyer’s Guides is the Mini-ITX Home Office Build, which is based on the smallest ITX chassis on the market, the Antec ISK110-VESA. Because it’s so small, a lot of our readers are curious what it’s actually like to build in. Well, we don’t like to keep you all guessing, so we went ahead and built it up to show you, in pictures and words, exactly how easy it is to put together this awesome little build. It’s truly small enough to fit on a bookshelf, and powerful enough to meet just about any PC user’s needs.
Here are the parts we used, which totaled just over $300, not including the operating system:
- Antec ISK110-VESA Case ($69 at time of publication)
- Intel Pentium G3258 Dual-Core Processor ($70 at time of publication)
- MSI H81I ITX Motherboard ($65 at time of publication)
- Crucial MX 100 128GB Solid-State Drive ($70 at time of publication)
- Crucial Ballistix 4GB DDR3-1600 RAM ($39 at time of publication)
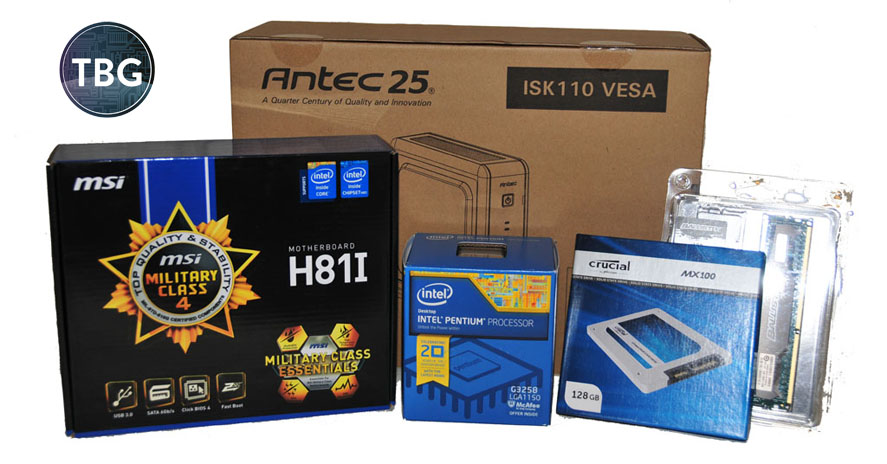
That’s it – just about the simplest and least expensive build you could possibly imagine. In fact, even building the palm-sized Intel NUC wouldn’t be much easier, and it’s quite a bit more expensive, despite having only about half the processing power. Below you can see all the parts we used, set out prior to assembly:
We’ve numbered the parts above to make everything clear. The components are as follows:
- External power supply and internal cabling (included with the case)
- Antec ISK110-VESA case
- MSI H81I motherboard
- Screws used for mounting the motherboard and SSD (included with the case)
- SATA cable (included with the motherboard)
- Intel CPU cooler (included with the CPU)
- Crucial MX100 128GB SSD
- Intel Pentium G3258 CPU
- Crucial 4GB DDR3-1600 module
Now, we should point out a few things here. First, we went with a Pentium processor rather than a higher-end processor like Intel’s Core i3-4160, in part because we knew we didn’t need the power of a Core i3, which adds Hyperthreading, for our intended purposes (browsing, listening to music, streaming video). But we also wanted to try our hand at overclocking this tiny build. The Pentium G3258 is the only overclockable processor outside of Intel’s quad-core line (which wouldn’t be compatible with this system’s 90W power supply). In addition to losing Hyperthreading, the Pentium line drops the maximum supported RAM speed down to DDR3-1333, so if you go with this setup, you might want to manually adjust the timings of the RAM to compensate. The Crucial RAM we used is rated at DDR3-1600 with 9-9-9-24 timings. We ran it at DDR3-1333 with 7-7-7-21 timings.
Second, we used an H81-based motherboard that we’ve never before recommended pairing with Intel’s newest processors, such as the Core i3-4150, Core i5-4590S, and the Pentium G3258. That’s because the H81 chipset was released prior to these processors arriving on the market, and if the motherboard’s BIOS doesn’t come updated from the factory, the system will not boot with these CPUs installed. In July of 2014, MSI released the necessary BIOS update for the H81I motherboard used in this build, so it now supports all of these processors. A motherboard package that had been warehoused for a while, though, could leave users out of luck. In October of 2014, we received this updated model from Amazon.com, and we assume that going forward, any MSI H81I boards shipped from Amazon will be up-to-date.
That’s great news, because the H81I is the perfect match for this system. It has a well-designed UEFI BIOS that allows for easy overclocking of the G3258, and it includes two USB 2.0 headers, allowing the use of the four USB 2.0 ports on the front of the Antec ISK110 case. It even has a USB 3.0 header, so it will also work great if you use an Antec case with front-mounted USB 3.0 ports, such as the Antec ISK310-150. It’s also hard to overlook the incredible price – the H81I is a true bargain. Now, keep in mind that the Intel H81 chipset does have some limitations, including a limit of two RAM slots, as well as fewer lanes for a PCIe 2.0 slot, but because an ITX system would never have more than two RAM slots nor a PCIe 2.0 slot, these limitations are only relevant in larger systems.
One other thing we’ll mention – before we started installing any components, we had to get past the very hardest part of this build – figuring out how to open the case! There are two screws at the back of each side panel that need to be unscrewed, which would suggest that once they are removed, you simply pull back on the panels. In fact, the panels are held on by more than just the visible screws – plastic tabs affix them to the chassis as well. Thus, the only way to remove the panels is to pull them sideways away from the case, rather than backwards like a typical case. Once that unusual step was out of the way, it was all smooth sailing (well, until the last step, but we’ll get there eventually!).
OK, on with the build!
Building the Box
In a typical ATX or micro ATX build, we’d probably install an internal power supply or optical drive first, but neither of those components are even on the list for this build. This system’s power supply is external, like a laptop, although there is some internal wiring that we’ll need to handle a bit later. And as for an optical drive, this case can’t fit one (which is what allows it to be so incredibly small!), but if you’d like one, feel free to pick up an external USB-based DVD drive, such as the new Samsung Ultra-Slim Optical Drive. We didn’t need one for our build, but we were loading the OS (Windows 10 Technical Preview) off of a thumb drive. Loading an OS off of an optical drive is definitely more straight-forward.
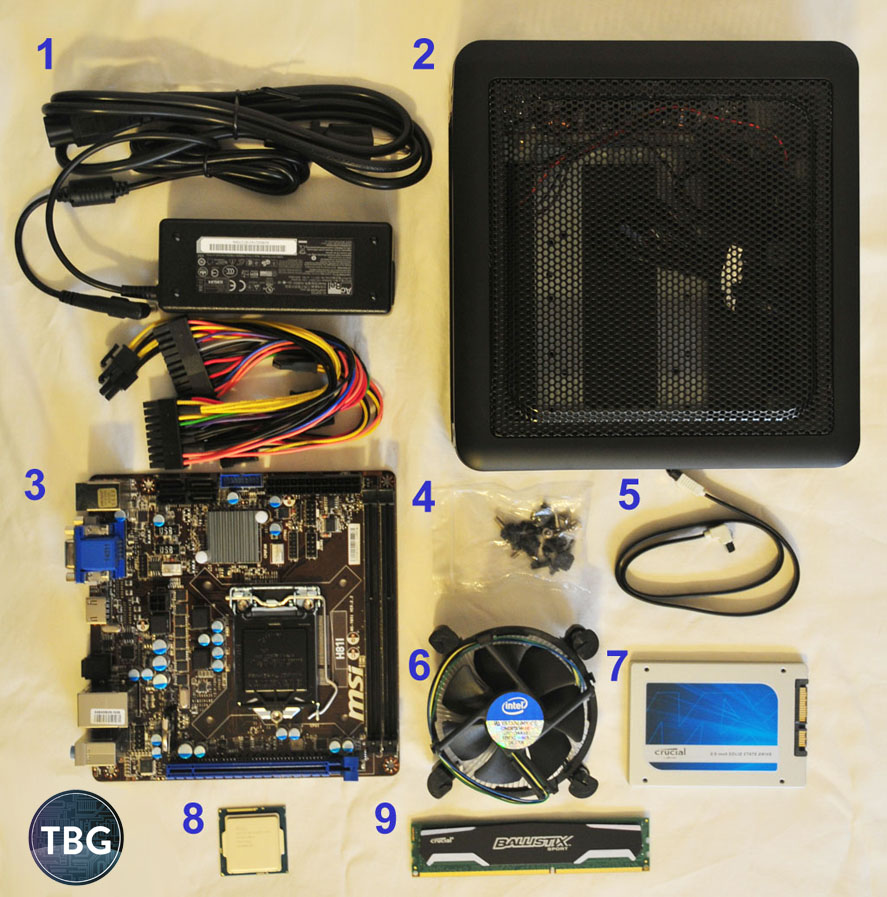
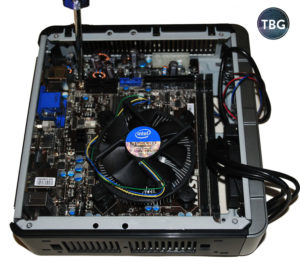
As usual, locking down the CPU bracket, which we’re doing in the photo to the right, is an exercise in courage. Yes, it takes a lot of effort, and yes, you’ll likely feel as if you’re crushing the CPU, but as long as the text printed on the CPU heat spreader is oriented right-side-up and the grooves on either side of the CPU slip over the tabs on the motherboard socket, you’ll be fine. Once the bracket was locked, we attached the Intel fan by pressing in the four push-pin connectors and connecting the 4-pin fan power connector. Next, holding the board by the heatsink assembly, we lowered the motherboard into the case. It’s a tight fit, as this case is just slightly bigger than the motherboard itself, but with a bit of patience, you’ll get it to drop in. One tip here – the motherboard’s I/O panel at the back of the case has small tabs above each port – make sure those don’t end up being pushed out while you’re inserting the motherboard, as they will actually block the ports they’re supposed to sit on top of.
In the photo here, we’re in the process of affixing one of the four motherboard mounting screws that came with the case. They are easy to identify by their flat shape, and the fact there are just four of them. We might as well mention here that the one and only tool you’ll need to assemble this PC is a Phillips-head screwdriver, like the one shown in use above. That’s it – no need to buy a huge tool set or any other supplies!
Now, things are going to get just a bit messy as we progress towards the last stages of the build. As you can see in the photo to the left, the power supply cabling needs to be inserted into the case’s internal power board and then routed to the motherboard’s 24-pin and 4-pin jacks, as well as the solid-state drive (which we’ll discuss in the next step).
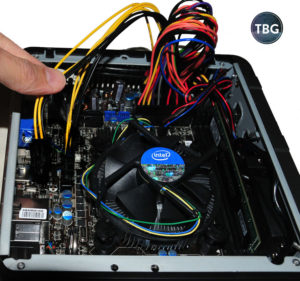
What we’re holding here is a spare 4-pin CPU power cable. Because the MSI motherboard we’re using only requires a single 4-pin connector, rather than a combined 4+4-pin (or 8-pin) connector, there’s one 4-pin connector that goes unused in this build. We’ll want to make sure it’s tucked out of the way of the CPU fan. You’ll also see that we’ve inserted our Crucial RAM module on the right side of the board. For compatibility reasons, always use a motherboard’s second slot, rather than the first, if you have just one stick. Note that the front panel cabling is stuffed in between the RAM stick and the front of the case, and is therefore pressing against the RAM. This doesn’t look ideal, but it’s really just an aesthetic issue – the RAM will not be damaged.
OK, now it’s time to get that mess of cabling under control. With a little nip and tuck, we’re all set. Note in the picture below that we’ve also attached the two USB 2.0 cables to the twin USB 2.0 headers (visible just to the left of the silver motherboard heatsink). As mentioned on the previous page, one of the reasons we picked the MSI H81I board is because of these twin USB 2.0 headers, an usual feature for a mini-ITX board, and one that is necessary if we’re going to use all four of the Antec ISK110’s front-mounted USB ports. The tradeoff (and there usually is one with boards this small) is that the H81I only has four rear-mounted USB ports. This is because only a certain number of USB ports in total can be supported by the chipset.
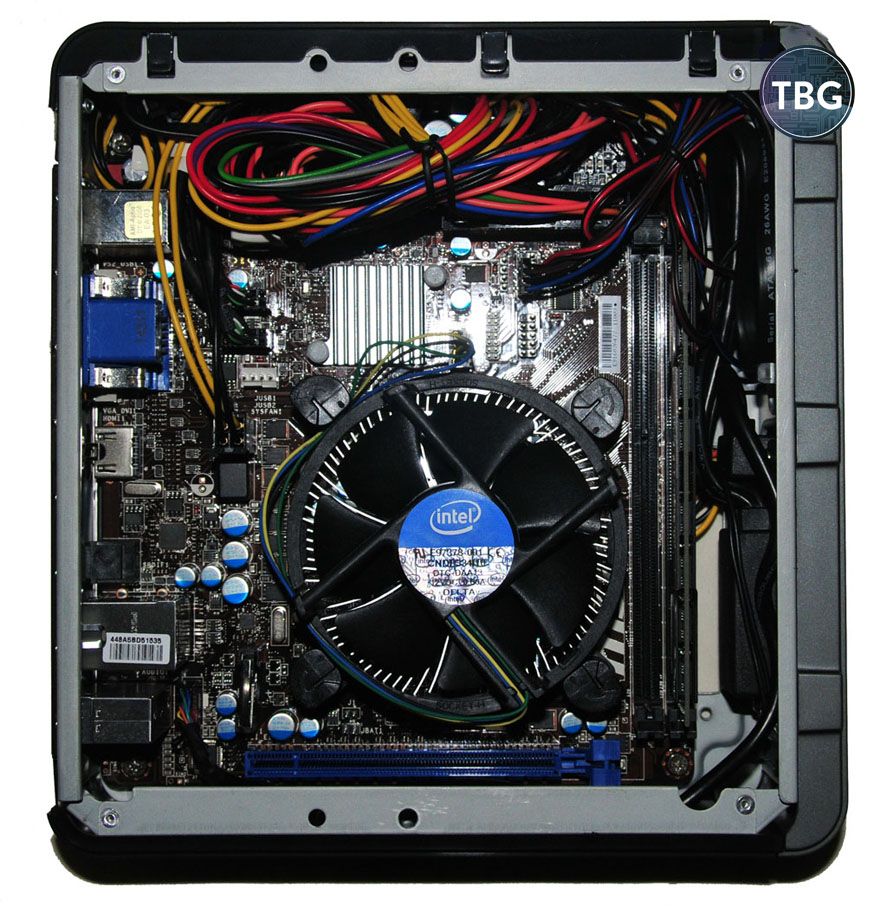
At this point in the build, we also connected the front panel audio and power leads to the motherboard. For the first time in a very long while, we actually had to crack open the motherboard manual at this stage, because the front panel header is not labeled with “power’, “reset”, and the like. Maybe this board is just so small that the extra text couldn’t be printed on it, but regardless, be prepared to have the manual handy or you’re going to be left guessing. We also made sure to check the manual to determine which of the SATA ports were 6Gps-enabled, as a 6Gbps port is required to make the most out of any modern SSD. Higher-end boards may jettison older 3Gbps ports all together, but this board had a few that we wanted to avoid.
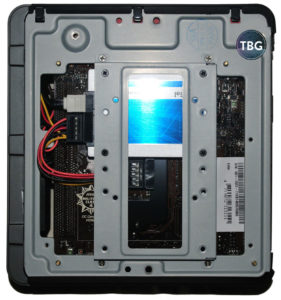
The final step before closing up the case is to mount the SSD behind the motherboard. To the right you can see we’ve flipped this little guy over to show you how that’s done. Looks simple, but this step was actually somewhat tricky. The case’s SSD bracket was pre-installed from the factory in the reverse orientation, meaning that the SSD’s power and data ports were facing the wrong way, far out of reach of the cabling visible on the left side of this photo. Luckily, there was an easy fix – unscrewing and remounting the SSD bracket in the other direction, which is what we’ve done here. Once that step is complete, connecting the cables to the SSD is a breeze.
All right, would you believe it’s time to close this little beast up and put it through its paces?

Performance and Parting Thoughts
Here you can see the completed build up and running on our kitchen counter (you can also see what The Tech Buyer’s Guru website used to look like!). The Antec ISK110 features quite a nice design, with sleek matte plastic side panels and a brushed aluminum front panel. It’s a level of fit and finish far beyond what you’d expect at its price point. The fact that it includes a power supply in the price is just icing on the cake! Remember, this whole system cost about $300 for the hardware at the time of publication.
Running the technical preview of Windows 10, we tested the system using a few of our favorite benchmarking utilities. We even overclocked the little guy, a novelty in a system this small, but an entertaining step for any of enthusiasts out there.
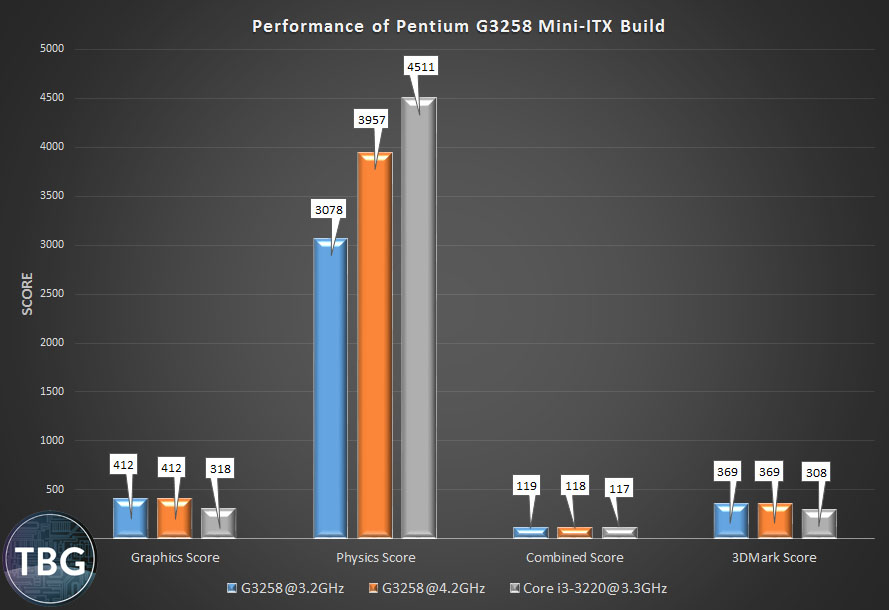
We went ahead and benchmarked this build against the system profiled in our Step-by-Step Guide to Assembling a Basic PC, which used an Intel Core i3-3220. That chip is from Intel’s previous-generation “Ivy Bridge” line, but it’s a good comparison, in that it’s just slightly slower than current-gen “Haswell” chips like the Core i3-4150. What you can see above is that the graphics capability of the little Pentium actually exceeds the older Core i3 by a significant margin (nearly 30%), but the Core i3, endowed with Intel’s Hyperthreading technology, pulls away from the Pentium in the Physics test, even when the Pentium is pushed to a very high 4.2GHz core clock. We view the Physics Score as the best gauge of the maximum theoretical benefit of Hyperthreading because it’s a perfectly-threaded, CPU-only test. Hyperthreading adds two “virtual” cores, which translates to nearly a 50% advantage over the stock Pentium G3258. In reality, the performance of these two chips in games, or frankly just about any other application, will be much closer, more like what you see in the Combined Score above, which taxes both the CPU and graphics core. We recommend a Core i3 processor to anyone who will be engaging in heavily-threaded tasks, such as intensive spreadsheet computations, decompression of high-resolution video, or photo/video-editing. For typical office tasks, the Pentium is nearly the equal of a Core i3, and as overclocked in our test, it will far exceed the typical Core i3’s potential.
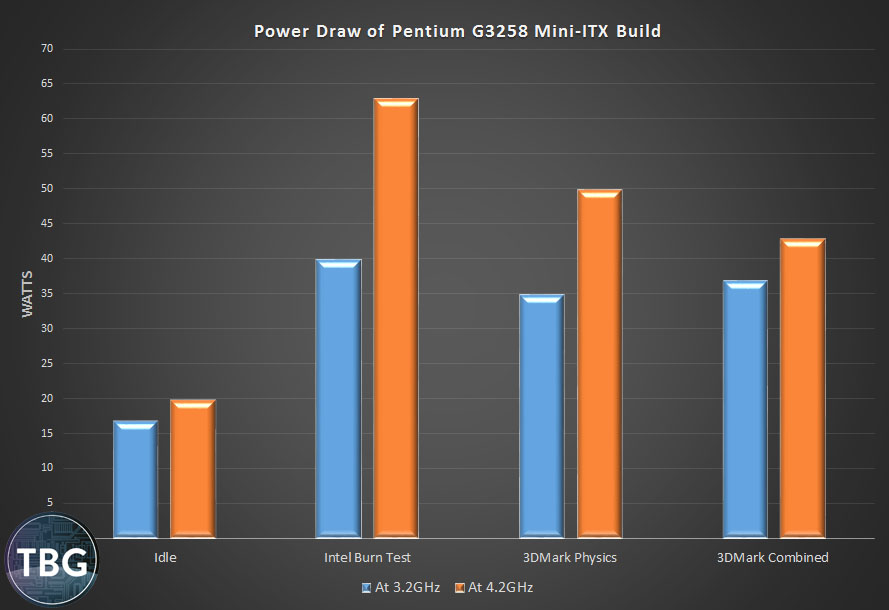
Of course, that extra speed doesn’t come for free – it increased power use by up to 50%, but luckily never exceeded the capacity of the 90-watt power supply included with the Antec case. Even in the ultra-demanding Intel Burn Test, which is used to test a CPU’s stability at maximum load, the power draw of our overclocked system never went above 64W, and it was far below that at idle and in 3DMark’s range of graphics-oriented tests. And at default clocks, the Pentium is quite a power-miser, never exceeding a 40W power draw. Impressive, isn’t it?
The last thing we did to tweak this system was to enter the UEFI (accessed by holding the delete key during boot) to set a quiet fan profile. By default, the Intel fan tends to ramp up and down incessantly at the slightest change in CPU temperature. Alas, that’s both annoying and completely unnecessary, as neither a Pentium nor a Core i3 chip is capable of generating sufficient heat to approach dangerous temperature levels (i.e., above 95C). Even pushed to the max at a 4.2GHz overclock, our Pentium G3258 never exceeded 65C with a 1000 RPM fan setting. The motherboard’s default setting would have the fan spin at over 2000 RPM even at temperatures far below this level, and we’d much rather have the CPU run a bit hotter than have a buzzing fan in our case. We set the minimum fan speed at 25%, with a minimum threshold of 55C, meaning that at temperatures above 55C, the fan beings to ramp up, with a maximum RPM set for 80C (which it will never hit).
So, there you have it. An ultra-compact, ultra-silent PC fit for a home office user, an HTPC enthusiast, an overclocking nut, or your mom. It’s truly a system anyone can build and everyone can appreciate! To build your own, simply select the parts listed on the first page of this article, or flip to our Small Form Factor Buyer’s Guides to see additional options.