Assembling an Extreme Gaming ITX PC (2016)
Introduction
 Anyone can put together a list of PC parts and tell you to press your luck with them, but here at TBG, we make it a point to actually build as many different PC configurations as possible to make sure that when we give you buying advice, you’ll have a positive experience building your PC. Just because parts are compatible doesn’t mean they’ll actually work together, especially when it comes to building compact PCs. And that’s why we continually add new step-by-step assembly guides to our How-To Guides section as new platforms, cases, and components arrive on the market.
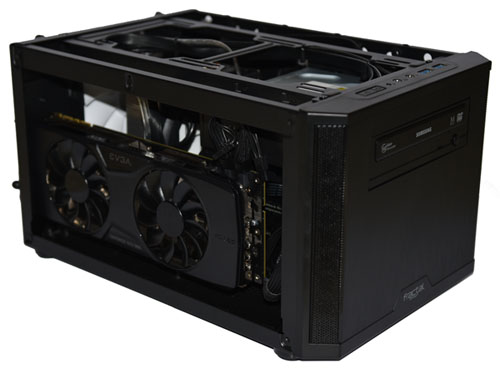
So hot on the heels of our High-End Gaming Mini-ITX Guide, we’re presenting our Extreme Gaming Mini-ITX Guide. Now, to be honest, this is not our first attempt at such a guide. We tried putting together a similar build back in 2014 using the SilverStone SG08 case back in 2014. While it looked similar, it wasn’t exactly a smashing success in terms of usability. We ran into numerous component compatibility issues, and we also found that the case simply didn’t offer proper cooling. So here we are in 2016, with a brand-new case, the Fractal Design Core 500, and the new Skylake platform. While the platform doesn’t change things all that much (in fact, this build ends up being just 10% faster than our 2014 build), the case changes everything. That means this build is not only faster, it’s much, much quieter, and more efficient too.
The key is that Fractal Design learned from its competitors missteps in the “shoebox PC” market, and it wasn’t just SilverStone that made them. Cooler Master also had a hot-selling model in its Elite 130, which was good, but not great. The Core 500 adds about 30 centimeters in depth, width, and height versus the SG08, while actually coming in smaller than the Elite 130, and yet beats them both in terms of component compatibility and cooling. While there are still a few hard-stops in terms of what will work and what won’t, we think Fractal Design made the right calls on this case, and we’ll point out all the important caveats about building in it in this assembly guide. In fact, this system actually ended up running so cool and quiet that we could have put much higher-powered components in and it would still keeps its composure. That, alas, will have to wait until the next generation of gear arrives!
Component List
We based this build off of our $1,500 VR-Ready Mini-ITX PC Build Guide, as of March 2016, with just a few tweaks. The biggest change was moving from liquid cooling to a new air cooler from the Swiss-based company Arctic Cooling. We had a hunch it would work perfectly for this build, despite the usual trouble fitting tower coolers into ITX cases, and we got lucky… but it was close! Below you can see all the gear we brought together for this build:
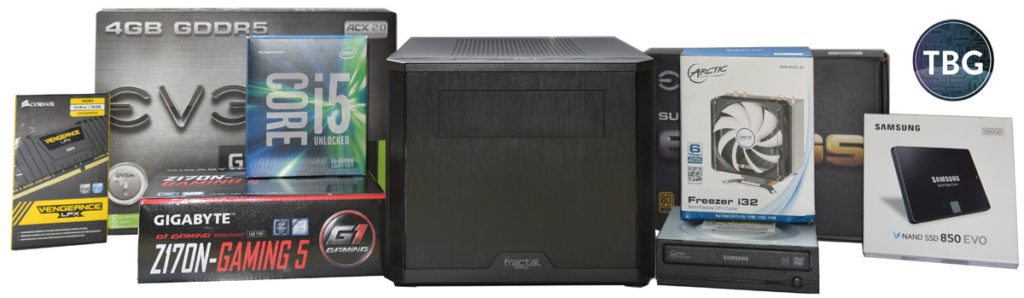
Here are components seen above:
- CPU: Intel Core i5-6600K
- Motherboard: Gigabyte GA-Z170N-Gaming 5
- Memory: Corsair Vengeance LPX 2x8GB DDR4-3000
- Video Card: EVGA GeForce GTX 980 SC 4GB
- Solid-State Drive: Samsung 850 Evo 500GB
- Optical Drive: Samsung SH-224FB
- Case: Fractal Design Core 500
- Power Supply: EVGA Supernova 650 GS
- CPU Cooler: Arctic Freezer i32
- Operating System: Windows 10 OEM Disc
This system is based on Intel’s Skylake platform, introduced in August 2015. It’s not necessarily revolutionary, but it did introduce a few new standards to the mainstream PC audience: DDR4 memory and full-speed M.2 solid-state drive slots. For this build, we’ll be running 16GB of DDR4 RAM, but as with all of our ITX builds, we pass on using the M.2 slot. We’ve tested these slots on ITX builds and find that due to being mounted on the back of the motherboard (virtually a requirement for fitting it within the ITX footprint), the cooling on drives mounted in these slots is beyond poor. We just wouldn’t trust our data to be safe over the long haul when using these slots.
As for our other components, we go with the second-best in just about every category, with Intel’s top Core i5 processor, Nvidia’s high-end GTX 980 GPU, and Samsung potent yet budget-friendly 850 Evo solid-state drive. We’ve also chosen the largest power supply that can physically fit in this case (it’s 150mm long), and while there are much more expensive compact units with more wattage, it would be a waste of money to buy them – you’ll never come close to stressing our 650W PSU pick in a system like this.
All right, now that you’ve heard how we decided on the components for this build, let’s see how they all came together!
Installing the CPU, Cooler, and Memory
The process of building an ITX-based system is actually quite different from how you build a standard full-size desktop system. The order in which you do things is critical, and for the most part, is in a completely different and nearly opposite order to how you’d build a large desktop. For example, you simply cannot start by installing the motherboard, and then proceed to the CPU and cooler, as you’ll have no access to the cooler mounting mechanism once the motherboard is in the case. Furthermore, while you’d typically install a power supply before anything else in a large system, for this particular ITX system, doing so would make it impossible to proceed to the next step. In other words, if you decide to build the system profiled in this guide, take the order in which we assembled it seriously – it really won’t work any other way!
So, we’ll start with prepping the motherboard for installation. If you need help learning how to install a CPU, check out our Guide to Assembling a High-End ITX PC. For purposes of this guide, we’re going to assume you know how to use the Intel locking mechanism. Once the CPU is in, it’s time to install the CPU cooler. Note that if you’ll be using a liquid CPU cooler like the Corsair Hydro H60, you’ll need to carefully install the cooling block while placing the hoses and radiator off to the side of the motherboard – they cannot be detached.
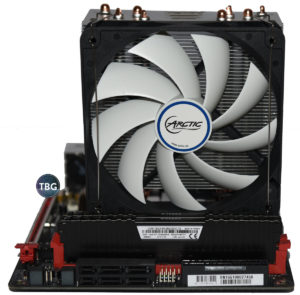
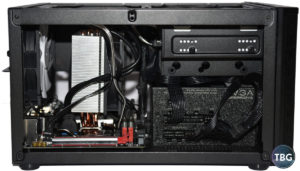
We used an excellent new 120mm-based tower cooler from Arctic, the semi-passive Freezer i32. As you’ll see in the photo here, it’s about the biggest cooler you can install in this system. You could use some 140mm-based coolers, as Fractal Design has designed the Core 500 with 170mm of headroom, but RAM clearance could be a serious issue. As it was, the Arctic cooler’s fan was touching the first RAM stick’s heatsink, and this was despite using a low-profile Corsair Vengeance LPX kit. And honestly, this cooler performed so well, as we’ll show later, that there’s no reason to take a chance with a larger model.
Mounting the Motherboard
Installing a motherboard in a small case is always a bit of a challenge, and it’s doubly-hard when it has anything much bigger than Intel’s stock heatsink attached to it. That includes both tower-style coolers, as we used here, as well as liquid coolers. Tall coolers mean “threading the needle” between the side frame supports of the case, while a liquid cooler requires you to mount the motherboard while also holding the radiator assembly in the other hand. That’s just how it is if you want a high-performance compact PC, folks!
Interestingly, we came upon an error in the manual for the Core 500 as we were assembling this system. While Fractal Design indicates that you must install the power supply before the motherboard, this is in fact completely wrong. Installing the power supply makes it impossible to insert the motherboard, as you need extra clearance to maneuver the ports into place, which having the power supply installed does not permit. We really have to wonder whether Fractal Design bench tested this case!
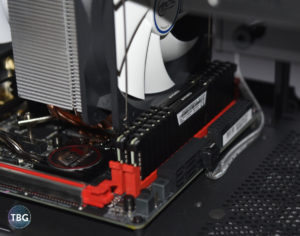
Another issue we came upon was somewhat motherboard-specific: the port placement. We found that the side-facing SATA ports, as well as the mid-mounted front panel header, made things a lot more complicated than they would be with a different board layout. You’ll need to use 90-degree left-angle cables for the SATA drives (the motherboard included one right-angle connector, which worked in a pinch, but wasn’t ideal, as shown below). You’ll also want to make sure to connect your front panel cables at this point, as doing so after the power supply is installed is basically impossible.
Installing the Power Supply
All right, about that power supply… yes, indeed, jamming an ATX power supply into an ITX case has been the nail in the coffin for far too many previous ITX cases. We found that the SilverStone SG08 essentially could not use an ATX power supply, even though it’s spec’d for one, while the Cooler Master Elite 130 can hold a very large ATX power supply, but it essentially starves the CPU of cool air. Well, Fractal Design has done its very best here, but that doesn’t mean this is an easy fit.
First of all, you absolutely, positively must use a power supply that’s 150mm long or less. Want to use a bigger power supply? Well, you can forget about installing your video card! Second of all, you should keep in mind that the power supply draws in cool air from the bottom of the case. Want to place the case on thick carpeting? You’re going to have a cooked power supply in short order! Luckily, we found the perfect power supply for this build: the EVGA Supernova 650 GS. Based on a new Seasonic design, the 650 GS is powerful, efficient, fully-modular, and most importantly, 150mm long! Even so, you can see in the photo below that it is really, really jammed tight in this case. Also note that the PSU exhausts out the right side of the case. Want to install it in a cabinet with little breathing room on that side of the case? Again, good luck with that!
Note that we’re just using four cables in this build: the motherboard 24-pin cable, the CPU 8-pin cable, a single SATA chain, and a PCIe power cable for the video card. That’s the beauty of modular power supplies, and as you can see, it keeps things as neat as possible. That being said, this is of course an ATX power supply, so the cables are far longer than necessary for a build like this. We stashed the excess cabling between the power supply and the drive trays.
One other thing we’ll discuss in more detail here is the issue we raised previously about the USB 3.0 header. Frankly, we think Gigabyte made a serious mistake placing the header in the middle of the board. Due to USB 3.0 signaling requirements, all internal USB 3.0 cables are thick, making them very hard to bend. Furthermore, the connector itself is quite large. What does this lead to? Component incompatibility, of course! While we got lucky with RAM clearance as well as case headroom, we were nearly done in when we went to connect the USB 3.0 cable, as there simply wasn’t enough room under the CPU heatsink to do so easily. We had to jam it in there, which forced the heatsink to lean forward every so slightly. Our temperature data showed that this didn’t have any adverse effect on thermal performance, but it sure would have been nice if we hadn’t needed to deal with this.
Our advice: if you’re going to use a tower-style cooler, skip the Gigabyte board and go for the Asus Z170I Pro Gaming. It costs slightly more and has very similar specs, but its superior layout makes it worth every penny for a build like this.
Installing the Data Drives
We should note something critical here: if you are using a 3.5″ drive, you must install it prior to install the motherboard. It will be blocked by the CPU cooler otherwise. We chose not to use such a drive in this build, instead relying on a single 2.5″ solid-state drive as well as a 5.25″ external optical drive. The optical drive is very easy to install, as it slides in from the front (once the bay cover is removed), while up to three 2.5″ drives can be installed at any time along the periphery of the chassis (two on the right side, one behind the front panel). We really like this style of drive mounts for 2.5″ drives, as it doesn’t waste any space, while also allowing easy access to the drives in the future. The hardest part about installing the drives is actually the cabling, and to use the high-performance SATA ports, you really needed to have your cables installed a long time ago, as we mentioned on the previous page.
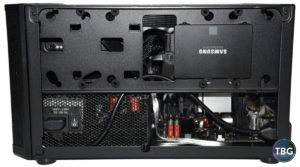
Another thing visible in this photo is the power supply exhaust, which lines up neatly with a perforated grille in the Core 500’s side panel. The positioning of the power supply dictates that the case has no cool-air intake from the front, but this is a wise choice by Fractal Design, the ability to exhaust hot air is far more important in compact cases. We’ve seen far too many ITX designs done in due to the lack of exhaust vents, which in turn leads to hot air being trapped inside a case. With a fully perforated top panel and a huge 140mm exhaust fan mounted in back, hot air has nowhere to go but out of this case!
Installing the Video Card
All right, last step before powering this system on: the video card. Compared to every other step, this one is actually pretty easy. Luckily, the Core 500 doesn’t fall prey to another failing of many ITX cases: insufficient headroom to lower a card onto the motherboard. You see, to actually install a card, you need approximately 15mm of vertical space to move the card into position and then lower it into the PCIe slot. In some ITX cases, the top crossbar plays havoc with extra-tall video cards. We used the EVGA GeForce GTX 980, which conforms to the standard PCI height (4.4″), but there are many cards out there approaching 5″ tall. The Core 500 will work with them, and in fact will probably work with every single video card on the market (update: watch out for cards that are more than two slots wide, though!).
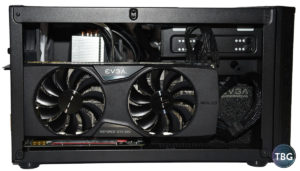
Don’t forget to also connect your power leads to your video card at this point. Most high-end cards require to connectors, and that really does mean two; the second one is not optional! If your card has an 8-pin header, you’ll need to use a 6+2-pin connector, fitting the 2-pin section in under the 6-pin section and then locking them both into place together. You’ll also need to connect power and reset switch leads, along with the hard drive and power LED leads. Most new motherboards ship with a handy connector block that allows you to attach all these leads at once, and then drop it down onto the motherboard’s front panel header in one simple step. That header is always in the lower-right-hand corner.
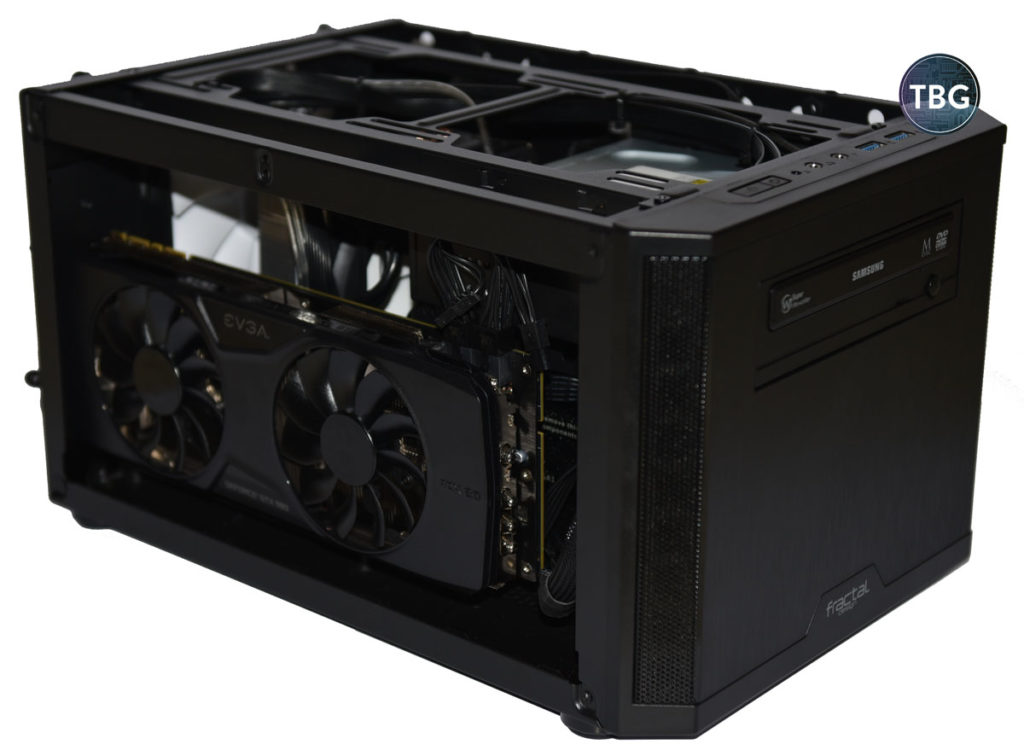
Finishing Touches
At this point, the build is just about ready to boot. In addition to double-checking your cables (which is no mean feat in a compact case like this!), we’d suggest you also tidy up the cables with zip-ties. While this is more of an aesthetic issue in larger cases, with this build, we really did need to take this step to prevent cables from hitting the fan blades of the case fan and CPU cooler fan.
Our system powered up on the first try (lucky break!), and once Windows was loaded via the DVD-ROM, we were up and running. Well, almost… it turned out that the semi-passive mode of our unique Arctic Freezer i32 cooler tripped up our motherboard’s UEFI. It simply would not turn on, and this is a recipe for overheating in the long term. Yikes! We simply installed Gigabyte’s Windows-based fan control app (called SVI), ran the fan tuning routine, and we were in business. Phew! While we were at it, we also set the 140mm exhaust fan to run at 500rpm up to 50°C, after which point it slowly ramps up in speed. Doing so keeps air moving through the chassis at all times without making more noise than necessary.
Once everything was set in terms of cooling, we turned our attention to overclocking. We set our RAM to 3000MHz using the built-in XMP profile, and pushed our CPU to 4GHz via the core ratio setting in the UEFI. We could have gone much higher, based on the low temperatures we were seeing (around 60°C at load), but we kept it nice and simple for now. Our GTX 980 sample could hit 1500MHz on the core, 7800MHz on the memory, which we tuned via MSI Afterburner, as always.
Conclusion
You might conclude from the multiple pitfalls we mentioned throughout this guide that we weren’t pleased with how this build turned out. Quite to the contrary, we think this is the very finest ITX build we’ve every put together. At idle, it was absolutely silent, and we do mean silent. It was so quiet that our sound meter simply wouldn’t register. That’s silent, folks. And it should come as no surprise, given that the power supply, video card, and CPU all shut off their fans at idle, we used no mechanical hard drives, and the single high-quality Fractal Design case fan was set to run at very low speed at nearly all times.
Sure, we had some trouble with cabling, and installing the power supply was a bit tricky, but overall, we just can’t think of a better layout for a high-performance ITX system. We’ve built smaller gaming systems, but they’ve all had serious tradeoffs in terms of noise, temperature, and component compatibility. As long as you play by the very reasonable rules of the Core 500, you can put together a devastatingly-powerful gaming system that can do double-duty as your home office PC. Unless you have a need for lots of add-in cards or a huge hard drive array, we’re not sure why you’d choose anything else. Just make sure you have the patience to put all of this system’s puzzle pieces together!
Well, that’s a wrap on yet another TBG PC Assembly Guide. If you’d like to read more of our hands-on guides, flip over to our How-To Guides page, and if you’re ready to order up some parts to build your very own Extreme ITX System, see our Small Form Factor Buyer’s Guides, updated monthly!