The Complete Guide to CPU Coolers: Downdraft vs. 120mm vs. 140mm vs. Liquid
Introduction
There was a time not too long ago when CPUs ran so cool that they barely needed heatsinks, but today’s high-performance PCs require users to pay a bit more attention to the cooling of their systems. Luckily, PC users have a nearly unlimited range of fans and heatsinks to choose from to keep their CPUs from overheating. Of course, both Intel and AMD include simple heatsinks with all of their consumer-level CPUs that will work just fine, but if you’re a PC enthusiast, you’re always after more performance, quieter operation, or maybe just a bit more style. Whatever you’re looking for, there’s a solution out there for you, and in this article, we’ll walk you through the various choices you have, the nuts and bolts (literally) of cooler installation, and the performance you can expect from the various classes of coolers available.
We’ll be looking at six coolers in total, each targeting a different niche. This is not a head-to-head showdown so much as a primer on the range of coolers on the market, with a focus not only on how they perform, but also how easy they are to install, how much noise they make, and which applications they’re best for. The six contenders are shown below, arranged from smallest to largest, starting clockwise from the lower right with Intel’s offering.
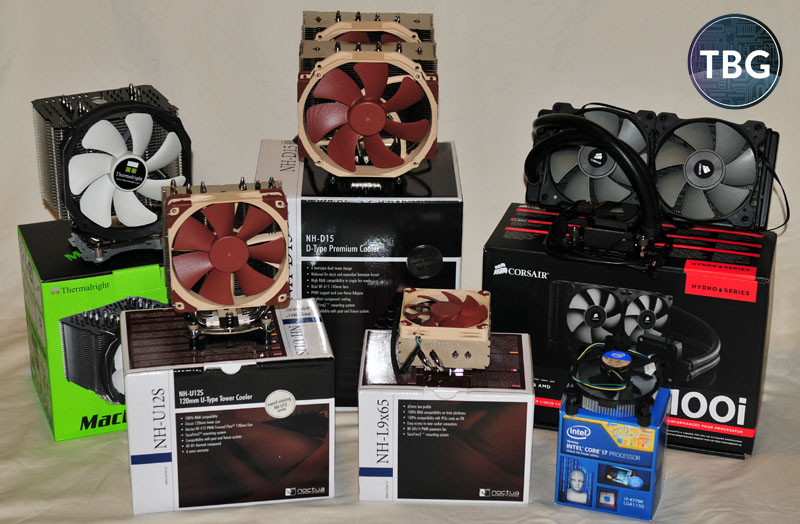
We’d like to express a very special thank you to Noctua, which provided us with three of the six coolers we tested and made this round-up possible. The six models are listed below, followed by a table providing their specifications:
- The stock Intel cooler: included at no cost with all consumer-level Intel CPUs, this is by far the most widely-used heatsink in the world.
- The low-profile 92mm downdraft cooler: the Noctua NH-L9x65, designed for small form factor systems. Note that while larger downdraft coolers exist, they are typically based on old designs and are outperformed by similarly-priced tower coolers. We don’t recommend using a downdraft cooler unless the purpose is to fit into a small form factor system.
- The 120mm tower-style cooler: the Noctua NH-U12S, among the very best 120mm coolers available, graced with one of best-engineered fans in the world, the NF-F12.
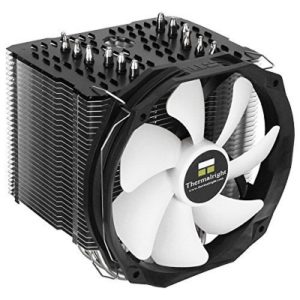
- The 140mm single-fan cooler: the Thermalright Macho Rev. B, the newest iteration of Thermalright’s premier 140mm tower-style cooler, representing what may be the perfect balance of price and performance for high-end PC builds.
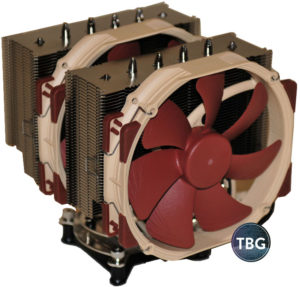
- The 140mm dual-fan tower-style cooler: the Noctua NH-D15, the largest, and perhaps most powerful tower-style cooler on the market. It employs dual heatsink towers plus dual 140mm fans to “max out” what can feasibly be achieved by a “big air” cooler.
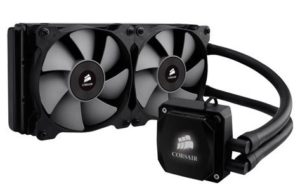
- The 240mm liquid cooler: the Corsair Hydro H100i, which really needs no introduction. It’s not the newest liquid cooler anymore, but it has been among the top-selling liquid CPU coolers since its introduction in late 2012. Note that an upgraded version has recently been released, the Hydro H100i GTX.
Among the many factors that PC builders might consider include the obvious, such as price and performance, but also noise level, size, ease of installation, weight, fan quality and build quality, and we’ll touch on all of them in this article. The table below provides all the vital specifications for our six entrants, along with our installation notes on each one:
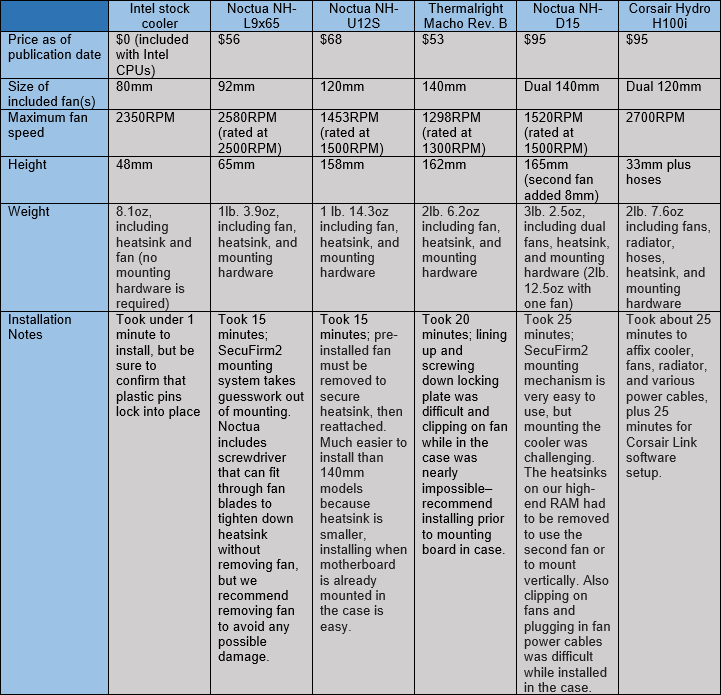
Before even looking at performance benchmarks, we can draw a few important distinctions between these coolers from their specs that will be quite relevant to many PC builders. First of all, the Intel cooler is compact, lightweight, and incredibly easy to install, requiring no access to the back of the motherboard, nor any tools. It utilizes plastic push-pins to snap into the motherboard’s mounting holes, and while these can be a bit tricky for first-time builders to fully lock in, once you get the hang of it, the installation of this cooler quite straight-forward. The three Noctua coolers all use Noctua’s SecuFirm2 mounting system, and it’s by far the best we’ve seen, but the larger the cooler, the more cumbersome it gets to install; while the NH-L9x65 was very easy to install, the NH-D15 was a serious hassle to install. The Thermalright and Corsair coolers were overall the most difficult to install, in part because their mounting brackets just aren’t that well engineered, and the Corsair cooler in particular requires quite a lot of juggling of components and additional cable management to handle its cornucopia of fan cables, USB cables, and hoses. And don’t get us started on Corsair’s CorsairLink software (available for download here) – sure it’s powerful and effective, but wow, is it clunky! It didn’t even function under Windows 8 until late 2014, long after that operating system was “new.”
Another important distinction between the coolers is weight and size, although once you get into the high-performance coolers, it’s a bit hard to compare these specifications directly, since liquid coolers are separated into multiple components. Put simply, big 140mm air coolers are monstrous things, making them a bit unwieldy to install, and in fact, based on our experience, we’d suggest that they be bolted onto the motherboard while outside of the case, with the whole assembly then lowered into the system. It’s just too hard to attach fans and fan power connectors inside a case. They also pose a slight risk of strain to motherboards. We’ve never seen one crack, but we wouldn’t recommend mounting a +2lb. cooler on an ultra-budget, ultra-thin motherboard. That is one key advantage of the Noctua NH-U12S – being a 120mm cooler, it doesn’t throw its weight around during installation. As for the Corsair Hydro H100i, it’s larger overall than the 140mm coolers we tested, and heavier than the Thermalright Macho Rev. B, but once mounted, its bulk is spread out across different sections of the case, making the overall presentation a bit more elegant. In between the Intel cooler and the high-performance air and liquid coolers is the comparatively-tiny Noctua NH-L9x65, which is small, but not entirely a lightweight, given that it’s over twice as heavy as the Intel cooler. Still, it won’t post a risk to any motherboard due to its size, nor will it pose any hardship to the installer – it’s by far the easiest heatsink we’ve ever installed besides the stock Intel cooler.
The last specification that we’d draw attention to is fan size and speed. Generally speaking, the larger the fan, the lower the speed required to achieve a certain level of cooling power (technically measured by cubic feet per minute, or CFM). Therefore, coolers equipped with larger fans typically also have lower-RPM fans, although this isn’t always the case. Manufacturers can boost their benchmark ratings a bit by equipping their coolers with ultra-high RPM fans, which result in great performance when noise isn’t considered. Witness, for instance, the relatively high RPM ratings of the 92mm Noctua fan and the 120mm Corsair fans, both quite a bit higher than the tiny fan on the Intel cooler. Also note that the NH-D15 uses specially-modified versions of Noctua’s NF-A15 fan, which run at 1500RPM rather than the 1200RPM of the retail product. All of these examples should raise the suspicions of silence-seekers. Therefore, we tested all of our coolers in two different configurations: maximum fan speed along with motherboard pulse width modulation (PWM) or software-controlled “normal” fan speeds.
Test Setup
Because we needed to use a benchmarking platform that could accommodate all of our coolers, from the smallest to the largest, we utilized our standard gaming benchmarking system. The specifications, along with test conditions and applications were as follows:
- Motherboard: ASRock Z97 Extreme4 (thank you to ASRock and Newegg for providing this review sample)
- CPU: Intel Core i7-4770K (running at stock and 4.4GHz overclock)
- Video Card: MSI GeForce GTX 780 Ti Gaming 3GB
- SSD: Crucial MX100 512GB
- RAM: 2x G.Skill TridentX 2x4GB DDR3-2400 Kits (16GB total)
- Case: Corsair 500R
- Power Supply: EVGA Supernova G2 850W
- OS: Windows 8.1
- Stress applications: Battlefield 4 and Intel Burn Test
- Temperature monitoring software: HW Monitor
- Noise level monitoring software: Sound Meter for Android
- Ambient temperature during all tests: between 64.5°F and 65.5°F
Note that we ran our system with all of its included fans plugged in but set to low speed. This included dual 120mm intake fans, a 200mm side intake fan, and a 120mm exhaust fan. The noise floor of this system is about 37dB, which is quiet but not silent, so that will be the minimum sound level you’ll see in our tests, although most of our CPU fans operate above that even at low RPM. Also note our tests were conducted at an ambient temperature between 64.5°F and 65.5°F. Unfortunately, it’s impossible to maintain an entirely constant temperature, if for no other reason than that benchmarking itself outputs heat that increases the temperature in the room.
An unspoken truth in CPU cooler comparisons is that liquid CPU coolers not only add more cooling potential in the form of liquid coolant; they also add more case cooling potential. It’s impossible to separate out the effect of the liquid cooling system from the additional case fans that liquid coolers effectively provide. Note that while many manufacturers recommend installing radiator fans as intakes, drawing cool air in from outside the case, they do this solely to “juice” the benchmarks. As an overall cooling scheme, running radiator fans as intakes is completely illogical. Sure, your CPU will run a bit cooler, but everything else in your system will run much hotter, from the motherboard, to the RAM, to the video card, to the hard drives. Simply put, it’s bad advice, and it exposes the risks of setting up a PC as an amalgamation of parts rather than a unified system. Therefore, we ran our Hydro 100i with its dual 120mm fans set to exhaust, mounted at the top of our case, working in tandem with natural convection to remove heat. But as we mentioned at the start of this paragraph, this added additional case cooling to our system. We considered running top-mounted 120mm fans for our other cooler tests, but ultimately decided that this would simply be unrealistic and unfair – those other coolers did not come with extra 120mm case fans for users to install, and adding such fans wouldn’t be testing the coolers on their own merits. To a certain extent, this illustrates that from a purely technical point of view, liquid CPU coolers are inherently superior, in that they separate the heatsink element from the radiator element, allowing the latter to be mounted much closer to the exterior of the case. That is not to say that they are always preferable, as we’ll demonstrate in our benchmarks. Moving heat from the heatsink to the radiator involves some extra effort, which unfortunately translates to unavoidable noise.
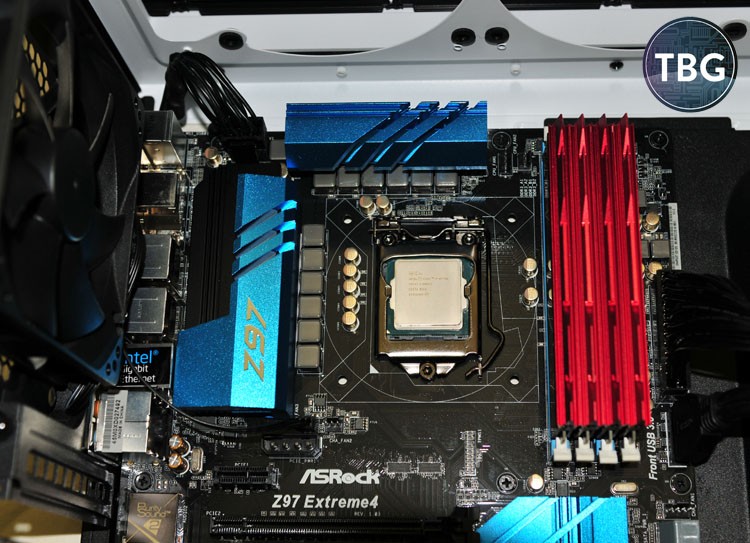
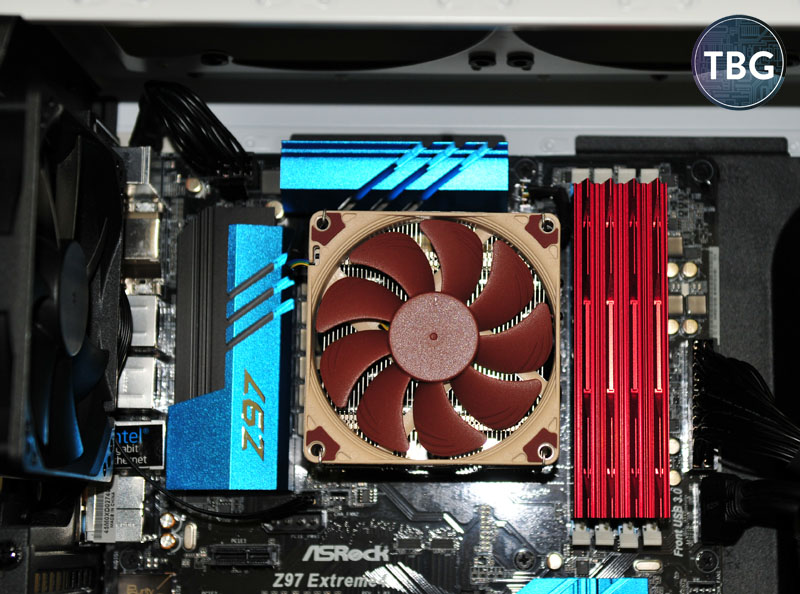
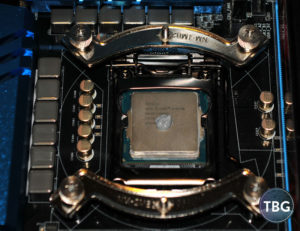
But we’re jumping ahead a bit, so let’s start at the beginning. First, we need to have a CPU installed before mounting the cooler. You can see below that our Intel CPU is locked in and the CPU area is clear. Note that we’re using four sticks of RAM, a configuration that every cooler should allow for, but not all do, at least not without some difficulty. These are extra-tall, high-performance models from G.Skill, so we’re really using a worst-case scenario here. Indeed, with one of our coolers, installation was sub-optimal due to the height of the sticks, and in another it was all-together impossible without modifying the RAM, as we’ll explain later.
Next we’ll do a deep dive into the installation of each of our six coolers.
Installing the Contenders
Before we go into detail on the installation of our six coolers, we wanted to give you a brief summary of the two main types of cooler mounting systems on the market today. The first is a cooler that uses plastic pushpins to engage a locking mechanism behind the motherboard, without requiring access to the back of the board. These were extremely popular in the days when cases did not have motherboard cutouts that allowed access to the back of motherboard while in the case, and are still used on Intel’s cooler, as well as many lower-priced aftermarket coolers.
The other type of mounting system uses a metal bracket behind the motherboard through which four metal screws are affixed. Since at least 2010, most cases have a cutout, so this type of mounting mechanism is now a lot more convenient to use, as the motherboard does not have to be outside of the case to attach it. Note that while we did not test one, the stock AMD cooler actually uses a variation of the metal bracket design, rather than pushpins.
The Stock Intel Cooler
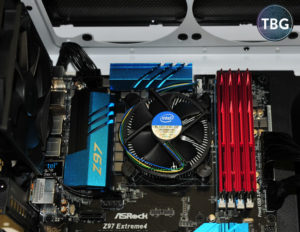 We’re starting off with the simplest cooler, the stock Intel cooler. It’s a low-profile aluminum-finned cooler with a copper base, features nothing in the manner of heatpipes or other extravagances. The comparatively-tiny fan measures about 80mm across, making it by far the smallest fan in our roundup. Because we’ve had experience with this cooler on numerous occasions, it only took about 1 minute to install. It’s a very straightforward process, and simply requires pushing the four push-pins through the motherboard’s mounting holes to lock the cooler into place. Intel pre-applies thermal paste to the bottom of the cooler, making it very easy to use on the first install, although after that, you’ll need to purchase your own thermal interface material, as the paste cannot be used more than once.
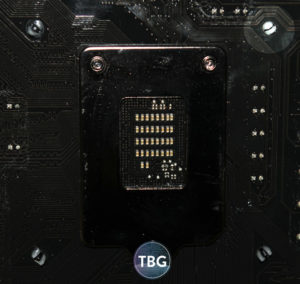
While installing the Intel cooler is quite simple, it’s not a fool-proof procedure. The main challenge is that the push-pins can go through the motherboard without locking into place. To the right you can see the rear of the motherboard, with one push-pin, highlighted in the upper-right, not fully locked in. When not locked in, the cooler won’t make solid contact with the CPU’s heatspreader, and temperatures could skyrocket quickly. Always make sure the cooler cannot be pulled up from the motherboard after installation, testing each corner one at a time.
The Noctua NH-L9x65
Next up is the Noctua NH-L9x65, a cooler that could work perfectly as a drop-in replacement for the Intel cooler in most PCs, save for those that have very little clearance above the CPU area. The NH-L9x65 is very easy to install, but unlike the Intel cooler, does require that a bracket be inserted through the back of the motherboard. Thus, you either need to install it before the motherboard is in the case, or your case needs a cutout to allow access to the back of the motherboard (most modern cases have this feature). As with all of the coolers in this roundup, we installed the NH-L9x65 while the motherboard was in the case, and after the Intel cooler, it was by far the simplest to install. It was the only aftermarket heatsink we tested that could actually be bolted on without removing the fan, although we’d suggest unclipping the fan anyway to make sure you don’t break a fan blade while bolting it down.
The graceful Noctua NH-L9x65 looks like it was tailor-made for this motherboard:
The NH-L9x65 uses a 92mm fan, which makes it a lot larger than the Intel fan in diameter, but not so much in profile, as it’s just 14mm tall. What really makes the cooler more effective, though, is the much more robust heatsink assembly, which includes four heatpipes and a fairly substantial chunk of fin material. That being said, it still conforms to the Intel footprint, and easily slots into place in our test system. Note that the fan and heatsink do overlap more motherboard components than the Intel cooler, but are raised up enough to avoid touching them. Whether they’ll avoid the components of every motherboard is unclear, but we’d guess it will work for just about all models.
You really can’t see Noctua products without scratching your head a bit at the color choice that has become Noctua’s calling card. Some people don’t like the brown on beige color scheme of its fans, but there’s no doubt that it’s unique and recognizable, immediately identifying the fan being used as a high-quality product. Ironically, Noctua markets an “Industrial” line of fans that uses a more stylish black-on-brown color motif, despite the fact that style probably carries a lot less weight in industrial applications!
The Noctua NH-U12S
Next up is Noctua’s mainstream entry in this roundup, the slim and sleek NH-U12S. Based on a fairly standard tower design and employing a 120mm cooler, it looks like many of other models in the ultra-competitive 120mm field, save for its distinctive brown and beige fan. But look closer and you’ll see that it uses five heatpipes, more than most 120mm heatsinks, and it of course also inherits Noctua’s excellent mounting mechanism. While you do have to remove the pre-installed fan to actually bolt the heatsink onto the bracket, it’s easy enough to do so even within the tight confines of a case due to the narrow dimensions of the NH-U12S. Getting your fingers around the fan clips is no issue at all.
As you can see below, the cooler installed without a fuss, just clearing our four tall memory modules, and avoiding interference with motherboard heatsinks and expansion slots. For a long time, 120mm-based tower coolers dominated the market, as going to a larger fan often meant inviting all sorts of potential pitfalls regarding compatibility. That isn’t true as much anymore, because many motherboard manufacturers have moved the full-size PCIe x16 video card slot down to the second position on ATX boards, where it’s nearly impossible to be hit by a CPU cooler. That being said, in addition to still being the largest form factor we recommend for micro ATX systems, there are other advantages to having a slimmer 120mm cooler, starting from the moment you start the installation process. Indeed, this was by far the easiest tower heatsink we’ve ever had the pleasure of installing, beating out the larger models in this roundup as well as other 120mm models we’ve tested in the past.

The Noctua NH-U12S is big, but not so big that it becomes hard to handle.
The Thermalright Macho Rev. B
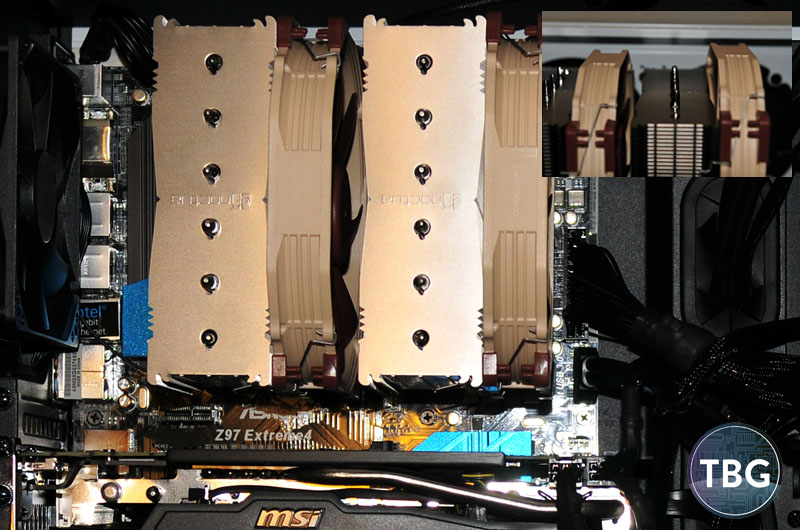
Next up is the massive Thermalright Macho. It’s likely the biggest cooler you’ll find in its price range, coming in just over $50 (which is actually a bit less than the NH-U12S). It uses a 140mm fan, however, which puts it in a different category all together. It’s taller, wider, and much deeper (Thermalright makes a slim version of the Macho called the True Spirit 140 Rev. A, which uses the same fan and six-heatpipe design, but with a much slimmer heatsink). You’re getting a lot of heavy metal for your dollar here, but it does come with a cost – installation is a pain. The bracket assembly wasn’t as straightforward as Noctua’s, requiring a bit more juggling of parts while affixing screws – almost to the point where two hands weren’t quite enough. Thermalright includes a nice long-reach magnetic screwdriver in the package, which is a great bonus, but happens to be necessary, as you actually have to lower a screw down through the hole in the middle of the heatsink, and wouldn’t be able to do it without a magnetic screwdriver. It was a bit hard to line up the screw with the screw hole given that it’s entirely out of sight – it definitely took some trial and error.
Next came the challenge of affixing the fan using the somewhat clumsy fan clips – which are the opposite of Noctua’s, attaching to the heatsink and then clipping onto the fan. As it happens, this arrangement turns out to be a bit more awkward to work with in practice. And then there was the issue of RAM clearance. The Macho is offset such that it leans back away from the RAM slots a bit, but that didn’t stop its 140mm fan from actually pushing into one of our RAM modules. Again, this is a worse-case scenario given the height of our RAM, but depending on the motherboard manufacturer, a few millimeters in one direction or the other could mean the Macho fits perfectly or entirely blocks a RAM slot. So there’s a bit of luck of the draw here. All told, the Macho definitely lives up to its name – it’s not shy about its bulk, and at about 2.5 times the thickness of the Noctua NH-U12S, it will have its work cut out for it in justifying all its bulk. What it won’t have to justify, however, is it’s cool white on black color scheme, which will look good in just about any build. Thermalright used to pride itself on some really oddly-colored fans, not all that different from Noctua’s. We like the white on black a lot better, Thermalright!
The Thermalright Macho Rev. B is a hefty cooler, pressing right up against our first stick of RAM.
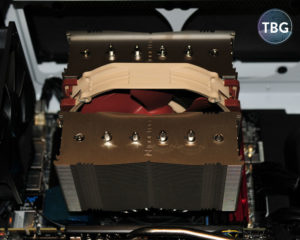
The Noctua NH-D15
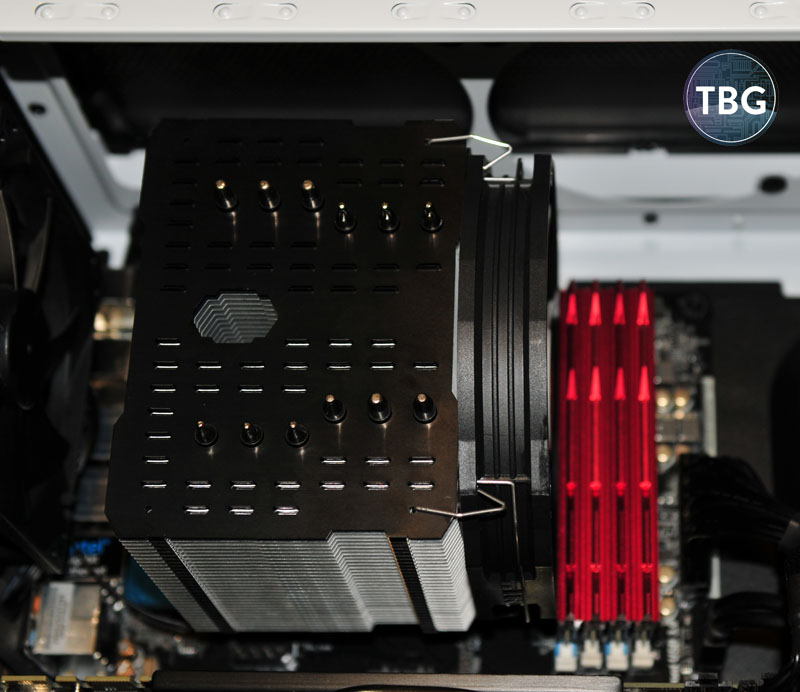
Just when you thought the Macho was the biggest air cooler you could fit in a PC, along comes the Noctua NH-D15. This cooler is simply enormous, and when fully suited up with dual fans affixed to its dual towers, is probably the biggest tower heatsink in the world. At over 3 pounds, it’s also quite a hefty contraption, although it’s still quite elegant; Noctua is known for its engineering prowess, after all, and this model is no exception. Of particular note are the cutouts seen in the heatsink when viewed in profile, as shown below, which easily clear even the tallest of memory modules. The same cannot be said, however, of the second fan, which is included in the box and is seen affixed to the heatsink in the photo to the right. While Noctua lists this as a 165mm-tall heatsink, we must take issue with this specification. We simply cannot imagine a single enthusiast-grade RAM kit that could fit under the external fan without lifting the fan above the lowest position, thereby increasing the heatsink height over 165mm.
We could certainly argue for and against the merits of tall heatsinks on RAM, but unfortunately for Noctua, it’s not in a position to change the RAM market on its own. Simply put, our RAM was not compatible with the NH-D15 in its default configuration. Luckily, our high-end G.Skill modules actually have removable heatsink fins, which once detached, lower the profile to that of a standard RAM kit. Even so, the external fan still needed to be raised about 8mm above the heatpipes and internal fan, thus making the heatsink 173mm tall in our modified scenario. We would encourage Noctua to revise its specifications to note the height of the heatsink when actually installed in a system with an average set of enthusiasts RAM modules, which is what one would expect in a system utilizing a heatsink in this price range. In our photo below, you can see the massive heatsink assembly installed, with an inset photo of the raised fan in the right-hand position, sitting just on top of our modified (lowered) RAM heatsinks.
The Noctua NH-D15 is gigantic, filling nearly the entire upper half of our case! Note inset photo of raised fan:
You may think that mounting the heatsink in the other direction (vertically) would help in this regard, but due to the width of the heatsink, and the fact that the sides are not sculpted out like the front and back, the compatibility was even worse. The heatsink itself hit the RAM, and again, we needed to remove the heatsinks on two of our RAM modules (in this case, the ones closer to the CPU). And unlike with the fan, there is no way to raise the heatsink to compensate – if the RAM doesn’t fit underneath the heatsink, you won’t be installing it in your system. Noctua suggests this orientation as an alternative in its clear and very concise installation manual, but gives no indication of which one would be preferred.
 Based on our testing of the heatsink in both orientations, the unequivocal answer is as follows: do not install this heatsink in the vertical orientation. While we’re spoiling the surprise that awaits you on the pages that follow, the sad truth is that the NH-D15 will underperform its much cheaper, much smaller brother the NH-U12S when used in this configuration. We made sure to test it like this not just because Noctua suggests it as an option, but because a lot of builders make the mistake of orienting heatsinks from a variety of manufacturers in this orientation. For reasons that we’ll explain later, it’s the wrong choice every time.
The Corsair Hydro H100i
Finally, we get to the liquid cooling category in our roundup. While we’ve only tested one model here, it happens to be one of the best-selling models ever released, so we think it’s fairly representative of what enthusiasts are using nowadays. The Corsair Hydro H100i is an all-in-one cooler with a CPU block, dual hoses, a 120mm by 240mm radiator, and dual 120mm fans. While there are larger 140mm by 280mm models, as well as 120mm by 360mm models, the 240mm size will fit in a much wider variety of cases. Of course, a single-fan 120mm or 140mm model is even easier to fit in most cases, but given the small difference in price, we’d recommend 240mm models every time. Most 120mm and 140mm models will barely outperform cheaper, simpler air-cooled models, while 240mm liquid coolers are in an altogether different class.
Below you can see the big H100i installed, with its heatsink block affixed to the CPU and its hoses routed to the back corner of the case, where they meet the 240mm radiator. Of course, separating the heatsink from the radiator and fans does have one major advantage – there’s almost no chance for interference with motherboard components, RAM, or the video card, and furthermore, little risk of damage during transit, because very little weight is hanging off the motherboard. On the flipside, not visible here is the mess of cables that we had to contend with to set up the H100i, including fan power cables, pump power cables, and USB controller cables. They’re all tucked away here, but we want to be clear that it adds to the complexity of the installation. We also found the mounting bracket to be pretty unintuitive, as it required a huge amount of force to tighten on correctly. Corsair’s newer H100i GTX addresses this issue, while tweaking the design in other ways as well.
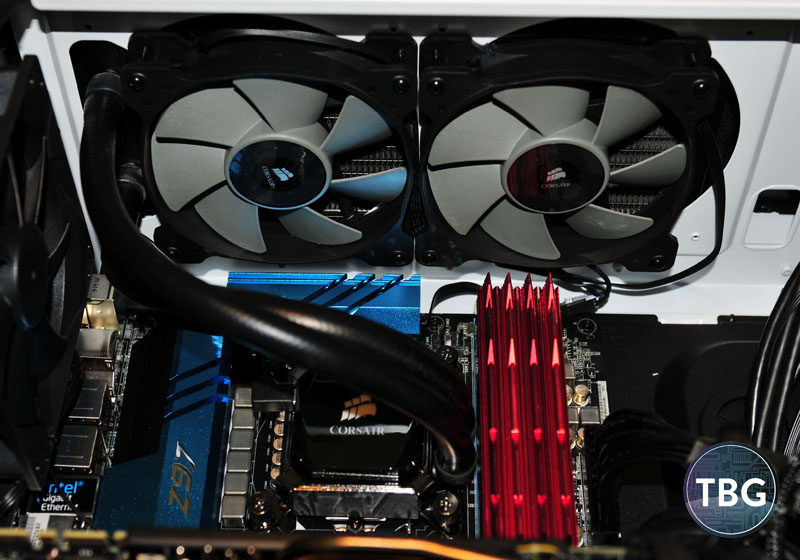
The Corsair Hydro H100i is relatively complex, but looks ultra-sleek once it’s installed.
A Word on Applying Thermal Interface Material
Given the number of cooler installs and uninstalls we did to write this article, we gained a pretty good understanding of the ins and outs of thermal interface material (TIM) application. First off, we should mention that we used the same TIM for each cooler, Arctic MX-4, except for the Intel cooler, which was tested with the pre-applied TIM that we bet 99% of users will rely on. Every cooler includes TIM, either pre-applied as a solid paste, or contained in a tube as a gel-like material. We’d like to single out Noctua here for including a generous portion of its excellent NT-H1 TIM with every cooler, regardless of cost. Intel and Corsair pre-apply a single use paste, and Themalright provides a very small amount in a plastic pouch, which isn’t as convenient to use as Noctua’s syringe applicator. We like MX-4 a lot, but if you’re getting a Noctua cooler, just stick with the NT-H1 that it comes with. As an aside, the best selling TIM is Arctic Silver 5, which for some reason has become the “go-to” TIM in the industry (probably because it was one of the first that was widely available). Back in the mid-2000s, we used it too, but to be honest, it isn’t that good. It’s sticky, hard to apply, and loses effectiveness over time as it becomes brittle. We don’t recommend it.
We’ve included before and after photos to illustrate exactly how much TIM to apply, and how it should spread once you bolt on the cooler. You may have read previously that the right amount of TIM to apply would be “pea-sized” or “rice-sized” or perhaps multiple grains of rice. Well, you can see above the amount we recommend, which is probably about the size of a pea, maybe a bit smaller. But it’s not just the amount that matters, it’s how you go about setting the cooler down on top of the TIM that counts.
To the right, you can see how the TIM appeared after removing the huge NH-D15 cooler. In this case, it worked perfectly – it helped that by this point we had a good feel for how to install the D15, which is about the hardest air cooler to install due to its tremendous bulk. There’s a little overflow on the top and bottom, but that doesn’t affect performance, and it’s what you’d expect when pressing a circular dot of TIM onto a square surface. All in all, we’d call this a pretty ideal TIM application. Our first attempt wasn’t quite as good, because the cooler slid around quite a bit, pushing the TIM to one side before we were able to bolt it down evenly. We’ve said it before and we’ll say it again – generally speaking, the bigger the cooler, the more challenges it can present during the installation process, and the issue of TIM spreading incorrectly is just one of them.
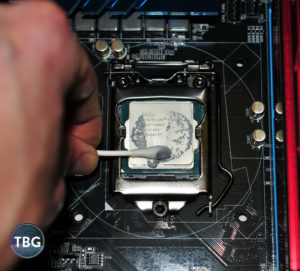
One last thing – you may wonder how we got our CPU cleaned up between each TIM application. The answer is simple – rubbing alcohol and a cotton swab (or low-lint paper towel). The alcohol strips the TIM right off, without leaving any residue, as it evaporates immediately. It’s really quite easy, actually, and won’t harm the electronic components of your motherboard, nor lead to any rusting of metal parts. We’ve included a photo to the left to show you exactly how it works. Yes, there are commercial products you can buy that are “specially formulated” for removing TIM, but in our opinion, you’re wasting your money with them.
With all that said, it’s time to move onto our performance tests.
The Stock Benchmarks
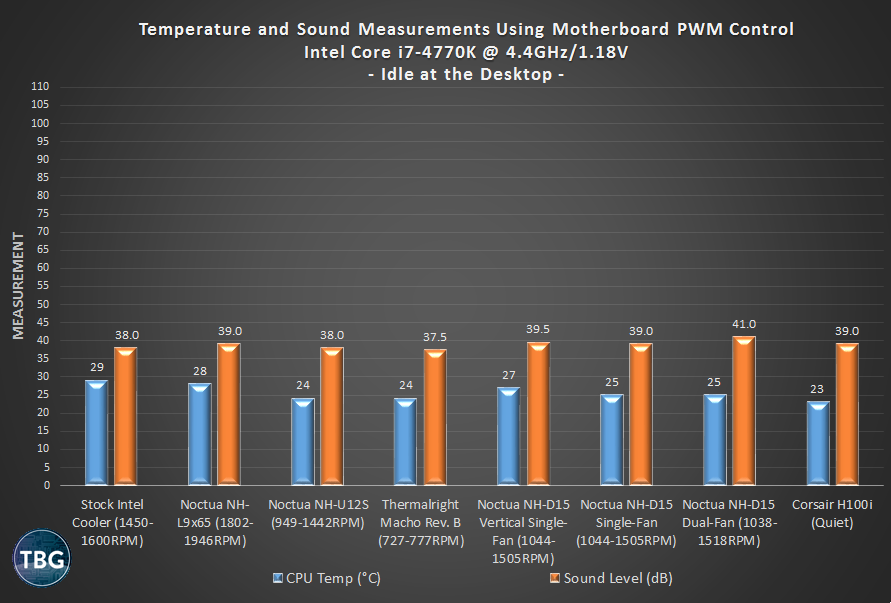
Now we get into the meat of the article – the performance benchmarks. That being said, we’re going to start with some pretty mundane charts – the idle performance numbers at stock settings. It’s important to understand that looking at idle numbers to pick out winners can be misleading – most heatsinks perform within a narrow performance band at low temperatures, and furthermore, many models are optimized for high temperature situations, and will often underperform simpler coolers at low temperatures. The most important thing to look at, then, is the noise levels. Frankly, it’s the only thing that matters when it comes to idle-state performance.
Each of our charts shows both temperature and sound level data. We know that makes them a little hard to read, but to be honest, heatsink performance must always be judged both by the ability to control heat and the ability to limit noise. Too many reviews separate out this data, or worse yet, don’t include noise data, and that just encourages manufacturers to ship their products with increasingly fast (and noisy) fans. We’re hoping that by addressing both factors simultaneously, overall heatsink performance will be clearer.
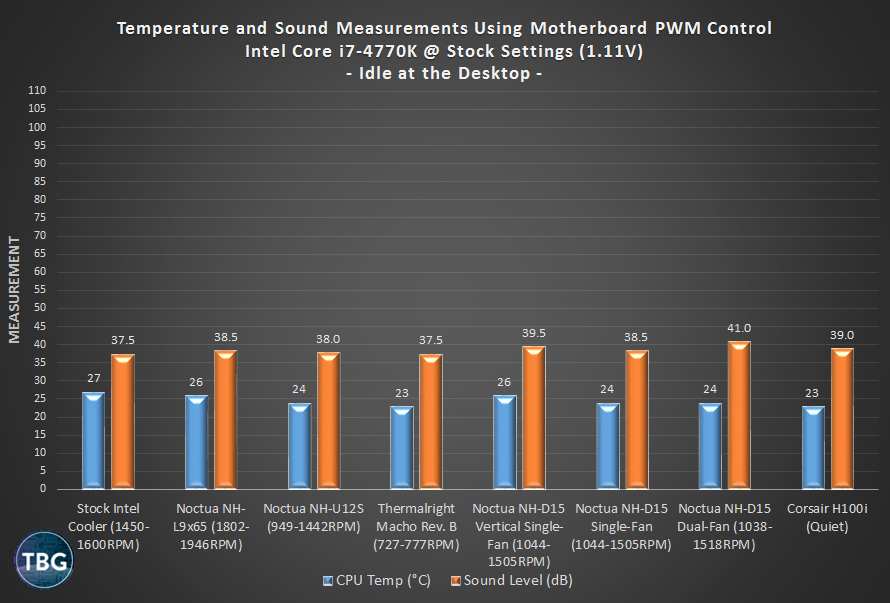
Right off the bat, we see that all of these coolers work just fine at idle, even when controlled by the motherboard (or in the case of the Corsair H100i, when set in low-RPM “quiet” mode via the CorsairLink software). But the noise levels are not all the same. As you’ll see, we’ve included RPM ranges for all of the coolers that are motherboard controlled, and at idle, you should assume that they are all at their lowest possible speed. But that speed differs dramatically from cooler to cooler, and so you have the 727RPM Thermalright Macho idling at 37.5dB (our test system’s noise floor), while the dual-fan Noctua idles at 1038RPM and registers 41dB, proving to be even louder than the Corsair Hydro H100i, which is at a disadvantage here because its pump always runs at full speed (the fans are actually spinning at around 1000RPM in quiet mode). Also keep an eye on the NH-D15 in vertical single-fan mode (with its fan blowing up towards the top of the case). It’s the loudest of the single-fan models, and also performs the worst. Not a good start, and unfortunately, it’s a sign of things to come. But Noctua does have one important piece of the puzzle nailed down, and that is fan quality. For example, the bearings in the Thermalright Macho’s TY-147A fan are clearly of a lower grade than those in Noctua’s fans, making a slight scratching noise despite incredibly-low decibel levels. The human ear is more sensitive than a decibel meter when it comes to changes in pitch, rather than sound intensity, so while the Thermalright’s sound level is lower, it’s not necessarily better than the Noctua NH-U12S, for example, which is running over 200RPM faster at idle.
Unfortunately (or perhaps fortunately, depending on your perspective), not all fans are controlled in the same way by our motherboard’s PWM fan headers. Some of the fans could be pushed up to maximum RPM (the Noctua NH-U12S and Noctua NH-D15), while the majority would use a much narrower range, even when pushed to the extreme (that includes the Intel, the Noctua NH-L9x65, the Macho, and the Corsair). That’s great for limiting noise, but it does curtail heatsink effectiveness somewhat. So we also include charts for each of our tests running fans at maximum RPM. You can see those numbers below, which for idling with a stock-clocked processor causes a simply outlandish amount of noise. The Intel actually surprises with a fairly low maximum noise level of 41dB, which is actually equal to the NH-D15’s idle level. Yikes! So much for reducing noise with a high-end cooler. The rest of the single-fan coolers are all between 43dB and 44dB, although interestingly, at very different RPMs. The Macho’s big 140mm fan unfortunately is at a disadvantage in this test – it just isn’t very good at high RPM. Perhaps Thermalright intentionally designed it to stick to a narrow RPM band when under PWM control, because at around 1300RPM, it’s kind of a stinker, making more noise than Noctua’s smaller models at higher RPMs, and making as much noise as the Noctua NH-D15 single-fan setup despite a 200RPM deficit.

The biggest losers when running at maximum RPM are the ridiculously loud Corsair H100i and dual-fan Noctua NH-D15. Keep this in mind when you see the load numbers that follow, because from our point of view, running these coolers at maximum RPM full time would be an unacceptable solution.
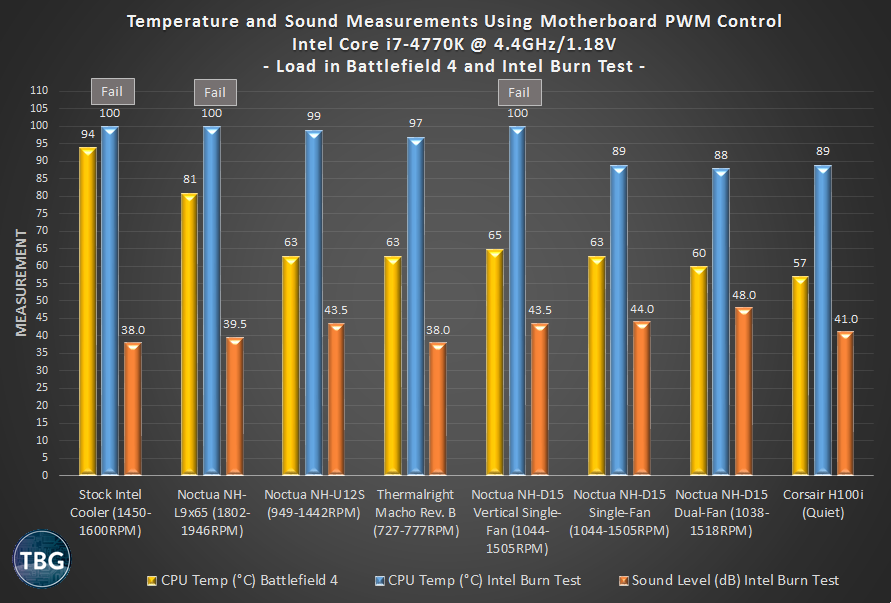
For our load tests, we used two different benchmarks: a 20-minute run of Battlefield 4’s multiplayer mode to simulate a typical CPU-intensive application, and 20 loops (about 3 minutes) of Intel Burn Test. Intel Burn Test taxes all cores at 100% and adds an AVX2 component to simulate a maximum load scenario, and quite frankly would be impossible to replicate in any typical application. It’s the worst of all worst cases. Our temperature numbers and decibel figures are maximums measured during our tests, but note that we don’t provide noise levels for our Battlefield 4 run, as it would be impossible to distinguish between CPU cooler noise and the additional power supply and video card noise inherent to these runs. For most of the coolers, temperatures were low enough during a gaming session to keep PWM-controlled RPMs near their minimums (i.e., close to idle noise levels).
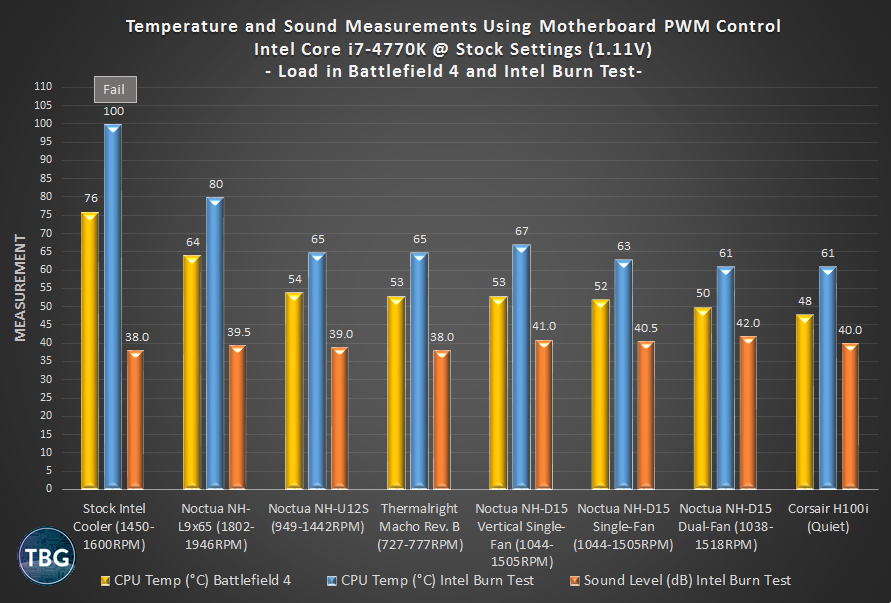
Unlike with the idle numbers, we do want you to look at temperatures here, because as you’ll see, they vary quite a bit. All of the coolers except the stock Intel cooler were able to get through this first round of load tests without problems, and even the Intel cooler was fine in a typical load scenario. We’d also like to highlight one standout among the coolers here: the Thermalright Macho. As we mentioned above, its fan stays within a very narrow range under PWM control, so it’s a good example of what a low-RPM 140mm cooler can do. In a word, it’s exemplary, achieving results between Noctua’s mid-sized and over-sized tower coolers, while besting them both in noise (and under-cutting them in price!). Another thing to notice is that once you move beyond the two compact coolers, performance tends to fall within a narrow range. It will be interesting to see if that remains true when we push into overclocked territory on the next page.
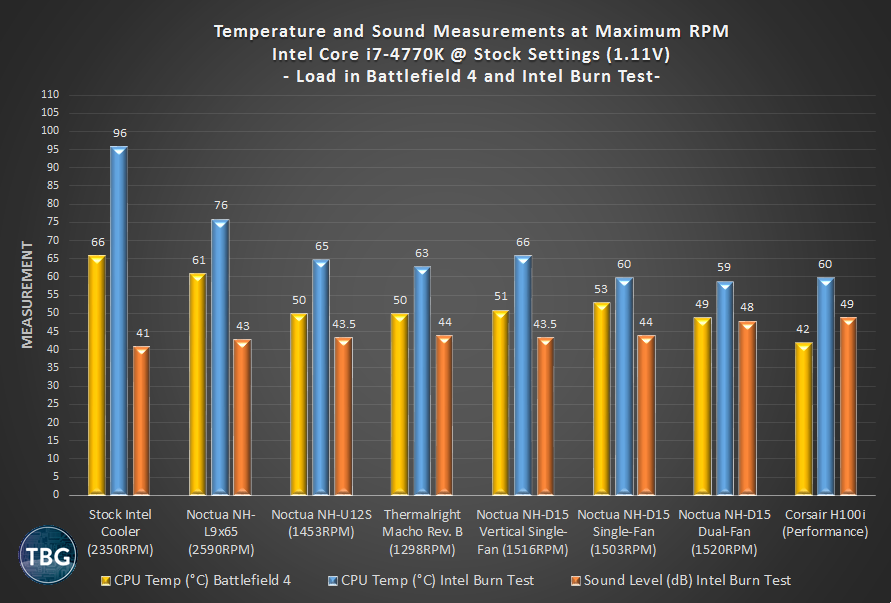
Here’s the last round of tests running our Intel Core i7-4770K at stock settings, this time with the fans on our coolers maxed out. This gives you a good sense of the ultimate cooling potential of each model, using one of the hottest running consumer-level CPUs Intel has released in recent memory. This time every cooler passes all of our tests, including the Intel cooler. Take note of the performance of the Noctua NH-D15 in single-fan mode. When mounted in a vertical orientation, it’s just not particularly good, losing to the smaller Noctua NH-U12S in both temperature tests while making the same amount of noise. And in the standard configuration, the NH-D15 is oddly a bit hotter in Battlefield 4 than it was with PWM controls, which can only be explained by slight test-to-test variation in CPU loads inherent in real-world (non-synthetic) testing. At the very top, the dual-fan NH-D15 and H100i trade blows for supremacy – we’ll call the Noctua the winner here for running a bit quieter, but overall, both are just too loud.
For PC enthusiasts who are more interested in an all-around balance of performance and noise levels for running a stock-clocked CPU, the results on this page are all you need to see. If we were to name a winner, it would be the Thermalright Macho, followed very, very closely by the Noctua NH-U12S, which is much easier to install, but with cooling potential that isn’t quite as high. If you’re running a stock CPU, the two high-end options (the NH-D15 and H100i), both of which run around $100, simply should not be considered. Spend the extra $40-$50 they’ll cost you over the NH-U12S or Macho on a better CPU or video card.
The Overclocked Benchmarks
When push comes to shove, what really matters to enthusiasts is cooler performance with an overclocked CPU, and that’s what you’ll see on this page. We took our Core i7-4770K to 4.4GHz on all four cores, with Hyperthreading enabled, and ran it through our battery of tests. Note that our particular CPU sample was able to achieve this overclock at a relatively-low voltage of 1.18V, just 0.07V higher than stock. That being said, the combination of the higher clock speed and the exponential increase in temperature with voltage will spell doom for a few of the coolers in our round-up, and it’s not just the ones you would expect.
To be clear, if you’re overclocking, you could jeopardize your system’s lifespan if you don’t carefully monitor temperatures, so please be aware of the risks. The effectiveness of your CPU cooler becomes much more critical when overclocking, and for the most part, we do not recommend overclocking when using the stock Intel cooler, although as you’ll see, it can be done under certain conditions.
Above you can see the idle measurements running an overclocked CPU (we’ve skipped the maximum RPM measurements on this page, as they really aren’t relevant at idle). If you’re using “adaptive” voltage control for your Intel CPU overclock, the CPU shouldn’t be running at much higher voltages at idle versus a stock setting. And even if you have a fixed voltage, idle state still won’t be where your system will be at risk, although fans could run at slightly higher RPM. Because we only tested with adaptive voltage, nothing changed significantly between our stock and overclocked idle state numbers. Thus, the results largely mirror what you saw on the last page. As before, the two best coolers in regard to idle noise, other than the Intel cooler, are the Noctua NH-U12S and the Thermalright Macho. But what will separate winners from losers for extreme overclockers are the load numbers, and that’s what you’ll see below, starting with the PWM-controlled results.
OK, we’re seeing some failures here in Intel Burn Test. The two low-profile coolers, from Intel and Noctua, failed within seconds, as the CPU exceeded 100C and throttled. That’s not a problem from our point of view, as these coolers were not designed (nor should they be utilized) for extreme overclocking. More surprising was that a couple of our Noctua coolers met their limits, with the mighty NH-D15 in single-fan vertical mode failing near the end of our Intel Burn Test run, despite hitting a maximum fan speed of 1505RPM.
When pushed to the extreme, it’s clear that the potential of the NH-D15’s massive heatsink is wasted when oriented vertically, and that even much smaller heatsinks work better in a horizontal position. The basic reason for this is that when mounted horizontally, a heatsink works in tandem with the natural front-to-back airflow of modern cases, which often feature one or two intake fans plus an exhaust fan. Even when cases have a top-mounted exhaust fan, as many new cases do, the primary airflow is still from front to back, and always will be until cases start featuring multiple bottom-mounted fans (one of the few examples of such a case is the Silverstone Raven, which also turns the motherboard 90 degrees). Another problem is that when mounted vertically, the heatsink is drawing air in from the single hottest point in the entire case: the back of the video card. While this is the only heatsink we tested in a vertical orientation, we’re pretty confident based on our results that all tower heatsinks will be compromised when used in such a fashion.
While the vertical NH-D15 is a disappointment, there are some real standouts among the bunch here. We have to call out the Corsair H100i for its excellent performance-to-noise ratio in an overclocked situation. It’s among the quietest coolers in this test, despite garnering the best results overall. Pity, then, that it can’t shut down its pump at idle, because it’s one of the loudest coolers when not under stress. Also impressive is the Macho, which comes through again with some very impressive low-RPM numbers. It’s able to match or beat the NH-U12S’s results while never exceeding the NH-U12S’s idle-state noise level. That speaks to the power of a 140mm fan and a massive (if somewhat cumbersome) heatsink. Finally, we’d skip right past the dual-fan NH-D15 numbers and look at the same cooler with a single fan. It’s actually quite impressive, nearly matching the H100i in overall effectiveness (and its Battlefield 4 temperature is only higher because it was running at very low RPM in that test). For massive cooling potential under adaptive PWM control, it’s a nearly perfect solution. Frankly, we wish Noctua would sell the NH-D15 at a reduced price with just a single fan. In comparison to the dual-fan setup, it would be easier to install, so much quieter, and for most users, plenty capable. Imagine an $80 single-fan NH-D15, and you’ll be imagining air cooling Nirvana.
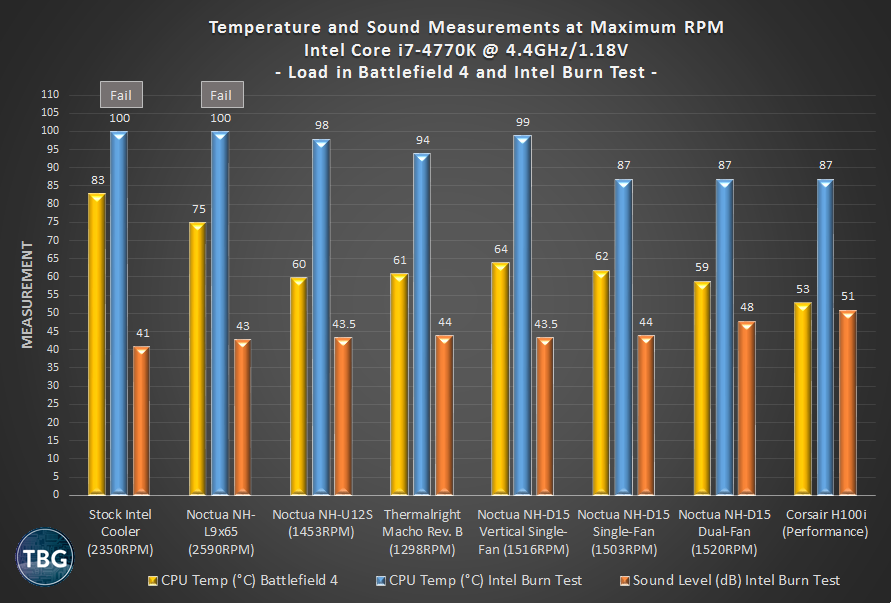
Our final test takes runs the fans on all of coolers at maximum RPM. Keep in mind that the two larger Noctua coolers will have similar results here as compared to the PWM benchmarks because they were able to spin all the way up to maximum RPM even under motherboard control. That is a key feature in an overclocked situation. Indeed, even at their fixed maximum RPM, the Noctua NH-U12S and NH-D15 only end up slightly cooler, owing to the fact that at maximum RPM, they are actively suppressing heat all the time, rather than just reacting once the motherboard detects a high-heat situation and sends them more voltage. On a separate note, as much as we like the Macho for its low-RPM performance, we just can’t get behind its high-RPM performance. It loses its low-noise advantage, while barely out-performing the more elegant NH-U12S.
By the way, in this testing situation, we’re going to call out the NH-D15 for an honorable mention. In single-fan mode, it proves that it’s indeed stronger overall than the Macho, at least when not in a vertical orientation, and when the second fan is strapped on, it performs nearly as well as the H100i here. Of course, it’s very loud, but it doesn’t create quite the same deafening racket as the H100i in software-controlled “Performance” mode. Faced with a lot of voltage, and therefore heat, the H100i automatically ramps its fans up to extremely high levels (remember, these are 2700RPM-rated fans), exceeding 50dB, the one and only example of this happening in our testing. Quite frankly, it’s unacceptable, and it’s no surprise that Corsair has outfitted the newer H100i GTX with lower-RPM fans, rated at a maximum of 2435RPM. That being said, we were quite pleased with the H100i in “Quiet” mode, and would take it over the dual-fan NH-D15.
Conclusions/Recommendations
We hope this article helped you learn more not only about the particular coolers we reviewed, but also about CPU cooling more in general. First things first, if you’re new to PC building or modification, you can rest assured that the stock Intel cooler will properly cool your CPU under all stock conditions. While it did “fail” the Intel Burn Test, IBT is an extreme stress test that goes beyond the load that any typical application would impose.
It’s also important to note that Intel processors do not “break” when the temperature hits 100C, but rather throttle their clockspeed and voltage to reduce core temperatures. You’d have to really push an Intel processor for a very long time before it was damaged due to heat. That being said, we’d advise that you monitor your CPU’s temperature upon first assembling or modifying a PC to ensure that the heatsink is properly attached. As we demonstrated, it’s possible to attach an Intel cooler without it being fully locked in, and under these circumstances, processor damage is more likely.
The smallest of the aftermarket coolers we tested was the Noctua NH-L9x65. We’ve done a separate in-depth review of this cooler, and in short, it really comes into its own when used with the low-noise adapter included with the cooler (and all Noctua coolers, as a matter of fact). In this round-up, we chose to run it at full speed to give it a better chance against the bigger coolers, but in all honesty, it’s a different product for a different application. Downdraft coolers are naturally at a disadvantage versus tower coolers, and the small proportions of the NH-L9x65 mean it’s never going to win in a head-to-head battle with its bigger cousins. But the fact that it will fit in every micro ATX case, and nearly every mini-ITX case, makes it one of the very few coolers we can recommend for these applications without hesitation. Many downdraft coolers are not only much taller, but also have a much larger footprint, making them a risky proposition in an ITX system. Note that the NH-L9x65 isn’t actually Noctua’s smallest cooler; that would be the NH-L9i, which is the cooler you’d want to use for ultra-slim systems that can’t accommodate the 65mm height of the NH-L9x65.
 Next on our list in terms of size is the Noctua NH-U12S. If there were one aftermarket cooler that we would have no hesitation recommending to every PC enthusiast, the NH-U12S would be it. Built to Noctua’s exacting specifications, the NH-U12S is nearly silent at idle and still relatively quiet when pushed to the max, while being by far the easiest tower cooler we’ve ever had the pleasure of installing. At just 158mm tall, it will also fit easily into most mid-sized ATX cases. Plus, the NH-U12S works extremely well, better in fact than every other 120mm cooler we’ve tried in the past. It even includes a second pair of fan clips to allow you to attach another NF-F12 fan, turning the NH-U12S into a true ultra-high-end cooler. Now, there’s just one fly in the ointment keeping the NH-U12S from being flat-out perfect, and that’s price. It’s not only more expensive than every other 120mm-based cooler, it’s also more than many 140mm-based models. It even approaches the price of the Noctua NH-U14S, which is essentially the 140mm version of the U12S. That being said, the elegance, broad case and motherboard compatibility, and best-in-class fan of the NH-U12S make it worth paying for, as long as you don’t need the absolute highest-capacity cooler out of the box.
Next up is the impressive Thermalright Macho Rev. B. Thermalright keeps a low profile in the PC building community, but it’s been busy churning out absolutely killer CPU coolers for a long time, and the Macho Rev. B’s combination of stellar performance, impressive low-noise, low-RPM operation, and competitive price make it a true winner. It’s actually the cooler we’d personally choose to run in our system among the ones we tested, based in part on its eye-pleasing style. That being said, we weren’t huge fans, no pun intended, of the slightly raspy tone given off by its 140mm fan, even at low speeds. In addition, the installation process was fairly challenging, due to the cooler’s massive bulk and the slightly awkward bracket and fan clip design. Still, in terms of bang-for-the-buck, you simply won’t find a better cooler, although the Macho’s cousin the Thermalright True Spirit 140 Rev. A might offer a better overall package when factoring in ease of installation and system compatibility.
Moving on to the Noctua NH-D15, our feeling is that it’s a very niche product. It can compete with 240mm liquid coolers, and that’s probably the target Noctua was aiming for when it designed the NH-D15. Noctua doesn’t make liquid coolers, so going with really big air was its only option for keeping up. But here’s our take: Noctua’s operating a bit out of its comfort zone with the NH-D15. When equipped with dual-fans, which spin up to a very high 1500RPM, the D15 was simply being run ragged, abandoning the quiet, composed behavior that Noctua is known for (note, however, that as with all Noctua products, low-voltage adapters are supplied in the box, which would limit the maximum speed to 1200RPM). It was also somewhat difficult to install, and proved to be incompatible with tall RAM heatsinks, a major faux pas for a company that prides itself on broad compatibility. On the flipside, we were very impressed by the NH-D15 when using just its single mid-mounted fan (at least when mounted horizontally), and in fact this would be our preferred setup if we were to choose one. But Noctua only sells the NH-D15 with two fans, which pushes the price up towards $100, and that, to be frank, is just too high for an air cooler. Big air has its place, but we don’t think it should be forced to compete with high-end 240mm liquid coolers. Each has its advantages, and one major advantage of air cooling is simplicity, which typically also means lower cost. [Update: Note that after we published this article, Noctua reached out to let us know that the single-fan NH-D15S will soon be released for $79.99!]
Finally, we have the Corsair Hydro H100i. Among the most popular 240mm liquid coolers ever released, it serves as a great demonstration of the power and the promise of liquid cooling. By separating the heatsink from the radiator, the exhaust can be moved to the edge of the case environment, while in the process providing additional case cooling. Versus air-cooled towers, liquid coolers are also less likely to interfere with other system components and won’t cause damage during transit, as most of the weight is bolted directly to the case, rather than the motherboard.
We predict that one day, all CPU coolers will be liquid coolers, because they just make so much sense. In the here and now, however, there’s one big problem: pump noise. Moving heat (via a liquid medium) from one location to another requires a lot of energy, and that means noise. Unfortunately, with very rare exceptions, today’s liquid coolers do not use variable-speed pumps, and so that heavy liquid is being pushed around all the time, even when cooling requirements are minimal. Indeed, the H100i’s noise level is deeply disappointing at idle, but strap it to an overclocked system, select the software-controlled “Quiet” mode in CorsairLink, max your CPU out in your favorite application, and experience the future. Able to out-compete even the most powerful dual-fan 140mm air cooler on the market, despite producing noise levels below most 120mm single-fan air coolers, the H100i was Corsair’s first shot at a dream cooler, and the new H100i GTX is no doubt even closer to the dream fulfilled.
So, to wrap up, here’s what we hope you gleaned from our in-depth investigation of CPU cooling:
- When using a stock-clocked processor and typical computing applications, the stock Intel cooler is always sufficient, and relatively quiet too.
- To gain some overclocking headroom, a good 120mm tower cooler is your next step up, with 92mm or 120mm downdraft coolers a fallback in slim systems. Be wary of coolers that come in under $25 – most will barely outperform the Intel cooler, and will likely be louder as well.
- For the perfect combination of overclocking support and ultra-low noise, there’s no better option than a low-RPM 140mm cooler. Despite costing just a bit more than 120mm coolers, these models really operate in a different league. But keep in mind that installation will always be a bit more difficult, their width means the first motherboard expansion slot is often blocked (which will spell doom for micro ATX systems), and at over 160mm tall, they will not fit in narrow ATX cases. And don’t try to get around space issues by orienting a 140mm cooler to exhaust towards the top of the case. The optimal installation method is always to have the cooler blow towards the back of the case. If that won’t work, use a 120mm cooler.
- Finally, if you’re looking for the ultimate in high-voltage overclocking, with noise levels being only a secondary concern, you must go to dual-fan liquid cooling. We didn’t test a single-fan model, but to be honest, they aren’t worth bothering with unless your case can’t accommodate a double-wide radiator. The 240mm models (as well as the even larger 280mm and 360mm models) are where it’s at in terms of liquid cooling. They’re often just $10-20 than comparable single-fan models, despite having twice the cooling capacity. Another advantage of liquid coolers is that they aren’t affected by hot-running video cards. In fact, it’s the only type of cooler we recommend for use in Crossfire and SLI gaming systems utilizing open-air rather than blower-style video card cooling.
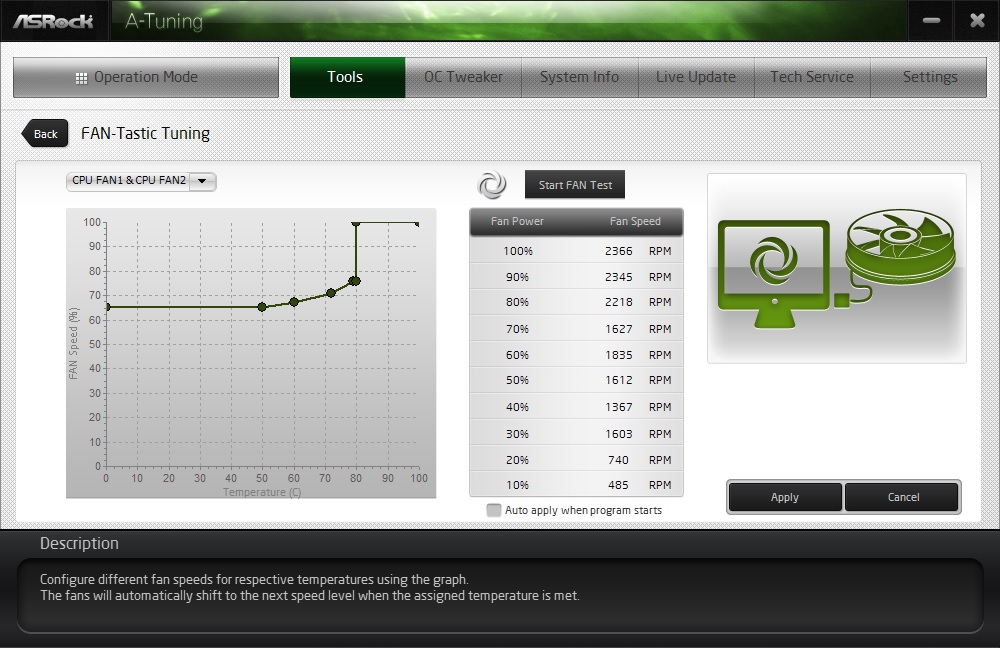
One last tip: running any CPU cooler at maximum RPM all the time is downright silly, and unfortunately, many CPU cooler reviews only test this scenario, or else show fixed, arbitrary RPM settings. Using default motherboard PWM control is the easiest way to set up your fans, but in case this doesn’t turn out to be as optimal as you might wish, loading up your motherboard’s software controls is always a great option, and one we highly recommend to dial in just the right balance of noise and performance. A screenshot below shows the fan controls provided by our Asrock test board. They can be freely adjusted by the user to allow for ultra-low RPM operations at low temperatures, with higher RPMs when necessary. In this example, we set the fan to max out at 80°C, but you can choose any target you feel comfortable with.
All told, we put over 40 hours into writing this article, which included product installation, photography, benchmarking, charting, and the drafting of our analysis. As with our past in-depth guides, our goal was to provide our readers with a comprehensive but easy-to-understand analysis of a complex topic. We hope you’ve enjoyed what we came up with, and more importantly, that you’ve learned something new to apply the next time you’re ready to build or modify a PC.
Update: After we originally published this article, we put together a CPU Cooler Buyer’s Guide, which is updated on a regular basis. If you’re looking for our current top picks at every pricepoint, you’ll definitely want to check it out!