Assembling an AMD Ryzen PC (2017)
Introduction
 Here at The Tech Buyer’s Guru, it’s our goal to make building PCs easier for everyone, from first-time builders to veterans. And when a new platform comes out, everyone can feel like a beginner again, for better or for worse. So it is with AMD’s new Ryzen platform, which may well revolutionize the way PC users think about processors. But first, we have to learn to build a Ryzen PC, which is what this guide is all about! Note that if you need help navigating basic PC building techniques that apply to all systems, check out our Guide to Assembling a High-End PC (2017), which goes into a lot more detail on case setup, cabling, and cooling.
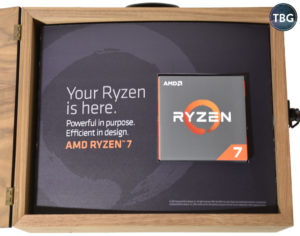
Truth be told, our Ryzen guide was in the making for quite some time, and unfortunately got a bit sidetracked due to component failure. Yes, indeed folks, this really does happen, and it happened with gear provided to us directly by AMD, no less. After we met with AMD back in January 2017 at CES in Las Vegas, we provided some fairly detailed coverage of what was in store with Ryzen. That may have encouraged AMD to send along a sample, which you can see in the photo above. Trust us, we didn’t ask for it! As regular readers of TBG know, we never ask for CPU or GPU samples, because we firmly believe that requesting samples of performance-related items like CPUs and GPUs limits journalistic freedom and potentially taints the entire evaluation. No cherry-picked gear for us! Funny, then, that the $250 Asus Crosshair VI Hero that AMD provided us, which happens to be Asus’ premier X370 board, failed out of the box.
After spending days messing around with our newly-built system and failing to receive any response from AMD when we notified them of the issue, we took it upon ourselves to make the best of the situation. That meant, of course, that we’d go out and pick our own motherboard to test the potent Ryzen 7 1700 CPU that AMD sent along with the defective Crosshair VI. Luckily, the Gigabyte GA-AB350-Gaming 3 that we selected worked perfectly from the moment we pressed the power button, and our positive experience with it meant that we could go ahead and publish this guide, and more importantly, recommend Ryzen to our readers.
With that being said, here’s the full parts list for this build:
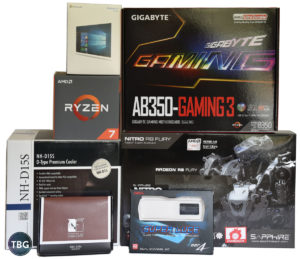
- CPU: AMD Ryzen 7 1700 (thank you to AMD for providing this review sample)
- Motherboard: Gigabyte GA-AB350-Gaming 3
- Video Card: Sapphire Radeon R9 Fury Nitro+ 4GB
- SSD #1: Samsung SM951 256GB
- SSD #2: Crucial MX300 525GB
- RAM: GeIL 2x8GB Super Luce DDR4-3000
- Case: Thermaltake View 31 TG RGB
- CPU Cooler: Noctua NH-D15S (thank you to Noctua for providing this review sample)
- CPU Cooler Adapter: Noctua NM-AM4 (thank you to Noctua for providing this review sample)
- Power Supply: EVGA Supernova G2 850W
- Operating System: Windows 10 Flash Drive
As mentioned above, our Asus ROG Crosshair VI Hero failed out of the box, but it wasn’t a catastrophic failure, which made it all the more vexing. Upon our initial attempts at power up, the system would hang at the Windows install, so we used a tried-and-true approach: booting with one stick of RAM in the second slot. This did the trick, but as it turned out, the problem was fairly serious. After much trial-and-error, we discovered that the board’s B channel was completely dead. The system would get a few seconds into the boot process with a stick of RAM in either B slot as long as there was also RAM in an A slot, but as soon as the system started addressing both slots, it would hang. Furthermore, even with one stick of RAM in an A slot, we found frequency and module support was incredibly limited. What a headache!
Long story short, once we decided to ditch the Crosshair and switch it out for the much less expensive (and infinitely-less defective!) Gigabyte B350 board, we also decided to find RAM that would be guaranteed to perform as spec’d. Our GeIL 2x8GB Super Luce DDR4-3000 offers up some very rare traits: it’s made up of single-sided, single-rank DDR4-3000 8GB sticks. On the Ryzen platform, these characteristics are prized, because the memory controller is unusually sensitive to extra loads put on it. We knew going in that Ryzen platform has limited multipliers available to users, and 3000MHz isn’t one of them. Our Gigabyte motherboard automatically parsed the XMP Profile (which is an Intel standard) to set our DDR4-3000 CAS 15 RAM to DDR4-2933 CAS 16. That was good enough for us, and we left it as is without further tweaking. Ryzen’s growing pains haven’t been any more obvious than in this area, but the good news is that things are finally starting to get ironed out. Even so, we’re going to insist that our readers consult each motherboard’s Memory Support List (sometimes referred to as a QVL) to select memory, and our PC Buyer’s Guides will only include such memory for Ryzen-based system.
There was another issue that we had to navigate in setting up a Ryzen system, and that was the matter of CPU coolers. AMD told us back in January 2017 that it had partnered with Corsair and Noctua to bring out highly-capable coolers that would be ready to push Ryzen to its limits at launch. We didn’t understand the significance of that at the time, but in retrospect, it’s become brutally clear that AMD in fact didn’t have enough aftermarket coolers in the pipeline that would work with the new AM4 socket. This was a critical error, particularly in light of the fact that the highest-end Ryzen CPUs didn’t include stock coolers. Buyers of the $400 Ryzen 7 1700X and $500 Ryzen 7 1800X could very well have gone weeks after launch without the ability to turn on their systems for want of a cooler. We watched in amusement as the cooler market turned upside down, with ancient Corsair Hydro coolers that included AM2-specific mounts selling at huge premiums, as AM4 was made backwards-compatible with these older mounts. Alas, most coolers didn’t have the necessary hardware in the box, and we were lucky to get an AM4 kit direct from Noctua. Lucky in more than one way, as Noctua’s entire supply of AM4 adapters in the retail channel dried up within a day of Ryzen’s March 2 launch.
Of course, no AMD build would be complete without an AMD Radeon GPU, and so we pulled out our R9 Fury Nitro+ from Sapphire. As it happens, upon its release, this video card was the fastest air-cooled Radeon ever, and it’s held that title for over a year. AMD’s long-awaited RX Vega, arriving at the end of Q2’17, will finally relieve the Fury of its title, but that kind of longevity speaks volumes both to the Fury’s potency and the delays that have beset Vega.
There are several components that we’ve reused from other builds, and we’re not going to dwell on their specifics for purposes of this guide. These include the striking Thermaltake View 31 case, the always-reliable EVGA Supernova G2 850W power supply, which has lived many lives for us here at TBG, and a couple of high-quality SSDs, including the now-venerable Samsung SM951, the progenitor of the ground-breaking 950 Pro. With the release of Ryzen, AMD finally offers broad support for PCIe-based solid-state drives, so we thought it worthwhile to put this feature to the test.
OK, with all that out of the way, let’s move on to the building process!
Installing the CPU
We start with the CPU installation, and it turns out Ryzen’s AM4 socket is different enough from Intel’s most recent products that we had to dig into the manual to make sure we were doing this all right. First point of confusion: the Ryzen CPU installs sideways. We really couldn’t believe that AMD would have its board partners orient the socket in such a fashion, so we checked and checked again to make sure this was indeed the intended approach. We’re sure that more than a handful of users are going to try to install their Ryzen CPUs with the Ryzen branding right-side up. Luckily, the CPU’s pins won’t allow the CPU to drop into the socket in that orientation, but there’s still a chance that they can be accidentally bent in the attempt. Note that the AMD pin design is the reverse of Intel’s: the pins are on the CPU, rather than the socket, and luckily they are a lot less easy to damage than Intel’s flexible socket pins.
Update: To help our readers get comfortable with the AM4 socket, we have created a step-by-step video showing you exactly how to install a CPU in a modern AMD-based system!
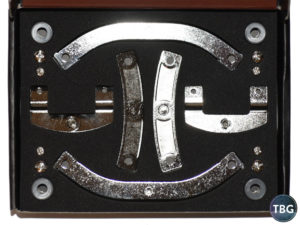
Don’t have patience for a whole video? No problem – just study the photos below:
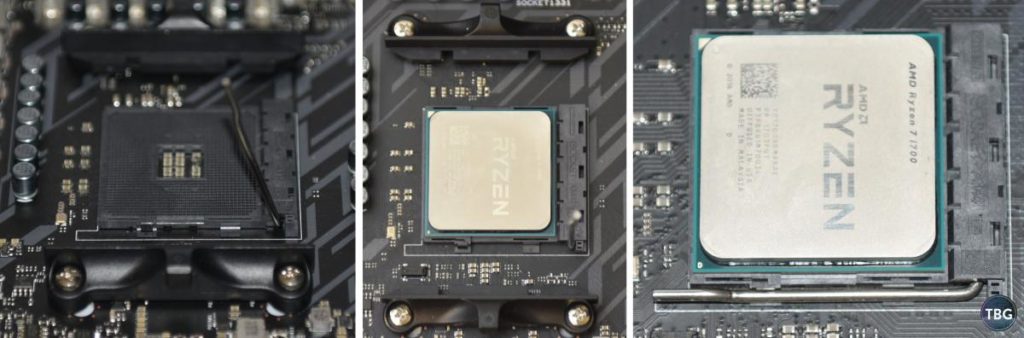
In the photos above, you can first see the locking bar in the unlocked position, and then you see the Ryzen CPU dropped into the socket. In the last photo, the bar is dropped down into the locked position. Interestingly, this lock isn’t so much a lock as a switch; the bar simply slides the CPU into position. As we found out the hard way, it doesn’t actually lock the CPU down: when we went to swap out our cooler, the CPU lifted right up out of the socket with the cooler, having adhered to its base as a result of the bond formed by the thermal paste applied to it. To prevent this, you need to twist the cooler off to break the seal between it and the CPU heat spreader.
Speaking of CPU coolers, let’s dive into how that installation works on Ryzen.
Installing the CPU Cooler
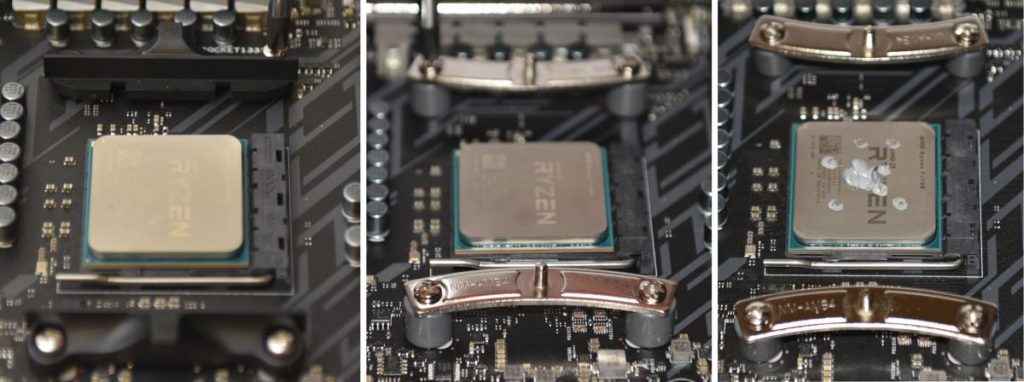
What you can see in the first photo above is our CPU locked into place, flanked on either side by the stock AMD heatsink mount. Because AMD didn’t send along a sample of its Wraith cooler, we had to go aftermarket, but luckily Noctua had set us up in advance of the Ryzen launch with its best gear. In place of the AMD mount went Noctua’s new NM-AM4 conversion kit, shown below, which as with all Noctua products comes packaged beautifully.
To use the Noctua mount, we had to remove the stock AMD mount. This is a process Intel users will not be familiar with, as there is no removable mount on the Intel platform; cooler manufacturers must provide it themselves. We have to applaud AMD for providing the mount, as it allows CPU cooler installation without the need to access the back of the motherboard. And just like the standard AMD AM4 mount, the NM-AM4 screws right in, without requiring access to the back of the motherboard. Strangely, though, that the screws were a little longer than we expected and stuck out the back of the motherboard by a few millimeters. No harm was done, but we wonder if those screws might touch the back panel in very compact cases (e.g., in mini-ITX systems). Once the bracket was in place, we applied Noctua NT-H1 thermal paste, using a bit more than we have with Intel’s Skylake and Kaby Lake CPUs due to the larger heat spreader on Ryzen.
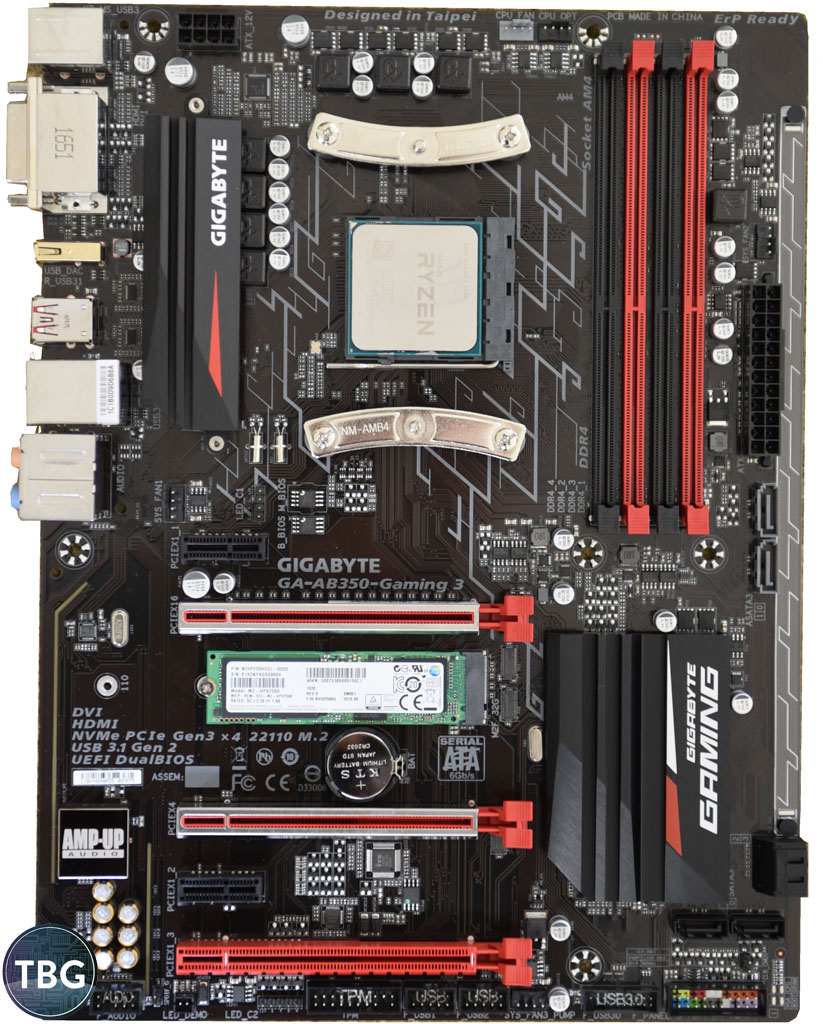
Below you can get the full picture of what a Ryzen processor looks like mounted in our Gigabyte GA-AB350-Gaming 3, with a bonus view of our Samsung SM951 PCIe drive installed in the PCIe 3.0 x4-compatible M.2 slot.
![]() Finally, we lower the big Noctua NH-D15S into position, affix the two spring-loaded screws, and attach the 140mm fan. Note that we also tried Noctua’s premier NH-D15 SE-AM4, which comes pre-packaged with the AM4 mount, but we found that it was simply too big. Unlike the NH-D15S, it has two fans, and its front-mounted fan blocked our RAM slots, requiring the fan to be raised way up, and even then it meant the sweet white LEDs on our GeIL RAM (which we’ll show off on the next page) couldn’t be seen. Even worse, it nearly covered the second PCIe slot (the first one was completely covered), meaning it was way too close for comfort to our Radeon R9 Fury video card. We decided to fall back on the NH-D15S, which features an ingenious offset to shift it upwards on the motherboard and away from the PCIe slots. It comes with just one 140mm fan, but that’s honestly plenty. The second fan doesn’t add that much performance to this cooler, as we found in our Noctua 140mm Cooler Shootout. Just keep in mind that the NH-D15S is not being sold as an AM4-specific model, so you’ll need the Noctua NM-AM4 kit to use it.
Finally, we lower the big Noctua NH-D15S into position, affix the two spring-loaded screws, and attach the 140mm fan. Note that we also tried Noctua’s premier NH-D15 SE-AM4, which comes pre-packaged with the AM4 mount, but we found that it was simply too big. Unlike the NH-D15S, it has two fans, and its front-mounted fan blocked our RAM slots, requiring the fan to be raised way up, and even then it meant the sweet white LEDs on our GeIL RAM (which we’ll show off on the next page) couldn’t be seen. Even worse, it nearly covered the second PCIe slot (the first one was completely covered), meaning it was way too close for comfort to our Radeon R9 Fury video card. We decided to fall back on the NH-D15S, which features an ingenious offset to shift it upwards on the motherboard and away from the PCIe slots. It comes with just one 140mm fan, but that’s honestly plenty. The second fan doesn’t add that much performance to this cooler, as we found in our Noctua 140mm Cooler Shootout. Just keep in mind that the NH-D15S is not being sold as an AM4-specific model, so you’ll need the Noctua NM-AM4 kit to use it.
The final step was to install the video card. As there’s nothing unique about installing a video card on an AM4 board, we’ll just take the opportunity here to discuss the difference between X370 and B350 boards when it comes to handling video cards. The X370 chipset offers up two PCIe 3.0 x16 slots, which can support dual video cards in either SLI or CrossfireX running at PCIe 3.0 x8 speeds. The B350 chipset, on the other hand, provides only one PCIe 3.0 x16 slot, with the other full-size slot being of the PCIe 3.0 x4 variety. This will support CrossfireX at reduced speeds, but Nvidia does not allow such arrangements to be certified for SLI use, so SLI is out of the question on the B350 chipset. As we’re testing just a single Radeon-based card, neither of these limitations were of concern to us in choosing the well-priced B350 board we purchased as a replacement for our defective Asus X370-based board. Keen observers will note that the Noctua cooler pictured above is actually mounted on the Asus ROG Crosshair VI Hero. Yes, we really did go through the painful process of testing this board only to find that it had a failed memory channel!
We want to end the discussion of the build process with one more important note related to graphics: you will find that most AM4 motherboards have video output connectors, but Ryzen CPUs do not have built-in graphics processors. These outputs will therefore be non-functional when used with any Ryzen CPU. This is not a massive goof up on the part of motherboard manufacturers; in fact, the boards are designed to do double-duty, with support for AMD’s forthcoming next-gen “APUs”. This different category of chip combines Radeon graphics into the CPU. With these processors, the motherboard outputs will of course be fully functional.
OK, now we’re ready to get the guts of the system installed into our case. Next we’ll see how it all comes together.
System Setup
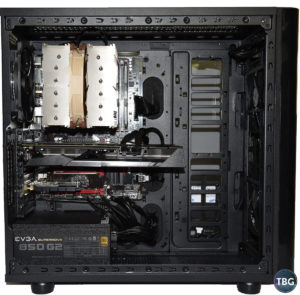 In the photo here, you can see our completed AMD system, ready to run. For our initial Ryzen testing, we did not choose to perform comprehensive overclocking tests, but we know plenty of other review sites have pushed their Ryzen chips to their ragged edge, running 1.45 volts through them to try to exceed 4GHz. Our two cents on all of this is that’s simply ridiculous. AMD itself has stated that 1.35V is the long-term limit, and from our point of view, people who spend their hard-earned money on PC gear probably want to back off the manufacturer-specified limit just a touch to ensure that their hardware actually lives a nice long life.
Frankly, we’re pretty ticked off that reviewers who got free gear decided to benchmark Ryzen at 4.0GHz+ using 1.45V and publish these as legitimate performance metrics. They are not, because those press samples are going to be degraded in no time flat, but the reviewers won’t give a darn because they didn’t pay for their CPUs. Well, as we indicated on the first page of this review, we didn’t pay for ours either, but that doesn’t mean we’re interested in performing suicide runs on our CPU, nor are we interested in telling our readers to do so. Our initial impressions are that most Ryzen chips should hit 3.8GHz with under 1.35V, and that is what most Ryzen owners should have in mind as a reasonable goal (ours runs at 3.75MHz with under 1.2V, which is so cool and quiet that we’re not going to be running it any faster!).
As for RAM, we took full advantage of our GeIL DDR4-3000 kit, which runs at 2933MHz on the Ryzen platform. The available frequencies when using Ryzen are 1866, 2133, 2400, 2666, 2933, and 3200, and any RAM that falls in between these speeds or above will be downclocked, as was our DDR4-3000. We had no problems at all from our very first cold boot at 2933MHz on our Gigabyte GA-AB350-Gaming 3 motherboard. As we stated earlier, you should consult the motherboard manufacturer’s website to find the list of compatible memory before taking the leap into a costly set of RAM sticks, as many kits that work perfectly on the Intel platform will not work on Ryzen, even at slower speeds. Another thing to keep in mind: AMD has published guidelines that suggest that the best stability is reached using just two sticks of single-sided, single-rank RAM, and that moving to four sticks, double-sided, or double-rank RAM will limit the frequency at which RAM can run. Again, consult the motherboard manufacturer websites for help on this, because they’ve done the hard work of figuring out which kits will actually run at which speeds in dual- and quad-stick arrangements. Note, for example, that when we tested Corsair’s stunning 4x8GB Vengeance LED DDR4-3000 kit in this system, it would run at DDR4-2933 with two sticks, but only at 2133MHz with four, despite being single-sided RAM.
By the way, for what it’s worth, we were able to take our Radeon R9 Fury from its factory-overclocked 1050MHz/500MHz state all the way up to 1120MHz/575MHz using the Sapphire Trixx software suite. That allows it to perform better than even a liquid-cooled Fury X, while remaining entirely silent. In fact, the cooler on the Sapphire R9 Fury Nitro is the finest air cooler we’ve ever tested, and was clearly overbuilt. While Sapphire doesn’t produce Nvidia-based cards, this cooler would likely do wonders if it could be strapped to a GTX 1080 Ti! We look forward to seeing what Sapphire and other AMD board partners can do with the upcoming Vega RX GPU.
Final Thoughts
 We are really excited that there’s finally renewed competition in the CPU arena. Anyone who’s been following this market since the dawn of the 2000s knows that this isn’t the first time AMD has put the screws to Intel. AMD’s pioneering dual-core design proved that there really was value in moving past the “megahertz race” that Intel won with its absurd 3.73GHz Pentium 4 Extreme Edition released in 2004. The dual-core Athlon put that and all other Pentiums to shame, despite much lower clocks, and that’s because cores really did matter. Alas, ever since Intel leapfrogged AMD in 2006 with its revolutionary Core 2 Duo, this has been a one-horse race.
Thankfully, AMD’s Ryzen offers something new and different, and will no doubt push Intel to work a bit harder to offer value to the consumer. It feels a bit like it’s 2004 all over again, with AMD offering potent six-core processors for the same price or less than what Intel charges for a quad-core. Yes, we’re aware that the Ryzen has its weaknesses (most notably games), but we’ve also done enough game benchmarking over the years to know that game engines are taking ever-greater advantage of core counts. We believe that in the near future, most games will in fact perform better on Ryzen than on like-priced Core i5 processors.
We hope you’ve found this guide useful… perhaps it’s even convinced you to make your next PC a Ryzen PC! Note that while we tested the Ryzen 7 1700 eight-core CPU, we think the best picks of the Ryzen litter are the six-core models, which offer a lot of computing power for the price, higher out-of-the-box clocks, and the same overclocking limits. As always, to see our latest system recommendations at every price, check out our Do-It-Yourself PC Buyer’s Guides, updated on a monthly basis with all the latest and greatest enthusiast gear!