Assembling a Basic Intel-Based PC (2013)
Introduction
![]() Welcome to The Tech Buyer’s Guru Guide to Assembling a Basic PC! We’re not just going to tell you how to build your own computer, we’re going to show you how, every step of the way!
Welcome to The Tech Buyer’s Guru Guide to Assembling a Basic PC! We’re not just going to tell you how to build your own computer, we’re going to show you how, every step of the way!
We purchased an entire system’s worth of parts just to illustrate for our readers all the steps and potential pitfalls that come with building a system. By letting you in on our thinking every step of the way, we believe you’ll learn a lot about building your own system. Part I of this guide focuses on how to select the right parts to meet your needs while ensuring that they’ll work perfectly together.
We’re basing this system off of our $500 Home Office PC Builder’s Guide as published in April 2013 (the $500 guide is updated regularly, so please flip over to it for our current parts recommendations). The parts list and our explanation for each part is shown below. We’re providing links to the manufacturer websites, so you can see the specifications, download drivers, or review support information, and we’re also providing links to the stores where we purchased the items. Note that we waited for all the best deals (which is what we recommend you do), so it’s unlikely all of the prices listed below are current.
Once you’ve read how we picked all our parts, flip to the next page of the article, where we step through the building process.
Step 1 – Determining Your Budget
The first thing you need to do as a computer builder is determine the budget within which you are operating. Just as if when you are buying a car, a TV, or a bucket of paint, there are alternatives available at a wide variety of price points, so rather than get overwhelmed with an open-ended budget, it’s best to have in mind a general sense of what you want to spend overall. When building a computer, there’s a lot of room to tweak certain component choices to meet your particular needs, so even within a given budget, there are a number of different systems we can build.
When selecting the components for this article, we decided we wanted as functional a computer as possible while staying within a $500 budget.
Step 2 – Assessing Your Needs
A computer can allow you to do a lot of things. First there are the basic tasks: surfing the web, checking e-mail, writing a document, or editing photos in a basic photo editor. For these tasks, just about any computer will do, although the user experience will be slightly different, of course, depending on the speed of the system. If you want to do sophisticated photo/video editing or want to play the latest video games, you’ll quickly run up against the limits of a system in the $500 range. Thus, you may have to return to Step 1 if you realize you just can’t do what you want within your original budget. Maybe that means waiting a few months until you have a bit more money saved up or until prices drop. Keep in mind, though, that prices rarely drop more than about 25% a year for full systems of equivalent performance. So you could be waiting a while if you want a system that will do everything under the sun for $500!
We decided to target this sample build at a user who just wants a basic home office computer that can also serve Home Theater PC duty. We also want something that’s quiet, looks good, doesn’t take up too much space, and will offer a little room to grow. Read on to find out what we came up with!
Step 3 – Buying the Parts
What you’ll see below are the parts we decided on based on a $500 budget and our intended usage pattern. In some cases, the choices were as plain as day, while in other cases, it honestly took us a few days of reviewing specifications and looking at professional and user reviews, when available, to pick the parts we ended up with. This is the same process you might go through (although hopefully you’ll use our many Builder’s Guides as a reference!), and we think letting you in on our thought process will help you consider your own computing needs.
Processor (CPU): Intel Core i3-3220 Dual-Core
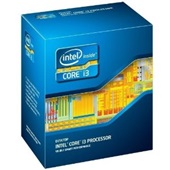 We wanted a CPU that could run basic tasks very quickly, but that would also have enough horsepower to allow for watching HD videos, running multiple tasks in the background, and maybe even a bit of gaming. At the same time, we wanted something very efficient, because for the average user, power bills may be just as important as raw speed.
For the tasks listed above, we believe Intel has the best solutions right now. While we like some of AMD’s budget offerings for midrange gaming machines, we don’t think AMD CPUs have the right combination of speed and energy efficiency in everyday tasks. So then it came down to an Intel vs. Intel battle. Interestingly, Intel keeps a pretty strict division between its various processor classes. Dual-cores start around $50, dual-cores with the ability to emulate quad-cores in some tasks usually start at $120, and true quad-cores typically sell for $180 and up. We knew $180 was going to eat through too much of our budget, but we also knew that operating systems and applications are getting better and better at using multiple cores, so we wanted something that wouldn’t feel obsolete next year.
We came to the conclusion that there isn’t a better all-around CPU for your money right now than the Intel i3-3220. That will change sooner or later, but with a $500 budget, this is the CPU you want. It features two CPU cores running at a fast 3.3GHz, along with Intel’s proprietary Hyperthreading technology, which allows each core to work on two threads simultaneously, emulating a quad-core. This allows the i3-3220, to outperform much more power-hungry quad-core CPUs in some cases. It also includes a built-in Intel HD2500 graphics core, allowing it to display all manner of video without issue. It can even play many games comfortably, although for newer games, an add-on graphics card, which we aren’t including in the budget, would really be necessary. All this, and it just sips power, using a maximum of 55 Watts under full load. Because it runs so efficiently, the small included Intel heatsink and fan assembly will be just fine for this system.
Motherboard: ASRock B75 Pro3-M
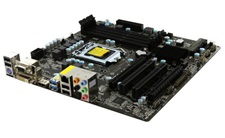
The three most common size classes for motherboards, from largest to smallest, are ATX (7-slot), Micro ATX (4-slot), and Mini-ITX (1-slot). We knew we wanted a Micro ATX (mATX) motherboard, because it would allow for the use of a slightly smaller case without cutting too much functionality. In fact, there are mATX motherboards that offer just about everything you can get in an ATX board, other than the 3 expansion slots that obviously cannot fit. Overall, mATX is a great compromise.
The ASRock motherboard we chose has a lot of great features for the price, but that doesn’t mean it was an easy decision. We considered other options, like the MSI B75MA-G43, but when it came down to it, the ASRock B75 Pro3-M was the clear winner in the $70 and under club. It also happens to be ASRock’s highest-end B75 board. So what were we looking for, and what did we lose by not going to the slightly pricier H77 line, which is a step up in Intel’s chipset hierarchy?
First, we wanted four RAM slots. There’s no quicker way to go obsolete than to run out of memory, and knowing that we were going to equip the system with 4GB of RAM, we wanted an easy upgrade path (i.e., one that didn’t require throwing 4GB of perfectly good RAM out). Second, we wanted at least six rear USB ports (including two USB 3.0 ports), because the four ports that many budget board come equipped with will run out fast. Finally, we wanted HDMI out. While most boards come with DVI, which provides an equivalent digital signal, for home theater PC use, there simply is no alternative to the incredible ease of use of HDMI, which carries both audio and video signals.
What did we lose by not going with the H77 motherboard line, which starts at about the same price as this B75 model? Not much that was going to matter here. H77 provides a potential for ten rather than eight total USB 2.0 ports (although no boards would use them all anyway), two SATA 6Gps ports rather than one, and both Intel RAID and Intel SSD caching, which are advanced hard drive options that weren’t relevant here. ASRock actually one ups most H77 boards with the B75 Pro3-M by adding two additional SATA 6Gps ports, but we assume they aren’t quite as fast as the Intel-provided variety. This B75 board, however, also beats all the H77 boards in its price range with its four RAM slots. Note that we didn’t seriously consider the Intel Z77 chipset, which is the highest-end consumer-oriented Intel chipset currently available. Its only real advantage is the ability to overclock Intel’s >$200 quad-core processors, and we aren’t using one of those, so it really came down to B75 versus H77.
ASRock actually goes and does something a little unexpected with the Pro3-M: it equips it with not only a PCIe 3.0 x16 port, which is the latest video card interface, but also an older PCIe 2.0 x4 port, which is an older, slower video card interface, meaning that the board can in theory support dual AMD graphics cards using AMD’s Crossfire technology. Don’t get your hopes up too high, though – the slower second slot will bottleneck newer cards, and because it’s the last slot on the motherboard, most graphics cards would overhang the board, and in turn not fit in a mATX case. You’d need a larger ATX card to mount a dual-slot graphics card (which most Crossfire-capable cards are).
Note that as with most motherboards, several SATA cables are included. This board comes with two, which happens to be just the number we need for a single hard drive and a single optical drive. Keep in mind that more expensive motherboards tend to include more SATA cables, but you should always check to see whether you’ll need to buy extras.
Memory (RAM): G.Skill Ripjaws Series 2x2GB DDR3-1866
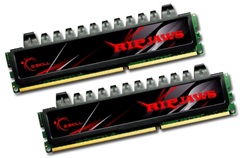
Ok, we admit, we actually bought this RAM way back in 2009, and used it in a previous system. But that’s the beauty of building your own computer – you really can re-use some of your parts, giving them a much longer lifespan than they’d have in a pre-built system that has proprietary components or that can’t be disassembled easily.
This particular RAM set has an aggressive operating frequency of DDR3-1866. Luckily, it will be more than capable of running at the DDR3-1600 level that we view as ideal for this system, but we’ll also see if we can run it at the full DDR3-1866 speed. Note that because the particular RAM kit used for this build is no longer available, we are providing a link to a similar kit currently available for purchase.
With two 2GB sticks, totaling 4GB, this kit is more than sufficient for most common desktop computer activities, and while we’d ideally have 8GB, the recent increase in RAM prices means it’s not quite as obvious a choice. To avoid “planned obsolescence,” we picked a motherboard with four memory slots to allow easy upgrades, as mentioned above, which cost perhaps an extra $5. Well worth it in our book.
Hard Drive: Seagate hybrid hard drive

For storage we went with a value-packed 1TB hybrid hard drive from Seagate, which uses 8GB of solid-state cache to accelerate many operations. Translation: much faster boot and app-launching times!
Now, given that we’re targeting the $500 build pricepoint, we have decided to forgo a solid-state drive (SSD). An SSD would dramatically decrease boot and application load times, but it would also increase our budget by about 20%, while adding a bit of complexity to the hardware and software setup. To learn more about SSDs installation and usage, see our SSD Guide.
Of note, the current sweet spot for capacity per dollar is at the 1000GB (1TB) level, but for most users, that amount of space just isn’t necessary, so we save a few dollars by going with 500GB.
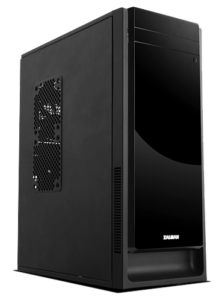
Case: Zalman ZM-T2 Micro ATX Mini Tower
We actually think picking a computer case is the most difficult step in selecting the components for a system. It’s the part you’ll see everyday, which needs to both fit your style and serve your particular needs, and there are a lot of choices out there.
So we looked long and hard for the right case for this build. The case we eventually chose, the Zalman ZM-T2, was so new that when we found it on Newegg, it was listed incorrectly as a full-size ATX case. And that’s an important point, because plenty of buyers could have purchased it and then found that their ATX motherboards wouldn’t fit! Pitfall #1: vendor error! We helped Newegg out by letting them know that the ZM-T2 is in fact a Micro ATX case. It always pays to do a bit of research before buying!
Back on point, we think for 99% of users out there, the mATX form factor is ideal. Four expansion slots is plenty, and mATX allows computer builders to use much smaller cases, since by design, they should be at least 2.4″ shorter. That’s because the mATX form factor has a maximum motherboard size of 9.6″ tall and 9.6″ wide, while ATX is 12″ tall and 9.6″ wide. Knowing that mATX users probably don’t have a need to install a large number of internal components, the case manufacturers ideally can cut space elsewhere. In addition, because mATX motherboards are less complicated than ATX motherboards, they usually don’t even extend to the full 9.6″ width specification. Note, however, that every case manufacturer offering a mATX case should design its cases to accommodate the full 9.6″ x 9.6″ specification for mATX motherboards, and to test that, we’ve purchased just such a motherboard. You’ll soon see how that worked out!
So, why did we choose the Zalman ZM-T2? It came down to the following reasons:
- Price – at $30 after rebate, you simply won’t find many mATX cases from a name brand for less. Zalman is a highly-respected manufacturer of PC cooling components, so they know computers.
- Size – this is where we wanted to avoid another potential pitfall – mATX cases that aren’t much smaller than ATX cases. What’s the point in buying smaller or fewer components if the case is still a monstrosity on your desk? At 16.73″ tall by 13.7″ deep by 6.65″ wide, this case has an incredibly small footprint. While its height is just a few inches shy of the typical ATX case, it’s footprint is similar to some Mini-ITX shoebox-style cases. We like that! In most desktop environments, it’s the width and depth that cause the most space constraint issues.
- Style and Features – we wanted a cheap case, but we didn’t want it to look cheap. Zalman’s slightly cheaper ZM-T1 just didn’t look that snazzy, although it had all the same features. The ZM-T2, with its smooth, glossy front fascia, seemed like it might have the right look for our build. That and the front and top fan mounts were what sold us. Decide for yourself how we did when you see the finished system pictures!
- Ease of Use – it seemed that Zalman put a lot of effort into making the ZM-T2 easy to build and use, particularly with its unusual hard drive mount and cutout for video cards. You’ll soon see if our hunch was correct!
That doesn’t mean the ZM-T2 has it all. Here’s what we knew that we were giving up from the start:
- Front USB 3.0 Ports – at this price point, it’s really hard to get USB 3.0 ports, and knowing that our motherboard would still have rear USB 3.0 ports, we passed on spending more to get them. USB 3.0 is honestly 5x as fast as USB 2.0 based on our in-house testing, but for most uses of front USB ports (plugging in a camera, thumb drive, or smartphones), those transfer speeds just aren’t necessary, particularly considering most devices are still using the USB 2.0 protocol.
- An Even Smaller Form Factor – there are some cases that really make a game of pushing mATX to its smallest extremes. That’s cool, but it usually comes with two drawbacks: cost and ease of use.
Did we give up anything else? We’ll see soon enough!
Power Supply: Corsair CX430M
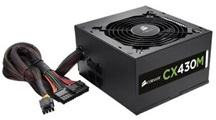
When this model became available, we knew we had to have it. Modular power supplies, like this one, allow the user to remove unused power cables, make building a system so much easier. There’s nothing more frustrating that a mess of cables in your system (well, other than a bluescreen, maybe!). But modular power supplies have historically been much more expensive than their non-modular cousins. Enter Corsair, which is selling the Corsair CX430M, with an ample 430W of power and removable cables, for under $50. That’s a clear win in our book. With enough power to support midrange graphics cards for gaming, four SATA drives, as well as older peripherals, it was a perfect fit for our system.
The beauty of the design is that you, the user, get to pick which cables you need. Corsair supplies more cables than you can actually connect to the unit, but that’s just fine with us – many of the cables are based on older tech, and you don’t need those cables hogging up space in your system.
Welcome to low-cost power supply Nirvana…or so we think!
Optical Drive: LG 24x DVD Burner Model GH24NS95
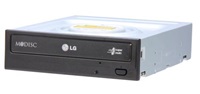
DVD burners are a dime a dozen (well, practically), and we have to admit that we bought this LG model because it was the cheapest available at the time. It didn’t hurt that it had stellar user reviews on Newegg, though. Generally, we tend to prefer LG, Samsung, or Lite-On drives, so we were comfortable getting this inexpensive drive. As a bonus, it offers something called M-Disc, which uses media that purportedly is more durable. We have no idea if that’s true, and honestly, we aren’t going to test it!
Note that while most users don’t use optical drives every day, we think that they are immensely useful once in a while – to install drivers, burn or rip music CDs, or to share photos with friends and family. Since they’re so cheap, we see no reason to risk not having one when you need it, unless you’re building a really small computer, which we aren’t here.
Operating System (OS): Windows 8 64-Bit Full Version (OEM)
Windows 8 isn’t perfect. Many people might actually like to stick with the more familiar (and time-tested) Windows 7. But time marches on, and Windows 8 is the more modern operating system. It’s a bit quicker, a bit more secure, and it even uses a bit less power to run. While the touch-inspired interface design doesn’t translate perfectly to a desktop using an old-fashioned keyboard and mouse, the concept of a desktop that actually has something on it other than a recycling bin makes a lot of sense!
Financial data suggests Windows 8 sales have been a bit of a bust for Microsoft, and rumor has it that Windows 8.1 is just around the corner. Coincidence? Whatever the reason, Windows 8.1 will offer some refinements meant to bring the desktop user experience back to the level of Windows 7, while keeping the great features of Windows 8. So jumping on the Windows 8 bandwagon now probably makes sense.
Total Cost: ~$500
Note that while the prices for the components above were slightly below average market prices, overall, a system similar to the one here should cost less than $500.
Now we’ll see how the build turned out!
The Assembly Process
Building a basic home office computer is something just about anyone can do. All you need is a screwdriver, some patience, and a little bit of ingenuity!
Step 1: Setting Out Your Parts
The first thing you’ll want to do is review all the components you have, making sure everything you purchased is at hand. You probably don’t want to open everything all at once – leave the parts boxed up until you’re ready to install them, or things could get really messy!
Step 2: Preparing Your Case
Because everything needs to fit inside your case, you should take it out first and get a feel for its design before you do anything else. First things first – set the case down on a soft surface, such as a carpet, a sheet, or a towel, and remove the side panel (typically the left side panel). Then look around the case to determine where each of your components will go. Make note of the front panel cables that you’ll eventually need to attach to your motherboard (including the cable for the all-important power switch!). Set out the various screws and other fasteners that the case came with and try to match them up with the illustrations that (hopefully) appear in the instruction manual.
Note that most high-quality cases provide you with all the fasteners you’ll need to install all the typical components, including the motherboard, hard drives, SSDs, video cards, optical drives, the power supply, etc. We encountered an issue right away, however, in that our Zalman case didn’t come with a sufficient number of motherboard setoffs, which are the little “legs” on which the motherboard sits, and into which the motherboard screws are fastened. We had to be a bit creative and decide where we really need the provided standoffs via trial and error. Unfortunately missing parts is a common issue, so check the inventory before you’re knee-deep into your build!
One optional step at this point is to route all the cables from the front panel neatly along the edges or back of the case. You may use twist-ties or other fasteners to keep them together.
Step 3: Installing the Optical Drive

While this step doesn’t necessarily have to come next, it’s often easiest to install an optical drive, like a DVD burner, before anything else is in the case. To do so, you’ll probably need to pull the front panel off the case, which is often secured with plastic tabs. These can be fragile (and yes, we’ve broken them in the past), so it’s best to identify where they protrude into the case and gently push on them while pulling on the panel from the outside. Eventually, the panel will pop off, and you’ll be able to insert the optical drive (which almost always goes in from the front).
This process is illustrated in the photo to the left. You’ll see that the front panel is detached, hanging on only by the front panel cables. The DVD burner here was set into place, and then affixed using screws that came with the case. Many cases have tool-less securing devices that make it very simple, although either way, you’ll likely have to figure out exactly how far the optical drive should be pushed in to make sure it lines up correctly with the front panel. You can adjust it later once you’ve reattached the panel.
Step 4: Installing the CPU
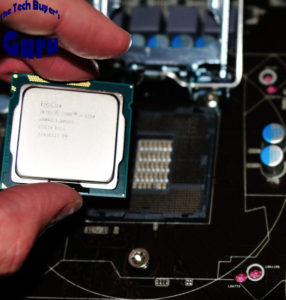
So you passed Step 3 with flying colors – on to the challenging stuff! Installing a CPU is often the step that worries people the most, and for good reason – the CPU is a small and relatively expensive component that looks quite fragile. But installing it isn’t that hard, as shown in the illustrations that follow. Note that this is specific to Intel – the process of installing an AMD processor will vary slightly.
It’s hard to damage a CPU as long as you handle it correctly. Notice how we are holding it by the edges, so as to avoid touching the electrical contacts underneath. We then gently place it into the CPU socket, as shown in the next photo.
 Notice how the tabs on both sides of the socket fit into notches on either edge of the CPU. Also note that a yellow triangle lines up with a white triangle in the lower left-hand corner.
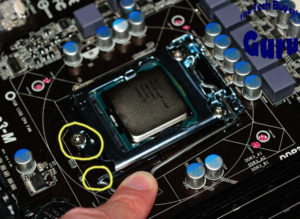
Next comes the scariest part – you need to hook the bracket under the bolt (top circled part), and then lower the locking bar, hooking it under the restraint (lower circled part). It requires a large amount of force, and you might think you’re crushing the CPU when you do it! This is the heatsink/fan assembly, which must be secured on top of the CPU. It comes with thermal interface material (TIM) pre-applied, but always confirm it’s there. To secure it, push down on the four plastic pins until they lock in place.
The last step here is to connect the CPU fan. Your system may not start, or alternatively will issue a warning, if this fan is not connected. Why? Because without the fan spinning, it’s very likely the CPU will overheat, shutting down the system and potentially causing damage.
Step 5: Installing the Motherboard
There are a number of steps that come with installing the motherboard. Let’s start with the easiest step first – installing the rear input/output (IO) shield. This comes with your motherboard, and is custom-cut for the specific ports on the motherboard. You just need to snap it into place, making sure it’s fully inserted or the motherboard won’t sit correctly in the case.
The next step is to install the motherboard standoffs, which are the mounting posts. These are typically gold-colored metal posts on which the motherboard will sit. Sometimes they are pre-installed, but even if they are, you’ll need to make sure they are in the right locations for your motherboard. Hold the motherboard over the mounting area to see if the holes in the motherboard will line up with the posts before you continue to the next step.
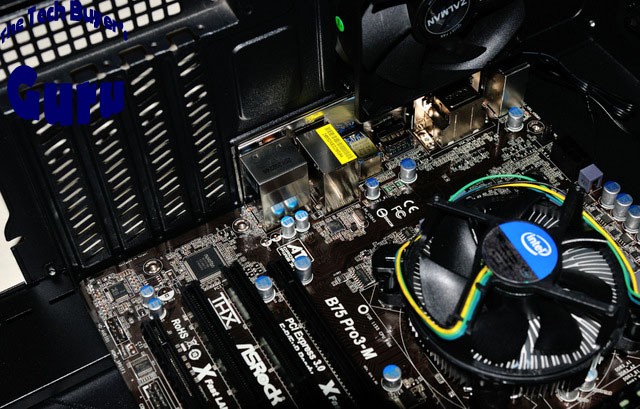
OK, on to the actual motherboard installation. This is when you will feel like you’re getting close to the end – because your system will really start looking like a computer. To mount the motherboard in the case, we recommend you grab it by the CPU heatsink – this is a good test of whether the heatsink is firmly attached (it better be!), and also avoids contact with any delicate componentry on the motherboard. As you lower it down, do so at an angle, focusing on lining up the rear ports with the I/O shield. Then lower the whole board down, taking care to line it up with the mounting posts. You will know it’s in place if you can see the mounting post holes through the screw holes in the motherboard. Once you’ve done that, locate the motherboard screws that came with the case and use them to secure the motherboard to the case. When you’re done, it should look something like the photo below (although if you look closely, you’ll see the motherboard screws have not yet been inserted).
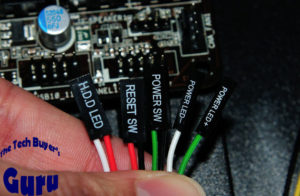
There is one more step before we can say the motherboard installation is complete – we need to attach the front panel connectors – these are typically for the power button, reset button, front audio plugs, front USB ports, and various LED lights. You will probably also have at least one case fan that needs to be connected. What you’ll see below are a closeup of the power and reset button plugs and the LED panel plugs, which are the trickiest to install because they are so small, and the corresponding “headers” on the board can be hard to decipher. They also must be matched up by positive and negative leads. Positive will generally be a bright color, while negative will be black or white.
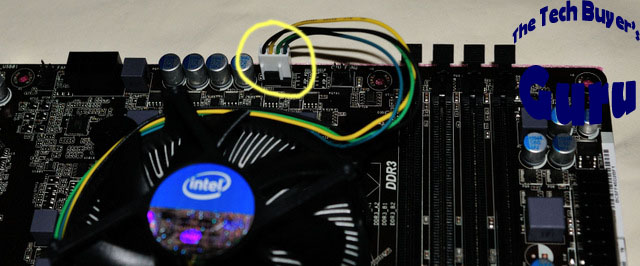
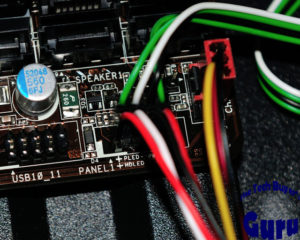 The other connectors, like the front audio plugs, front USB ports, and fans, are fairly straightforward. The front audio plug will be labeled HD_Audio, and there will only be one corresponding header on the motherboard. It will usually be on the left side of the motherboard, either on the lower edge or near one of the PCIe slots. There will probably be multiple USB connection headers, possibly including a single USB 3.0 header (which looks quite different from the rest due to being about twice as large). They’ll all be along the lower edge or right edge of the motherboard. Fan connectors will always be either 3 or 4 straight pins, and the fan connector can only be installed in one orientation due to a tab that will block it otherwise. The fan headers will be labeled chassis fan, power fan, system fan, or some abbreviation of these words. The photos above show a USB header (labeled USB 10_11), as well as a fan header (CHA_FAN1). The red-colored plug in the right-hand picture is a fan plug inserted into the fan header.
Step 6: Installing the Memory (RAM)
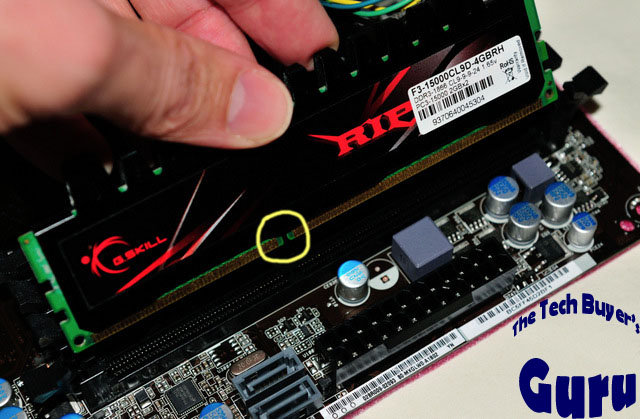
Now’s when we start putting the final touches on the motherboard to make it fully functional. We need to insert the RAM into the motherboard. There will be either two or four RAM slots on most motherboards, although very high-end motherboards can have six or eight. Assuming you are using DDR3 RAM, which has been the most common standard since about 2010, you will see that there is a notch in the RAM stick and a tab in the motherboard that match up so you can only install the RAM in one direction. The notch in the RAM stick is circled below. To insert the RAM, hold it with both hands on either side, and press down straight into the RAM slot. The locking tabs on either side should pop up when the RAM is in place.
If you have more slots than you have RAM sticks, the RAM sticks should be inserted in every other slot, so for instance, the second and fourth slot from the left is typically optimal on a four-slot board. Having two sticks in alternating slots (or having all slots filled) allows for “double-data rate” operation, which speeds things up a bit (but certainly doesn’t double the speed!). Do keep in mind that it’s always better to have an even number of sticks than an odd number of sticks for that reason. If you only have one stick, you should probably use the second slot, but take a look at your motherboard manual to be sure.
Step 7: Installing the Power Supply
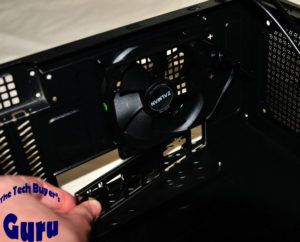
![]() The power supply will typically be mounted in the rear of the case, either at the top or bottom. Note that you should be careful to make sure that the power supply fan is either facing the interior of the case, or if it’s facing the exterior that there is a vent in the case. The power supply mounting bracket shouldn’t let you install it incorrectly, but just make note of the fan orientation to make sure. There will be four screws that attach the power supply to the rear of the case; there may also be a support tab on which the power supply rests if it’s mounted on top (as it would otherwise pivot downwards due to its weight). In the picture here, you can see the power supply has been mounted in the lower rear portion of the case, beneath the motherboard.
The power supply will typically be mounted in the rear of the case, either at the top or bottom. Note that you should be careful to make sure that the power supply fan is either facing the interior of the case, or if it’s facing the exterior that there is a vent in the case. The power supply mounting bracket shouldn’t let you install it incorrectly, but just make note of the fan orientation to make sure. There will be four screws that attach the power supply to the rear of the case; there may also be a support tab on which the power supply rests if it’s mounted on top (as it would otherwise pivot downwards due to its weight). In the picture here, you can see the power supply has been mounted in the lower rear portion of the case, beneath the motherboard.
Pay close attention to the two critical power cables that must be attached to power up your system – the 8-pin (or 4+4-pin) CPU power cable, and the 24-pin motherboard power cable. The motherboard power cable connector is hard to miss due to being the largest connector coming from the power supply, being multi-colored, and having the largest header on the motherboard. The CPU power connector is harder to spot, but will always be somewhere near the CPU, using a 2×2-pin arrangement or a 4×2-pin arrangement. It’s location often leads system builders to forget to connect it, and can also cause cable management problems – we’ve chosen to route the CPU power cable underneath the motherboard rather than across the top of it. This, of course, needed to be done before the motherboard was installed, so you’ll need to plan ahead if you want to do the same thing.
A special note here – one of the reasons the build above is not a total mess at this point is that we used a modular power supply. We actually don’t have all necessary power connectors attached, but as you’ll see later, even when everything is installed, it’s still very neat. We strongly recommend purchasing a modular power supply, even if it costs $10-20 more than an equivalent non-modular power supply. It makes building a system, particularly a compact system, so much easier, and makes the finished product look twice as nice!
Step 8: Installing the Hard Drive
![]()
We’re getting really close to the end now! A word of warning – our Zalman case uses a somewhat unique hard drive mounting system, due to the case’s compact dimensions, but the basic principles remain the same. In one form or another, there will be a 3.5″ drive rail or mount, and in newer cases, there will also be a 2.5″ drive rail or mount for SSDs. In this case, we’ve installed a 2.5″ notebook-class drive, a Seagate SSHD, attached to the lower mount on the drive bracket panel. You can see the bottom of it through the holes in the metal panel.

The two images to the right show you the SATA power connector (the wide connector) and SATA data connector (the narrow connector). You need one of each for every hard drive or optical drive installed. In this build we have one hard drive and one optical drive. Basic motherboards typically come with two SATA data cables, so we’re covered there (but just barely!), and the SATA power cables will be attached to or come in the box with your power supply. To avoid forgetting a cable, make sure to connect the SATA power connectors at the same time as the SATA data connectors. A hard drive communicates with the system through the SATA data connector, but will not function without power, which can only be supplied via a power supply’s SATA power connector.

In the closeup photo to the right are the two SATA connectors used for this build – a black SATA 6Gbps cable for the hard drive in the motherboard’s SATA_0 6Gbps port and a red SATA 3Gbps cable for the DVD burner, in the SATA_5 3Gbps port.
Step 9: The Finishing Touches
All right, we’re just about ready to turn this baby on. Let’s go over the following checklist before we install the side panel onto the case:
- 24-pin motherboard power connector (right side of motherboard) is firmly connected
- 4-pin or 8-pin CPU power connector (upper-left of motherboard) is attached
- SATA power connector to optical drive and hard drive(s) (on drives) are attached
- SATA data connector to optical drive and hard drive(s) (lower-right of motherboard) are attached
- CPU fan connector (above CPU socket) is inserted
- All optional fan connectors (located in various locations) are connected
- All front panel connectors, especially the power and reset buttons (lower-right of motherboard) are connected
- Any required video card 6-pin or 8-pin PCIe power connectors (none used in this build) are connected
- RAM sticks are firmly inserted
- CPU heatsink/fan is firmly attached
So everything’s in place? Great! We’ll close up the system and see if it turns on!
Step 10: Powering On
![]() The next step of the build is to power it on. First, make note of whether there is a power switch on the back of the power supply. It will need to be in the on position to power up the system, but it doesn’t actually turn the system on, it only activates standby. The universal symbols “I” and “0” signify on and off, respectively. Once you’ve confirmed that is in the “I” position and the 3-pin power plug is connected to a wall socket, or better yet a surge protector socket, you’re almost ready to power the system on.
The next step of the build is to power it on. First, make note of whether there is a power switch on the back of the power supply. It will need to be in the on position to power up the system, but it doesn’t actually turn the system on, it only activates standby. The universal symbols “I” and “0” signify on and off, respectively. Once you’ve confirmed that is in the “I” position and the 3-pin power plug is connected to a wall socket, or better yet a surge protector socket, you’re almost ready to power the system on.
You will of course need to connect a monitor, keyboard, and mouse. The monitor may be connected using a variety of connectors, and that will depend on your motherboard or video card (depending on what you’re using for video output) and your monitor. The common connections are VGA (analog), DVI (digital), HDMI (up to 1920×1200 digital with sound), and DisplayPort (ultra-high-resolution digital). Your keyboard and mouse will likely connect via USB. We recommend initially setting up your system with a wired rather than a wireless keyboard and mouse. That way you can eliminate one potential source of problems (and in fact, some wireless input devices may not be detectable by the motherboard before an operating system loads).
OK, now that we’ve covered those steps, it’s time for the moment of truth! Will the system turn on?
If you’ve installed everything properly and reviewed the checklist in the prior step, you’ll probably be fine, but believe it or not, our test system did not turn on with our first attempt. We narrowed it down to a 24-pin motherboard power connector that was not fully inserted, so if you have a similar issue, don’t panic, just go through the checklist again!
If the system powers on, you’ll see a message or graphic come on from your motherboard’s BIOS or UEFI (essentially, a mini operating system), which functions even without an actual operating system installed. You can even interact with it without a hard drive connected. If you see this screen, you know you’re in business!
Step 11: Installing the Operating System
The final step of the building process is installing an operating system. Assuming you were able to get through Steps 1-10, this shouldn’t be too hard. You will notice that booting up without an operating system will eventually lead to an error message indicating a missing boot disk. That’s not a problem (yet). Let’s get a “boot disk” in there.
What you’ll need to do is insert the operating system DVD into the optical drive. Many motherboards will by default search for an optical drive to install the operating system, but if yours doesn’t (and you have the Windows DVD-ROM in the drive), access the BIOS at startup by holding the key indicated on screen, usually F11, F12, or Delete. You’ll need to change the “boot order” so that the optical drive is first.
Once the DVD is accessed, Windows will slowly boot off of it. Don’t worry – this is not a sign of things to come. Your system will be much faster once the operating system is on the hard drive or SSD. You’ll have a few choices here, but assuming this is a brand-new system, you don’t need to select a custom installation – just use the default option. Once you’ve allowed Windows 8 to go through its installation process (selecting a few things along the way like your time zone and user name), you’ll be greeted with something like this:
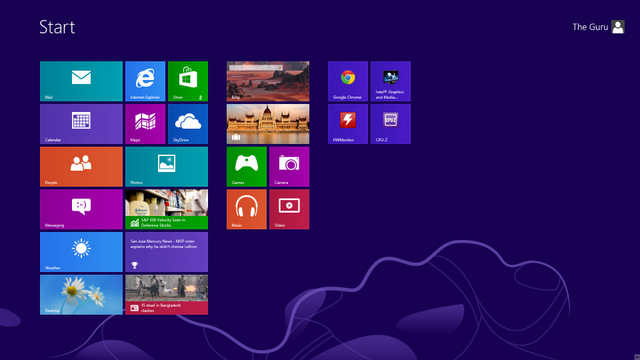
Ta-da! You have a new computer!