Thermaltake View 31 TG RGB ATX Case Review
Pros
Cons
Rating

Introduction
Here at The Tech Buyer’s Guru, we begin every case review by noting that we really like reviewing cases. In fact, we’ve reviewed more PC cases than any other tech product. While big changes in other areas of PC technology get lots of press, the equally-important changes in case design often get overlooked, despite the reality that they might actually have a much greater impact on your user experience. This is doubly true if you intend to keep a case for a while, tweaking, refreshing, or completely rebuilding your PC over time, while sticking with the same chassis. That’s why every year, we aim to review the best new cases at a variety of pricepoints in order to give our readers a “best of” list that keeps up with the times. These top-rated cases end up being the featured picks in our Do-it-Yourself PC Buyer’s Guides.
To keep up with all the latest designs, we spend a lot of time chatting with PC case vendors at trade shows each year (primarily CES and PAX), which gives us insights into what’s here and what’s coming long before these products become top sellers (or also-rans) on real and virtual store shelves. And that’s how we came to review the subject of this article, the Thermaltake View 31 Tempered Glass RGB ATX Case. Thermaltake had a number of new cases on display at CES 2017, and right off the bat, this case was the one we thought had the greatest market potential, and therefore the one we most wanted to review. It combined a proven chassis with beautiful glass panels and patented RGB fans, which made it truly stand out from every other case we’d seen over the past year or so, including those from Corsair, SilverStone, Phanteks, In-Win, and CoolerMaster. When we first saw the prototype on display, a price hadn’t been set yet. Well, now that the View 31 has been released, we know that it retails for $129.99. Folks, this bodes very well for the View 31 TG RGB. Read on to find out if Thermaltake got everything else right!
We’d like to extend a special thank you to Thermaltake for providing a review sample of the Thermaltake View 31 TG RGB.
Description and Features
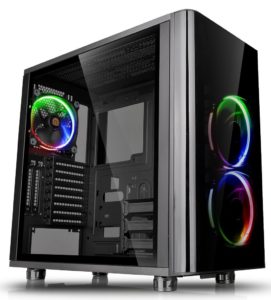
First things first: the promotional image shown here, created by Thermaltake’s marketing department, isn’t the most representative demonstration of the View 31’s appearance. The reality is that the Thermaltake Riing fans, which are included with the View 31 RGB and featured in this image, cannot provide full-spectrum RGB effects. To the contrary, they only emit a single color at any given moment (generated by two embedded LEDs combined with a highly-effective lightpipe, based on our examination). By default, the Riing RGB controller cycles these fans through 256 colors in an alternating pattern, which is actually a very cool effect, but it’s not quite what you see in the marketing photo. In response to our inquiry regarding the potential for consumer confusion this could cause, Thermaltake’s representative explained that this was the best way to demonstrate in a static image the fact that the Riing fans can display multiple colors. Fair enough, although it puts the onus on consumers to “interpret” that image to mean that they can choose from any one of the colors displayed. This is by far the greatest criticism we’re going to levy at the View 31, and in the end, it’s a pretty minor one. We felt, however, that in sharing a Photoshopped promotional image with our readers, it was critical to provide this disclaimer. The photos we provide throughout this article, including the one below, offer a better illustration of what the View 31 looks like in actual use.

Before we get into the features of this case, let’s go over the components we used to put it to the test:
- CPU: Intel Core i7-7700K
- Motherboard: Gigabyte GA-Z270X-UD3
- Video Card: EVGA GeForce GTX 1070 8GB
- SSD #1: Samsung 850 Evo 500GB M.2
- SSD #2: Crucial MX300 1TB 2.5″
- RAM: Geil Super Luce 2x8GB DDR4-3000
- CPU Cooler: Cryorig H7
- Power Supply: EVGA Supernova G2 850W
- Operating System: Windows 10 Flash Drive
This is a fairly high-end build, similar to what we recommend in our $1,750 Advanced Gaming/Productivity PC Buyer’s Guide. A few key elements include the potent Core i7-7700K processor, which is rated at 4.2GHz but actually runs at a blistering 4.5GHz in almost all situations, along with the GTX 1070 video card. It also features the Cryorig H7 CPU Cooler, which won our recent 120mm CPU Cooler Roundup, along with a new Z270-based motherboard from Gigabyte.
Now, how about the View 31’s features? Well, first, it’s among the lowest-priced cases on the market with dual tempered glass panels (left and right), and it’s the only case we’ve seen that uses sliding glass panels, rather than bolt-on glass panels. As Thermaltake explained to us at CES, one of the advantages of this approach is that you aren’t putting strain on the glass panel itself by driving a bolt through a hole in the glass. We’re guessing that many of the shipping problems that Thermaltake’s competitors have had with tempered glass in the past related to this very issue. While designing a sliding system likely cost a bit more and involved more engineering design work, the result is most definitely a plus for consumers. The one thing we’ll note is that because the glass panels don’t have the notches that traditional sheet metal panels use, they are a bit harder to guide into place – you essentially have to hold them and slide them simultaneously, which isn’t quite as effortless as securing a metal side panel that hooks into the chassis.
The other major feature of the View 31, specific to this “limited edition” RGB version, is the Riing 14 RGB Triple 140mm Fan Kit with RGB controller. This kit sells for around $60 on its own. Let’s circle back to the intro where we mentioned the retail price of this case: $130. If you consider the value of the fan kit it includes, you’re paying just $70 for the rest of the case, which is a high-quality kit, enhanced with the aforementioned sliding glass panels. The Riing fans are truly a cut above any other RGB fans out there, not only because they look better, but because they also perform incredibly well, which we’ll discuss later in this article. Nobody else is going to offer you the unique lightpipe design, because Thermaltake has patented it. All other manufacturers are stuck with designs that shine the LEDs at the fan blades, which just isn’t as eye-catching.
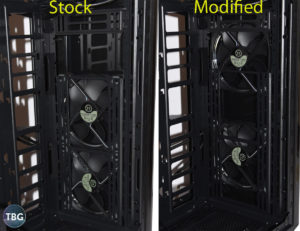
Note that the chassis allows you to use either triple 120mm fans or dual 140mm fans up front, and comes with dual 140mm fans mounted in the two lowest positions. We thought the aesthetics looked a little odd in the promotional images, so right out of the box, we modified the fan placement to provide for more even spacing, which not only improved aesthetics (from our point of view), but also improved overall airflow, as more air was directed at components that needed it (like the CPU and video card), and less was directed at the bunch of cables in the bottom of the case.
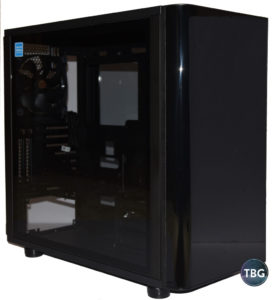
One thing that we’re always concerned about with cases that use solid front panels is airflow. We’ve found that plenty of high-end, expensive cases can fail in the airflow department due to this popular design approach. Luckily, Thermaltake has incorporated a large side-facing vent to allow for substantial airflow despite the solid front panel. One note in terms of aesthetics: the front panel is acrylic, not glass like the side panels, and while that was probably a necessity given its curved surface, it’s nonetheless a slight letdown. The optics of the acrylic are of noticeably lower quality than the tempered glass, with the crisp light of the Riing fans being somewhat subdued when viewed through that front panel.
All right, now that we’ve covered the basic description and features of the View 31 RGB, let’s get cracking on that build of ours to see how it works in practice!
Assembly
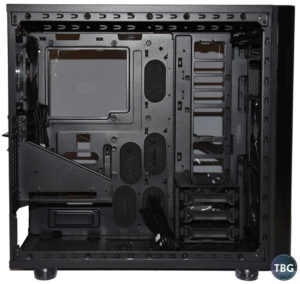
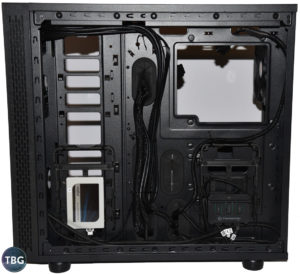
The first thing we’re going to show you is what the View 31 looks like out of the box. We made a number of small changes prior to building, one which we discussed on the previous page (the fan position), but from the factory, this is what you’ll see. Note the two front fans are positioned in their lowest positions (which we recommend changing to match our configuration shown elsewhere in this article), the drive cage is positioned in the lower-front corner of the case, and the vertical video card bracket is positioned above the motherboard area. Ideally, Thermaltake would ship this bracket in a parts box inside the case, rather than shipping it affixed to the case. As it stands, the bracket makes it virtually impossible to install the motherboard, and the truth is that most users won’t be utilizing the bracket anyway. So add another minute to your build schedule to get that out of the way!
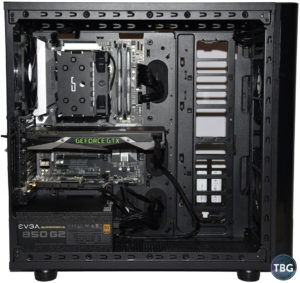
One really nice aspect of Thermaltake’s drive mounting system is that you can choose to use the drive sleds in the included modular drive cage, or if you’d prefer a cleaner main compartment, you can mount them vertically behind the motherboard. The case comes with three sleds, and there are conveniently three mounting spots in back. Unlike many other manufacturers that include vertical sleds, these can be used for both 2.5″ and 3.5″ drives, which is possible due to the copious amount of space behind the motherboard. The View 31 stands at a fairly wide 9.8″ (most cases fall into the 8.7″-9.3″ range), but this is one of the distinct benefits: you can run big 3.5″ desktop-class drives while also maintaining a drive-free main compartment. You can see our 2.5″ SSD mounted in one of these trays in the photo below.
Also seen in this photo is the included Riing RGB fan controller. This is one of the more impressive hubs we’ve seen with any case, with three control buttons: high/low fan speed, a mode button (for six built-in presets – red, blue, green, white, 256-color cycle, or off), as well as play/pause, which allows you to manually stop the cycle on your favorite of 256 colors. The controller draws power from one motherboard header, and will accept motherboard controls from this header, meaning you can choose to use the high/low switch, or allow the motherboard to control all the fans in unison, complete with RPM reporting. Very slick! It does, however, have two drawbacks. First, it can only control three fans, which we’re betting has a lot to do with the maximum current that can be drawn from a single fan header (three 140mm RGB fans is probably pushing it, by the way), Second, it doesn’t neatly attach to the interior of the chassis like smaller, more low-profile hubs. This one attaches with velcro, but there wasn’t a flat area large enough anywhere behind the motherboard to attach it, so we attached inside a drive sled, which meant the adhesive backing of the velcro didn’t have a lot of surface to adhere to.
Thermaltake has done a great job making the View 31 easy to work with, and we were particularly impressed by the pre-routed cabling and rubber grommets, which both provide a very neat look behind the motherboard. This is especially important with the View 31, because unlike any case we’ve ever used (and probably any our readers have used either!), this one puts the cabling on full display for all to see, thanks to the tempered glass right-side panel. The move by case manufacturers to transparent right-side panels is a bold one, given that the behind-the-scenes look in some cases can be downright gnarly. Luckily, Thermaltake realized this before sending these cases out into the wild – as you’ll see on the next page, the right side of the case looks nearly as good as the left!
The trickiest thing about building a system in the View 31 is keeping power supply cabling as neat as possible in both the main and rear compartments. Without a power supply shroud, the cables hang out in the open, and just pushing them through the grommets and forgetting about them simply won’t do in a case where everything is on display.
In the end, if you take the time to do it right, the whole system will look really good from all angles, and the huge working space afforded by the View 31’s open interior and wide stance really makes it easy to fit just about any components you can dream of into the case. You can use a huge video card (or two!), you can use the largest air coolers on the market, you can use multiple large radiators, and you can use custom water cooling reservoirs. Perhaps the biggest limitation out of the box is that only three drives can be mounted, which may be a little limiting in a case at this price range, but given that we were using one M.2 drive and one 2.5″ drive, that limitation wasn’t a problem for this build.
On the next page, we’ll discuss our impressions of the case from a performance and aesthetics point of view.
Performance

In assessing the View 31’s performance, we really have to consider a variety of aspects, including thermals, noise, and of course aesthetics. If you don’t care about glass panels and fancy LED lighting, you probably won’t be swayed by this case, and instead can go for lower-cost models that skip those features, including Thermaltake’s own Suppressor F31, which is in fact the exact same case, except for its different fans and front/side panels. We think the added cost of the View 31 is absolutely justified, however, and that the aesthetics speak for themselves. As we mentioned on the previous page and as shown here, even the right side of the case is attractive, thanks to the clean cabling made possible by the ample space behind the motherboard. This photo also gives you a very nice look at the side-facing vent that feeds those two big front-mounted fans.
With regard to those patented Riing 140 fans, we found they were virtually silent, and the included RGB controller can communicate directly with the motherboard, allowing you complete control over fan speeds and profiles. We’ve tested plenty of cases with built-in fan controllers, but few even offer motherboard control, and most have been unreliable at best when configured in this fashion. The Riing controller worked on the first try, and provided excellent control. Furthermore, you can combine its push-button speed control with motherboard controls for truly limitless options. We found that the fans spun at a maximum of 1400RPM in the high-speed mode and 1000RPM in the low-speed mode, but that the motherboard could bring them down under 500RPM during idle periods. And of course, the fans just look great. Reconfigured as we had them, it almost gives the View 31 the appearance of a futuristic home audio speaker.
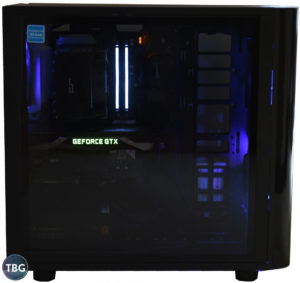
In the photo below, you can see our test system powered on and lit up like the night. This GIF image shows off four of the 256 colors that the case cycles through over the course of 25 seconds or so. While we initially intended to select the white LED mode using the included Riing controller’s mode selector, we decided the color cycling was impressive enough to utilize as our default setting. It really does look fantastic. It’s a shame that the plastic front panel adds a bit of haze, but at least it offers the same stylish tint of the glass side panels. Most plastic-paneled cases use simple clear windows, and tinting really adds to the View 31’s premium look.
In terms of thermal and acoustic performance, we were extremely impressed by the View 31. It kept our GTX 1070 video card quite cool, with the card never reaching 80 °C during a long-duration 3DMark stress test. That’s on par with other cases we’ve tested, but the View 31 did it in utter silence. We had the fans set to low speed, which meant they never exceeded 1000RPM. All you hear is air moving, and you really don’t hear much of that.
Is the View 31 the highest-airflow case we’ve tested? No, certainly not, but it offers a very nice combination of airflow, aesthetics, and silence, striking a balance that we believe the majority of users will appreciate. If all you care about is extreme performance, there are better choices, but none that look this good or run this quietly.
Conclusion
With its View 31 TG RGB, Thermaltake combined a venerable chassis, a market-leading RGB fan kit, and high-quality tempered glass panels to create a truly unique case. While not the most cutting-edge design we’ve reviewed in terms of interior layout, the View 31 offers outstanding versatility to PC builders. And the good news is that this utilitarian layout, used in several previous Thermaltake cases, gives up little to its more creative competitors when it comes to performance. Even better, the simple open box frame lends itself perfectly to being used as a very literal showcase. With glass panels on both sides, all you’ll really see are the components inside, with no chassis to obscure the view. In fact, once you start admiring the gear behind those thick glass plates, the View 31 virtually disappears from view, ironically enough. In the end, a number of disparate design motifs blend together perfectly in the View 31. Our only wish is that a future version includes a glass front panel, but obviously that will add to the cost.
As of our publication date, the Thermaltake View 31 Tempered Glass RGB is available for $129.99 shipped free from Amazon, which makes it an incredible deal if you appreciate the aesthetics as much as we do. If you’d like to build your own PC using the View 31 check out our $2,000 Premium Gaming PC Buyer’s Guide, where it will work perfectly!