The 140mm CPU Cooler Shootout: Finding the Sweet Spot
Introduction
In mid-2015, we published a comprehensive guide to CPU coolers, benchmarking six coolers featuring vastly different designs, from a low-profile 92mm model to a dual 120mm liquid cooler, using Intel’s Haswell-based Core i7-4770K as the test platform. Among those six disparate coolers, we found one that truly stood out: the Thermalright Macho Rev. B. We followed up on that article with a comprehensive shootout among high-end coolers, starting at $50 and going up over $100, using the hexa-core Intel Core i7-5820K as the test platform. Among the coolers in that article, we selected the Noctua NH-U14S as the overall winner. In the meantime, we’ve also published a few one-off reviews looking at individual new cooler releases. But the truth is that our readers are always going to best served when we compare a number of products, and more importantly, when we provide a deep dive into why some coolers perform better than others in a given test scenario.
Our keen interest in CPU cooler performance dates back to a semester of college spent in a fluid dynamics lab, studying the ebbs and flows of gases and liquid over and through various surfaces. While we certainly can’t at this point give our readers a primer on the physics of fluids, one thing is for sure: they don’t always travel in a straight line. And that’s what’s so critically important to understand when looking at CPU coolers. If it were just a matter of pushing as much air as possible through as large a chunk of metal as possible, there wouldn’t be much competition left in the CPU cooler market.
Here’s why that just isn’t the case: as you create ever-deeper fin arrays, you significantly increase drag, meaning that it becomes harder and harder to get air to travel all the way through the cooler and out the other side, which of course is the only way you can get additional air in to provide continued cooling. As they say, you can’t get around the laws of physics, and this is why we’ve seen a huge proliferation of 140mm-based CPU coolers over the past few years. You see, building a wide fin array doesn’t increase drag in the same way that building a deep fin array does. All things being equal, a tall, slender heatsink with a 140mm fan will always outperform a short, thick heatsink of the same mass cooled with a 120mm fan.
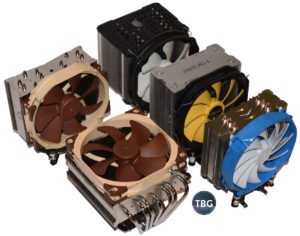
But of course there’s even more to it than that, which is why we find ourselves here testing five 140mm CPU coolers, looking to get closer to unlocking the secret to perfect cooling. Since our last roundup, we built a new benchmarking platform, based on Intel’s Skylake platform. And to put it simply, our Core i7-6700K runs much, much cooler than previous CPUs, changing the cooling equation substantially. Yes, you can go overboard with ultra-high-end coolers that could easily cool hotter-running CPUs from a few years ago, but why would you? Still, we decided to bring back our two previous champs, the midrange Macho Rev. B, and the high-end NH-U14S, and pit them against three of the latest entries in the 140mm cooler arena: the budget-priced Silverstone AR07, the midrange Reeven Ouranos, and the high-end Noctua NH-C14S.
OK, we know what you’re thinking. Silverstone, sure, Noctua, of course, but who the heck is Reeven? Well, we were wondering the same thing when a Reeven rep came to us with the opportunity to check out one of its new products. Turns out the Reeven (or as the company styles it, REEVEN), is a new line of high-performance PC cooling products spun off of a long-time player in the PC market, Scythe. And Scythe is a name we know very well, so we accepted the offer to review Reeven’s latest, even if Reeven is just barely entering the U.S. market at this point.
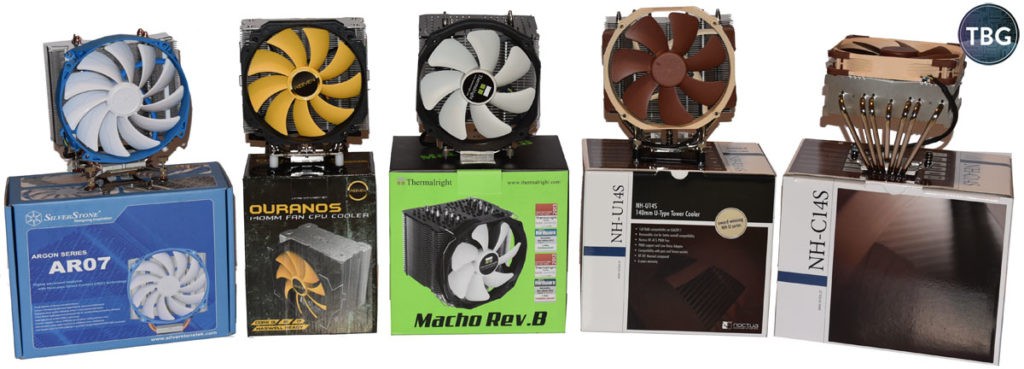
So, to summarize, here are the five coolers we’re testing, along with their retail prices as of our publication date:
- SilverStone AR07 – $40 (special thanks to SilverStone for providing this review sample)
- Reeven Ouranos – $49 (special thanks to Reeven for providing this review sample)
- Thermalright Macho Rev. B – $53 (purchased at retail)
- Noctua NH-U14S – $70 (special thanks to Noctua for providing this review sample)
- Noctua NH-C14S – $80 (special thanks to Noctua for providing this review sample)
Test Method
As we noted above, we have a new benchmarking system using Intel’s Skylake platform, and as we quickly discovered, there really is a difference between generations when it comes to cooling requirements. That’s why other review sites that keep their platform consistent (e.g. using a Core 2 Duo for the past ten years) in order to compare new products to older ones become much less relevant over time. When a new platform comes out, we’ll always re-test our previous top picks along with new models on it, rather than stick with an obsolete platform. Yes, that means we don’t have the dozens and dozens of models that you’ll see listed in reviews on some other sites, but frankly, we think loading up a chart with a lot of old models that are no longer sold or no longer competitive just doesn’t make sense.
Here’s the system we used to rate our contenders:
- CPU: Intel Core i7-6700K (overclocked to 4.4GHz)
- Motherboard: Gigabyte GA-Z170X-Gaming 6
- Memory: Corsair Vengeance LPX 4x8GB DDR4-3000
- Solid-State Drive #1: Samsung 850 Evo M.2 500GB
- Solid-State Drive #2: Crucial MX200 1TB
- Video Card: EVGA GeForce GTX 970 FTW 4GB
- Power Supply: EVGA Supernova 850 GS
- Case: Phanteks Enthoo Evolv ATX
- Operating System: Windows 10 Home
Note that we chose to provide complete benchmarks of our CPU only in an overclocked state, providing only a baseline figure running at stock speed using the least expensive cooler. We think it will become abundantly clear that all of the coolers we tested are overkill if you’re not overclocking, and even more so if you’re using one of Intel’s clock-locked dual-core or low-wattage quad-core processor.
Another issue that’s we’ve been grappling with is how to create a basis for comparison between various CPU cooler models that run their fans at different speeds. Most reviews simply run fans at maximum, show the results, and perhaps on the following page provide noise data. Frankly, this just isn’t good enough. Performance data divorced from noise data is meaningless, and it has encouraged manufacturers to “juice” the benchmarks by shipping coolers with ever-faster fans. Fast fans may increase overall performance, but they come with diminishing returns (again due to the laws of physics!), and more importantly, deliver a serious penalty in terms of noise. Therefore we ran our coolers through two separate sets of tests. First, we recorded data using motherboard PWM fan controls, which is the default for most systems, and therefore likely to be the setting most commonly used by PC builders. Second, we ran all of our coolers with their fans set to 1000RPM, which we view as a reasonable speed for extended use. In so doing, we are putting the coolers on equal footing (assuming their fans are generally up to the task), and truly shedding light on the effectiveness of their thermodynamic design.
The other major change we’ve instituted for our air cooler benchmarking is to shut off all system fans during testing. Both our power supply and video card remained idle during all measurements (when our power supply did heat up enough to require its fan to spin, we stopped testing). And we went ahead and unplugged all five of our case fans. We wanted to give our readers an accurate sense of both the effectiveness and noise levels of our coolers. Having other fans running makes assessing noise levels very difficult. The one drawback to this approach is that the case interior slowly heats up during the course of testing. We therefore performed our tests in the same order for each of our coolers, going from idle to moderate load to maximum load.
We also want to make clear that we do not use temperature “corrections” which, in a word, are methodologically inaccurate. Yes, it would be easy for us to just report the delta from ambient, as many sites do, or worse, factor in adjustments as the ambient changes, but basic thermodynamic principles suggest that using either shortcut method would void the results. A 2°C difference in ambient has a varying effect as a CPU’s operating temperature changes, making any conversion worthless from our point of view. It may well increase idle temperature readings by 2°C, while it will have little to no effect on load temperatures. Our ambient was 68°F throughout our tests, and when the room temperature changed (as it in fact does as heat is produced during the tests), we stopped until it returned to 68°F +/- 0.5°F.
Why are we going into so much detail regarding our test methods? Because benchmarking CPU coolers is quite different from benchmarking the speed of components like CPUs and GPUs, despite the fact that most tech websites assess them similarly. We felt a method taking into account the mechanical engineering aspects of CPU coolers should be applied. In other words, we want to do more than throw up some numbers, we want to provide insights into why the numbers are what they are, based on the differing design approaches used by each cooler manufacturer.
All right, with that introduction out of the way, it’s time to get into the nitty-gritty of our results, starting with a review of installation!
Installation
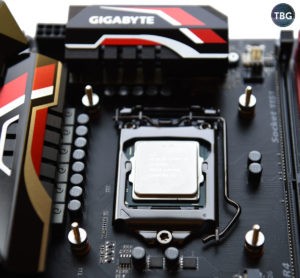
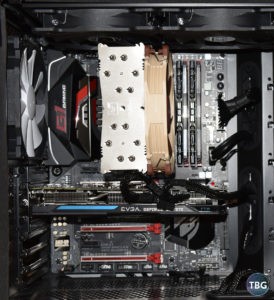
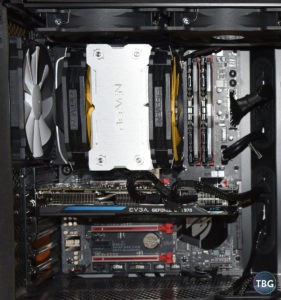
As we noted on the previous page, since our last cooler test, we put together a new test system based on Intel’s Core i7-6700K quad-core CPU and Gigabyte’s GA-Z170X-Gaming 6 motherboard. One thing you’ll see in the photo here is how very compact the Skylake-based Core i7-6700K processor is. Its small heatspreader can pose a challenge for coolers designed around larger processors, as the cooler base can often extend far beyond the processor’s edges. In fact, our lowest-performing cooler most definitely faltered due to a mis-match between the contact of its heatpipes and the CPU surface, as we’ll discuss later.
Each cooler was given a fresh installation for this test, using Noctua’s excellent NT-H1 Thermal Paste. While every cooler comes with thermal paste, we strongly recommend using great paste at the time of installation, as it’s not something you’re going to want to deal with later on (we should know… we had to apply thermal paste five times in the course of a couple days of testing!). Now, this does mean that we gave some of our coolers an unfair advantage that they don’t have out of the box, which might be viewed as no different then equipping them with a non-standard fan. Sure, sure, you could make that argument, but from our point of view, thermal paste is cheap enough that it’s worth buying if you’re also investing in a good cooler, so stock up on Noctua’s NT-H1 and you’ll be happy. The fact that Noctua models already come with a great tube of paste is built into their retail price anyway!
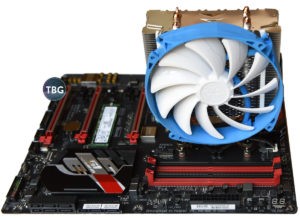
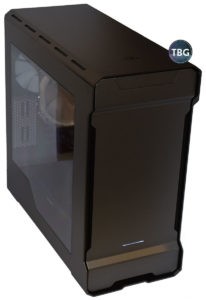
The photo here shows just how big a 140mm cooler looks in comparison to even a full-sized ATX motherboard, and this is with the smallest tower cooler we tested, SilverStone’s AR07. As you’ll see later on this page, a few of our coolers quite literally cover the entire CPU section of the motherboard! For the most part, the installation of each of the five coolers was straight-forward, if not exactly easy. That’s because for the sake of expediency, we did not uninstall our motherboard from the case for each cooler installation. And with bulky 140mm tower coolers, that can mean a bit of frustration, especially when it comes time to attach fans, which must be left off to affix the mounting screws. If you’re installing a 140mm in your system, especially if you’re building up a system from scratch, do yourself a favor and install it before the motherboard is in the case! Our hands took their fair share of abuse, and we actually drew blood on the Thermalright Macho Rev. B. In fact, whiole we found it a bit humorous that the manual for the Reeven Ouranos suggested wearing gloves, in retrospect, we almost wish we had. Almost, because we’re just not sure how you’d handle all the small parts and tight spaces with anything encumbering your hands…
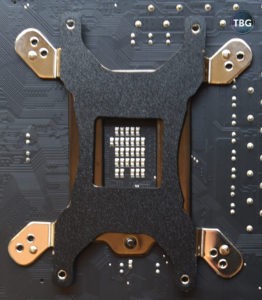
The one real stumbling block we hit was with our SilverStone cooler, which used a truly unorthodox mounting plate, shown in the photo here. The eagle-eyed observer will note that this plate is not lined up with the motherboard, and trust us, this was not an error on our part. You in fact have to use a strange combination of mis-matched holes to attach it, and we’ve reached out to SilverStone to let them know this is almost certain to lead to confusion by users. They’ve assured us that an updated manual will provide more detail on the proper method of attachment.
To further assist readers who’d like to use the AR07 or any of the other coolers we tested, we’re providing a few installation notes for each model below.
SilverStone AR07
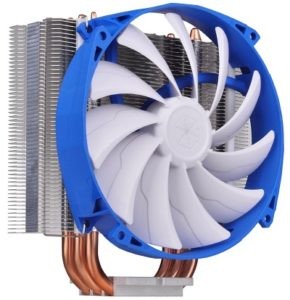
As mentioned above, we had some troubles with the AR07’s bracket, but other than that, it was fairly easy to install, helped by the fact that it was the smallest cooler in this roundup by quite a bit. We weren’t huge fans, however, of the basic, poorly-illustrated manual, and we’ve gotten that message back to SilverStone. At least SilverStone thoughtfully includes some rubber strips to attach to the heatsink to cut vibration from the fan. As for the white-on-blue color scheme of the fan… well, at least it’s fresh-looking!

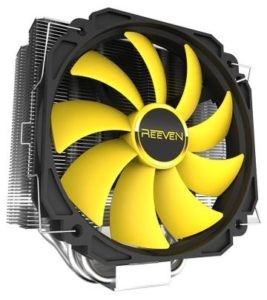
Reeven Ouranos
The Ouranos uses a modified version of Noctua’s proven bracket design, but unfortunately adds a few parts to it to make things more complicated. To bolt down the heatsink mount to the bracket, Reeven went with an odd choice: standard nuts, which must be attached with the included mini-ratchet. Why it didn’t use nuts topped with screwdriver slots is beyond us, as that’s a lot easier to affix inside a case. Luckily everything else went well, although like the other big coolers in this roundup, affixing the fan with the included wire hangars is very hard to do with the moptherboard inside a case, at least if you don’t have much space above and below the cooler.
By the way, special props to Reeven for the magnificent style of its ultra-modern cooler. Reeven flattens the tips of its six heatpipes at the top of the cooler, allowing it to affix a cool brushed metal nameplate. This really cleans up the look of the cooler for those who like to show off their build’s interior. For better or for worse, however, Reeven has settled on a yellow-on-black color scheme for its fans, which may wreak havoc with well-sorted interior color treatments.
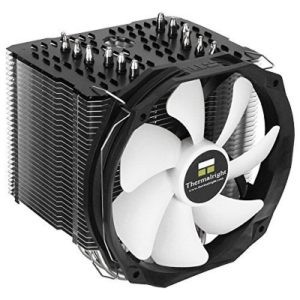
Thermalright Macho Rev. B
Thermalright wins the award for the most needlessly complex installation procedure. Well, actually part of the challenge is in fact necessitated by the tremendous depth of this cooler, and Thermalright includes a full-size magnetic-tipped screwdriver in the box to thread the screw down through the center of the cooler and into the bracket, as it would be absolutely impossible to do so without such a tool. Even with this great freebie (which we went ahead and used to install every cooler in this roundup!), the installation is quite difficult, and we recommend having the motherboard laying flat on a work surface, allowing gravity to hold the cooler in place while you mess with the screws. This is also the only cooler we actually cut ourselves on, due in part to the utter lack of room to work once the cooler is inside a case.
One bit of good news: the white-on-black color scheme of the Macho’s fan will likely go with plenty of builds!
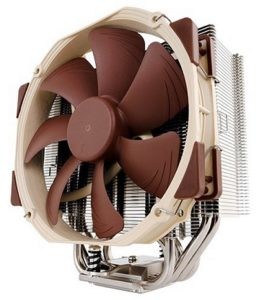
Noctua NH-U14S
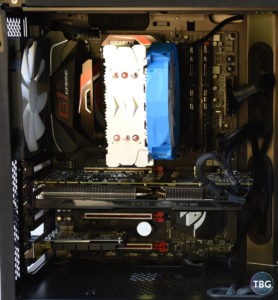
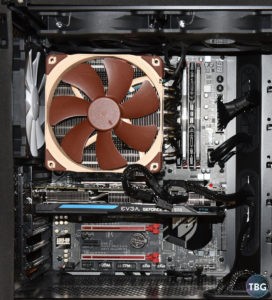
If Thermalright wins the award for most difficult installation, the NH-U14S most definitely wins the award for easiest installation. With a market-leading mounting bracket that couldn’t be easier to use, as well as a shallow heatsink profile that aids maneuvering inside the case, this big heatsink can be installed by anyone in 15-20 minutes, as long as your case has room for its 165mm height and fairly substantial width, which blocks the first PCIe slot. Note that as with all coolers, the fan clips are hard to affix once inside the case, a problem you won’t encounter with smaller 120mm-based coolers. And of course, when you go with Noctua, you get its trademark brown-on-beige color scheme, which truly goes with nothing else in the PC world!
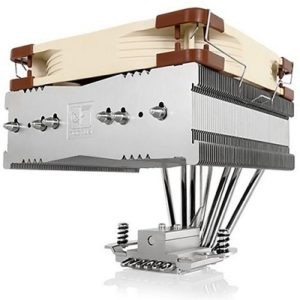
Noctua NH-C14S
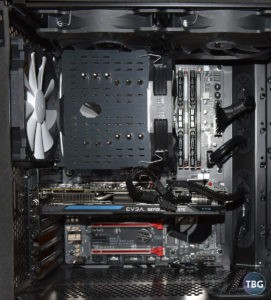
Well, Noctua can’t win ’em all, and while the NH-C14S may inherit the stellar mounting hardware from the NH-U14S, its downdraft design gives it a gigantic footprint, which in turn makes it very hard to maneuver the cooler inside a case. In fact, despite using a big ATX tower and a full-size ATX motherboard, the NH-C14S could only fit in one of the four possible orientations, and even then, it was hard to balance its unwieldly weight while affixing the mounting screws. While not the hardest cooler to install, it won’t win the same accolades as its cousin the NH-U14S.
Summary Notes
Remember, all of these coolers are larger than average, so you must take into consideration both their height and width before assuming they’ll fit in your case and on your motherboard. Luckily, none posed any problem with RAM clearance with all four slots occupied (although the NH-C14S did come dangerously close). We used a wide Phanteks Evolv case, so height wasn’t an issue, but in small ATX cases, it will be. For reference, the SilverStone AR07 is 163mm tall, the Reeven Ouranos is 161mm tall, the Thermalright Macho Rev. B is 162mm tall, the Noctua NH-U14S is 165mm tall, and the Noctua NH-C14S is 142mm tall (but 140mm wide and 163mm deep!).
So, now that we’ve covered installation of these coolers, it’s time to look at some benchmarks and pick a winner!
Performance (PWM-Controlled)
We begin our benchmarks with PWM-controlled results, using our Gigabyte motherboard’s default PWM fan profile, which increases fan speed as temperature sensors detect increasing heat. Note that the actual RPM is not controlled by the motherboard, only the voltage, so fans with top speeds of 1000RPM, 1500RPM, or 2000RPM, for example, will behave very differently when receiving the same PWM signal.
First up, idle numbers. Note that while our processor is overclocked, it still enters an idle state, reducing voltage substantially.

We want to be very clear here. If you’re focusing on temperature reading in the graph above, you’re doing it all wrong. At idle, the only thing that matters is noise. Attempting to achieve something meaningful by having the coolest-running PC at idle is a fool’s errand! The co-winners here, by the slightest of margins, are the Reeven Ouranos and Thermalright Macho Rev. B, the former by virtue of its excellent fan, and the latter by virtue of its slow fan. Not that it matters, but the Macho’s immense heatsink is so effective at low fan speeds (and even at zero fan speeds, if you dare!) that it has by far the lowest idle temperature.
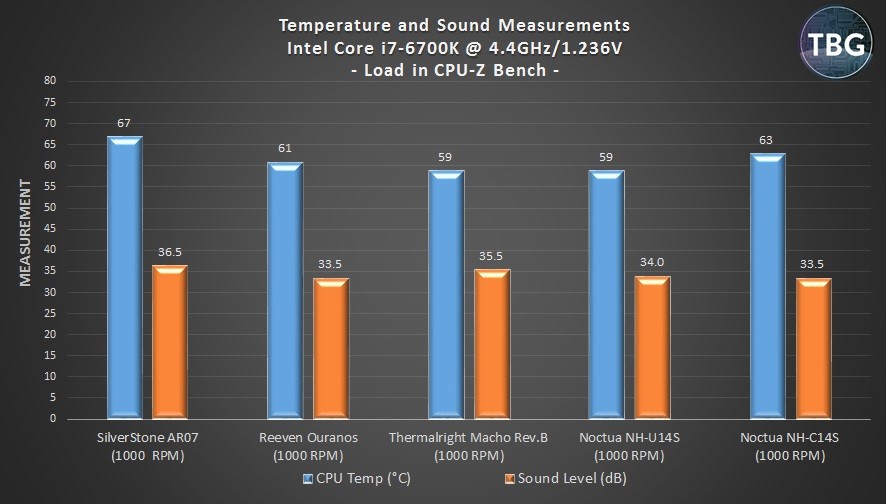
Next up, the multi-core benchmark built into the excellent (and free!) system utility, CPU-Z. While we used to use a gaming-related benchmark as our second test, we found that the fan noise generated by our video cards under such conditions really threw off the results. As it happens, CPU-Z generates a load very similar to a modern multi-threaded game engine, so if you’re a gamer, this is the result you want to look at.
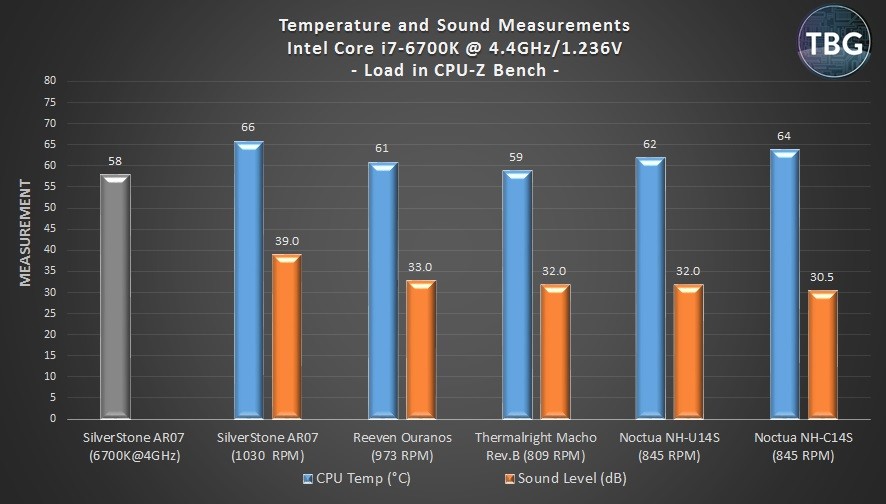
And here, things start to get really interesting. First, note that our least-expensive and least-capable cooler, the AR07, out-performs all other models when used with a stock 6700K. This is critically important for our readers to understand: there simply is no way to overheat a 6700K with a halfway-decent cooler if you’re not overclocking. It’s just not going to happen, so don’t sweat the details if you’re not an overclocker… just cap your CPU cooler budget at $40 and never look back.
As for our overclocked numbers, well, the AR07 falls way back, joined oddly enough by the most expensive cooler in our test, the downdraft-style Noctua NH-C14S. This is going to be a continuing pattern, and one that’s very important to keep in mind if you have room for a tower cooler. Despite the fact that the NH-U14S and NH-C14S are essentially identical in everything but orientation, they couldn’t be more different in performance. That being said, even the NH-U14S isn’t at its best here, as two less expensive but bulkier coolers are able to out-muscle it, with Thermalright’s Macho achieving the enviable goal of lowest temperature and lowest noise level.
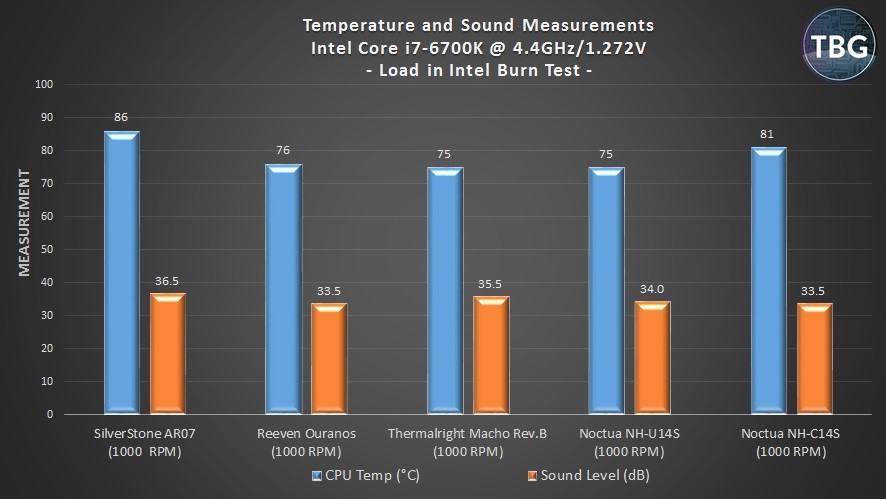
Finally, we illustrate cooling performance faced with the insane load generated by Intel Burn Test. We don’t think any application will put this much pressure on a CPU, so consider this an absolute worst-case scenario.

The good news: all of our coolers easily passed 20 cycles of this test without even coming close to the 100 °C thermal throttling threshold of the Core i7-6700K. Again, at stock clocks, the AR07 is more that a match for this CPU, with a lower temperature than our other contenders can achieve once the CPU is overclocked. Once overclock, our mid-priced models continue to impress, although the Ouranos is starting to sound a bit rough, owing to its high-RPM fan. We’re a bit surprised the NH-U14S didn’t do better in these PWM tests, but as we’ll see on the next page, it has a different trick up its sleeve.
Performance (Fixed 1000 RPM)
As we discussed in the introduction, we’ve long-searched for a CPU cooler test scenario that was methodologically sound. The most common test you’ll see in tech publications is benchmarks using the maximum fan RPM, which is quite simply useless. Any of these fans when run at 100% will both be far more powerful than you need and far louder than you can tolerate. And it leads to an arms race by manufacturers to equip their coolers with faster fans than everyone else. Sadly enough, even Noctua, with its immense technical prowess in air cooling, isn’t immune to this; it equips its coolers with non-retail versions of its 140mm fans that operate at 1500RPM instead of a more reasonable 1250RPM.
While the ideal test setup would probably be to pick a decibel level and find each coolers best results at whatever fan speed this equates to, dialing in a constant sound level for various models in various tests would be a nearly impossible task. So we’ve done the next best thing: we’ve found the fan percentage setting for each model that equates to 1000RPM, a rotational speed that we think represents the sweet spot for 140mm fans. They move plenty of air at this speed due to their large size, and when run faster, they become rough-sounding, just like their inferior 120mm cousins.
First up, idle numbers.
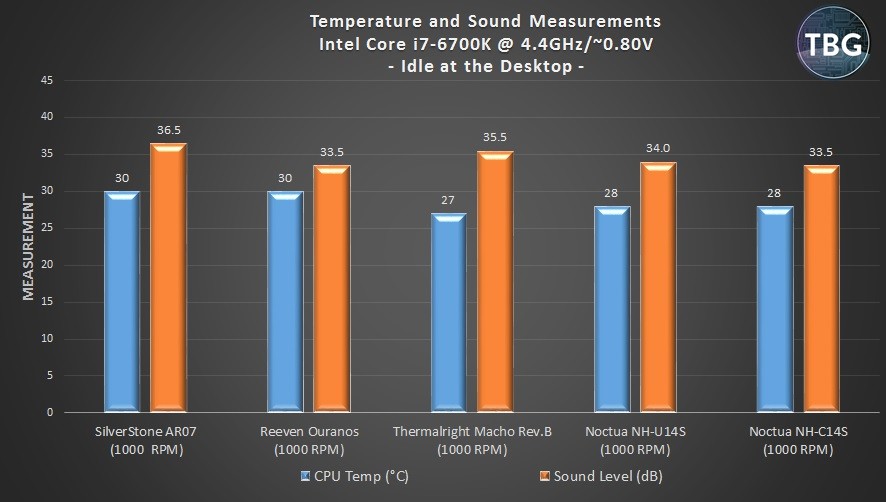
We’ll admit that these results are mostly irrelevant; if you’re going to bother dialing in a custom fan speed, you’re most definitely going to run an ultra-low speed at idle. But that being said, we can see Noctua and Reeven pulling ahead here in terms of acoustics (which will remain the same in the graphs that follow, given that the RPM is fixed), while the Thermalright Macho again wins in terms of temperature due to its large size.
But take note: in actual use, we found the Noctua NH-C14S to sound louder than our test results would suggest. How is that possible? Well, due to its different orientation, fan noise is projected in different directions. It does not project much toward the front of the case, but certainly projects just as much upwards (and in our setup, that meant towards our ears), and so we found that despite a very low decibel reading, it wasn’t actually quieter than the NH-U14S. That shouldn’t be surprising, given that they use nearly identical fans.
Below, we have what we believe best represents real-world loads, CPU-Z.
The relatively close results here serve to illustrate the importance of considering fan RPMs. Despite vastly different designs, sizes, and prices, these heatsinks are all operating within a very narrow range, and are all more than adequate for the job at hand. But when you look at noise levels, certain results stand out as better than the rest, namely the three in the middle of the graph (and the price spectrum).
Finally, we illustrate cooling performance faced with the the artificially-high load generated by Intel Burn Test.
Here we see the Noctua NH-U14S providing very low temperatures and very low noise. This, dear readers, is what makes the NH-U14S so special. If you look back at the previous page, you’ll actually see it was running both hotter and at higher noise levels. An error on our part? No, in fact, it has to do with the dynamics of PWM testing. The NH-U14S ramps up and down like crazy while using PWM controls, getting close to its maximum RPM, but doesn’t react quite fast enough to keep peak temperatures at bay. At a fixed 1000RPM fan speed, the NH-U14s is cool, calm, and collected, achieving equilibrium with its target, waste heat. By the way, the Reeven Ouranos is deserving of special mention here for its exceptionally-low noise reading and very good temperature result, while the Thermalright Macho gets the nod for bang-for-the-buck performance at slightly higher noise levels.
While we haven’t wanted to rub it in throughout our tests, we’ll just mention that the SilverStone AR07 is clearly outmatched in this roundup, and while it is the least expensive entry, several models that cost just slightly more provide much, much better performance.
Multi-Fan Testing
As discussed earlier, we tested each of the CPU coolers with our case fans turned off and with all fans set to run with automatic motherboard PWM controls or at a fixed 1000RPM. But in truth, neither of these is the optimal method for cooling a system. Of course, you want airflow in the case beyond that provided by the CPU cooler, and ultimately, you probably want your fans to run at below 1000RPM if possible, especially when using large 140mm models.
Our case happens to be equipped with five 140mm fans, three being Phanteks’ excellent PH-F140XP models, and two being Corsair’s equally-impressive (and LED-equipped!) AF140 Quiet Edition fans. And it also just so happens that Reeven was kind enough to send us an extra sample of its Coldwing 14 Fan, which comes standard with the Ouranos. Like many tower coolers, the Ouranos can be equipped with dual fans, but we weren’t going to take the bait and compare a dual-fan Ouranos directly to our other contenders, as it doesn’t come with dual fans out of the box. But it did present us the opportunity to show our readers exactly what you can do when you consider cooling from a whole-system perspective. We strapped the second Coldwing 14 on, plugged in our five case fans, and set all seven of the fans now in the system to run at 600RPM. Could we achieve the lofty goal of higher performance and lower noise?
In these graphs, we’ll just be listing out all our results using the Reeven Ouranos, which gives you an apples-to-apples comparison. As before, we start with idle numbers.

Well, this is what happens when you leave a box full of fans to do nothing but look pretty on your desk. Our system with a total of 7 fans isn’t overly loud, but even with its fans running at just 600RPM, it still produces more noise than a single fan spun down to a low PWM-determined 750RPM. At least it’s really cool, though!

This is the test that matters for people who are most interested in achieving a balance of noise and temperature in a system used for typical high-load applications. This, friends, is the true sweet spot we’ve been looking for. Ultra-low noise, ultra-low temperatures. That being said, our seven-fan system only ties our top result a few pages back, the Thermalright Macho Rev. B running in a PWM-controlled scenario with no case fans. So, it could be said that the average high-end user would best be served with a single, low-RPM 140mm fan strapped to a big cooler, and no other fans in their case. Perhaps. But what if you want to take a crack at bluescreen-defying antics once in a while?!?
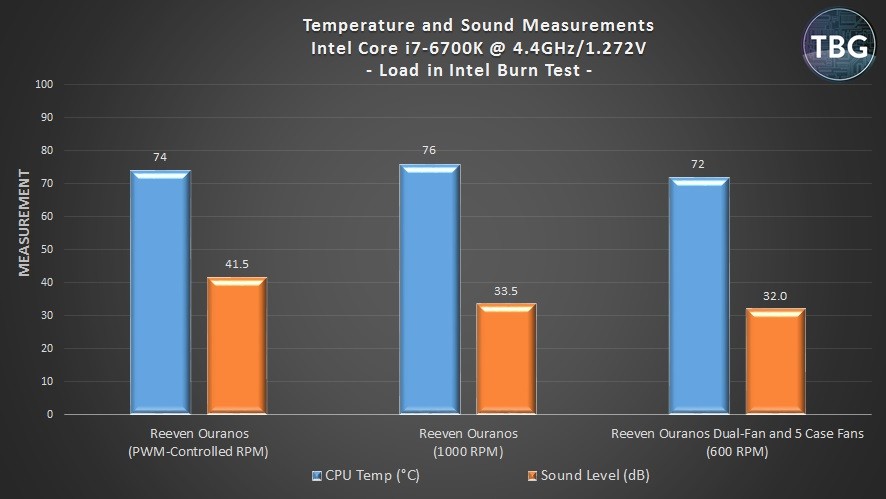
My goodness, ain’t that a thing of beauty? Ultra-low temperatures at an insanely-low noise level. Remember, you can’t load your CPU any more heavily than we have in this test. And the system is literally running at a whisper-quiet level.
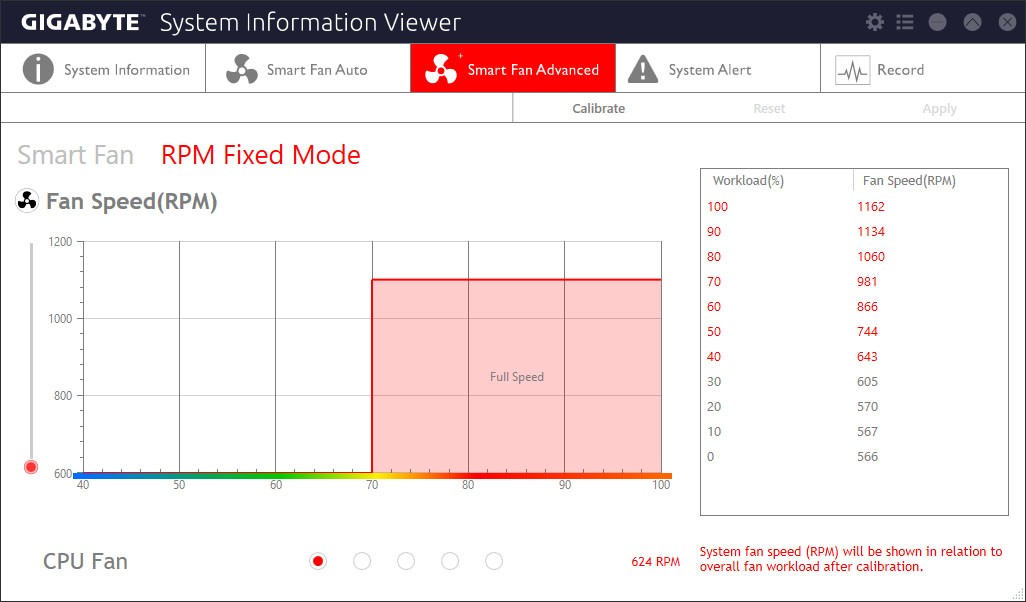
By the way, to set up a fan profile like the one we used above, you’ll probably need to use Windows-based software. While some motherboard UEFI’s may allow you to tailor your fan speeds by RPM, most just use presets based on certain PWM levels. It just so happens that our Gigabyte GA-Z170X-Gaming 6 motherboard comes with software (called System Information Viewer, or “SIV”) that includes an optional fan profile that we believe is absolutely ideal for most users: a flat, fixed RPM curve to provide low-noise operation during most scenarios, with a jump at 70°C, the level at which you actually need to start paying attention to what’s happening with your CPU. Below is a screenshot of what this curve looks like. If your software doesn’t have this exact option, just set up a custom profile that replicates the curve. You’ll be happy you did!
Conclusion
So, we said at the beginning that we were going to choose a winner, and indeed we are. And it’s going to be tough, because we’re trying to balance four factors here: price, cooling performance, noise levels, and ease of use. And in fact there’s a fifth dimension, believe it or not: form factor. But that’s a hard one for us to judge, because it’s entirely dependent on the case you use. So right off the bat, we’re going to knock out of contention the Noctua NH-C14S, which retails for $80, the highest price of all our entrants. The performance just isn’t there, and because this is still a very large cooler, there are very few scenarios where you’ll be able to fit it but not a tower-style cooler. Perhaps it’s a good pick for users with narrow ATX and mATX cases (i.e., with cooler clearance under 160mm) that still want very low noise levels. Too bad about that price, though, as we’re pretty certain that many 120mm-based tower coolers will outperform it for less. Update: Noctua came back to us after this review was published and suggested that perhaps there was something wrong with this sample, as it should perform similarly to the NH-U14S. In our opinion, it worked exactly as it was designed to work. It might perform well on an open bench, but in an actual computer case, this style of cooler became obsolete a long time ago.
Moving on, we’re going to have to kick the $40 SilverStone AR07 to the curb. We applaud SilverStone’s efforts to bring 140mm coolers down to the price of many mainstream 120mm coolers, but the AR07 has a few too many issues. We already mentioned the difficult installation process. We also hinted at another issue early on, and now we’ll get right to it: the direct heat pipe design that it uses, which was popularized by the top-selling but low-end Cooler Master Hyper 212 Evo, released way back in 2011, simply doesn’t work on the AR07. With just three heatpipes spread across a huge contact area, the AR07 falls flat on its face. In fact, only two of the heatpipes actually made contact with our Core i7-6700K’s heat spreader, which ended up being a huge handicap for the AR07. And while one could make the argument that the large contact area of the AR07 makes it ideal for big CPUs like Intel’s Haswell-E, one could also make the better argument that the cooler is far too mediocre to bother using on such high-powered CPUs. Oh well, back to the drawing board for SilverStone.
Next, we get to the Thermalright Macho Rev. B, which at $53 offers an amazing combination of price, performance, and moderate noise levels. But it’s not our winner for two reasons. First, its fan is clearly of lower quality than those of the top models in our roundup, with a rough bearing sound that isn’t quite picked up in our sound meter test but can clearly be distinguished by the human ear. Second, it’s just an absolute pain to install. But, if you’re looking for the bang-for-the-buck champion, especially for a PC used for typical high-load applications rather than competitive overclocking and stress testing, this is absolutely the one.
Our runner-up was a complete unknown to us when we began our testing, but boy did it prove itself worthy of this competition. The Reeven Ouranos, which retails for $49 and is currently only available in the U.S. via Newegg, is a promising new entry in a crowded market. It’s relatively easy to install, looks absolutely fantastic, and achieves a very fine balance of performance and noise levels. We think Reeven is pushing its luck shipping the Ouranos with a fan that spins up to 1700RPM, but at least it includes an in-line low-voltage adapter for those who won’t be taming this beast with motherboard controls. In fact, we had to use these adapters to get our motherboard to bring the Ouranos down to 600RPM in our dual-fan testing. Luckily, despite its high maximum RPM, this Coldwing 14 fan has a very docile nature, with a noise signature befitting of a high-end cooler. Alas, due to limited availability and performance that was great but not chart-topping, it isn’t quite our winner.
In the end, our top pick is the amazing Noctua NH-U14S, which won our previous round-up, and has since dropped in price to $70, making it even more attractive. It’s the total package, providing a fantastic manual and accessory bundle (including a tube of NT-H1 Thermal Paste), a truly exceptional mounting system, great performance, and ultra-low-noise operation.
Now, we’ll admit that the NH-U14S didn’t ace every performance test, but remember what we said early on: Skylake processors just don’t run all that hot. So if you’re going to bother with an aftermarket cooler, why not choose the one that installs in minutes, runs silently, and offers excellent all-around performance?
That’s all for now, but this isn’t the end of our CPU cooler coverage. To browse our top CPU Cooler picks at every price point, check out our CPU Cooler Buyer’s Guide, updated quarterly!